VLC Media Player is probably the best media player available for download on the internet, especially when it comes to playing video files on your Mac, Windows or Linux PC. It plays almost any type of media file, it’s fast, smooth and super streamlined. It also has support for most subtitle formats found on the Internet. All this simplicity and power though is shelled in one of the most boring skins of all time. Thankfully though we can Flash things up a little.
How to Customise Website Styles and Themes in Google Chrome.
VLC Media Player (more appropriately known as VLC) is a free and open-source, media player available on just about anything you can play media files on. From Windows 10 mobile to Android and all the Apple device you can name, alright maybe not the Apple watches but it wouldn’t be surprising if VLC figure that one out soon. VLC is available from all app stores, Apple's App Store, Google Play, and Microsoft Window’s quite lacking app store. You can also grab the windows files with a quick Google search.
As mentioned earlier VLC media player supports a huge range of media files and in all the years I have personally been using it, I cannot recall a video/audio file it wouldn’t open. Apart from its profound ability to play anything, it’s also quite good at what it does quality wise. Especially for a program that is completely free. Anyway enough about how it all works, let’s get to making this ugly beast somewhat more pretty.
Note: Skins currently do not work on Mac OS X.

Applying a Custom Skin to VLC Media Player (VLC)
Even though it’s quite a simple program to use, it can be somewhat more tricky to locate the place to change your skins from. Firstly, you will need to find a skin to use, if you haven’t already picked out something you like. Google is always a great place to start searching.
Note: Downloading skins directly from the VLC website is a good way to make sure your download is virus free and compatible.
Save your downloaded skin file somewhere that’s easy to access or somewhere you will remember where to find it. The Downloads folder is probably the most foolproof place or the Desktop. VLC skin files have a file extension called VLT (.vlt) so you won’t need to worry about confusing them with other files or compatibility. Once you have your new skin downloaded, unzip it (if it’s zipped) and place it into the following folder.
On Windows: C:\Program Files\VideoLAN\VLC\skins)
On Linux/Unix: ~/.local/share/vlc/skins2
Mac OS X: Skins not available :(
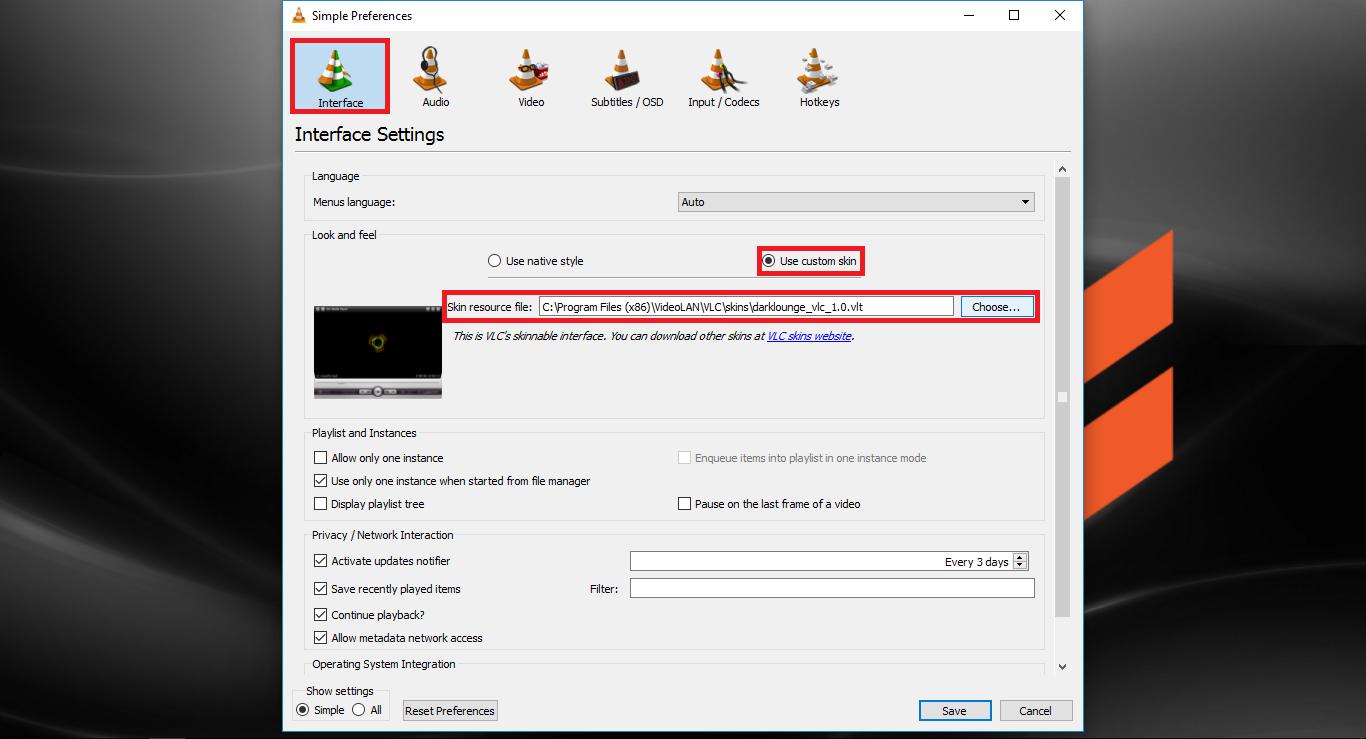
Now you have the files in their new home, open VLC and go to settings using either Ctrl+P or by going to Tools then Preferences. Here, locate the Look and Feel section. This can be found on the upper middle part of the window, right below the Language section or to the left of the little VLC picture. Once you located this, you will notice two options.
Use Native Style - This option sets the skin of VLC to default.
Use Custom Skin - This option allows you to use any custom skin you’ve downloaded.
Change the option to Use Custom Skin Then change the skin resource file to the one you placed in the VLC skins directory: C:\Program Files\VideoLAN\VLC\skins
Once you have selected the files, click save down the bottom and restart the program to apply the change.
Note: Some of the skins look fantastic but remove some of the function buttons, making use frustrating at times, so spend a little bit of time finding the best one for you. This might mean some trail and error is in order.