We can access it via a Google Drive interface, as in the case of other modules. As we have mentioned before, Google Docs and Google Drive have been integrated some time ago and now both applications use the same web address - drive.google.com.
Once you are in Google Docs, you can create a new word document by pressing the Create button. Then, select Document from a drop-down menu. A new blank window will open. The next step is to name it by clicking in the Untitled Document box at the top left corner.
Do not bother about saving
Once we opened a new word processing document, we can actually start writing. Google Docs saves all the changes on the fly, so we do not have to worry about saving every single change using Ctrl + S. the last updated time is displayed at the top.
The information All changes are saved to disk informs us that the latest version of the document is now online, and we can safely close a tab in the browser. The status Saving ... means we have to wait – we cannot close the tab. If we have good link connection, this process takes only a few seconds.
As good as Word
The Docs interface brings two elements that we can associate with a desktop word processor such as Word (part of MS Office) and Writer (with LibreOffice). It is a menu and a toolbar – both of which are located at the upper edge of the screen.
Of course, Microsoft Office is by no means the gold standard for office suites — we cannot argue with that. Office provides the most powerful set of features but most home users and students can get most of the functionality of Microsoft Word within Google Docs.
The toolbar lets you change the style of text formatting, select a different font (there are eight fonts to choose from and you cannot add your own), change its size, bold, underline, italics, modify text and background color, change the alignment or create an ordered or unordered list.
Additionally, we can print the text and use Undo and Redo buttons. There is also a special button dedicated for inserting hyperlinks (alternatively you can use the keyboard shortcut Ctrl + K).
A small arrow on the right allows us to hide a set of tools and thereby gain more space for the text editing. Plus, there are options for copying and cleaning word formatting (font color, italics, and so on).
Useful menu commands
The menu is also very easy to use, resembling the look of that known from Word or Writer. In the File we can create new documents, share them via email or export to our hard drives. We can choose from many formats, including DOCX, ODT, RTF, PDF, TXT and HTML.
Edit tab also includes options such as Undo and Redo, as well as Copy, Cut and Paste. However, shortcuts like Ctrl + Z, Ctrl + Y, Ctrl + C, Ctrl + X and Ctrl + V are so popular that this submenu is useful. In case you frequently copy and paste multiple blocks of text, then so called Storage will be a valuable tool for you.
The View lets you activate ruler or switch to compact style ( you can also use the aforementioned arrow on the right ). From this point, you can edit your text in a full screen mode.
Add images and comments
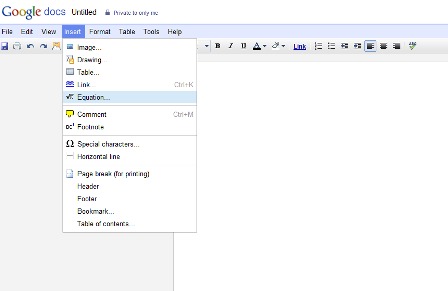
The most extended menu is the Insert menu. We can insert images, add links, mathematical equations or drawings without any hassle. We can also easily add comments, which is particularly useful if we want to give feedback to a collaborator on a document we are grading or just want to share our ideas.
The Insert option facilitates the editing of the header and footer – it is a perfect solution if you want to add page numbers and footnotes. Format menu is not very useful, since it incorporates most commands from the toolbar, including bold, underline, and alignment.
More advanced users will surely appreciate the Tools menu. It can be helpful if we want to start Google browser integrated with Google Docs, which greatly improves researching when writing. Besides, it allows access to the online dictionary Google Translate - all of this can be performed without a need to leave the page with the text.
Statistics and Auto-correction
In the Tools menu there is a Word Count command. Do not be mislead by its name, in fact it gives us information not only about the number of words in the document, but also the number of characters with spaces and without spaces, and number of pages. The data is displayed for the selected text.
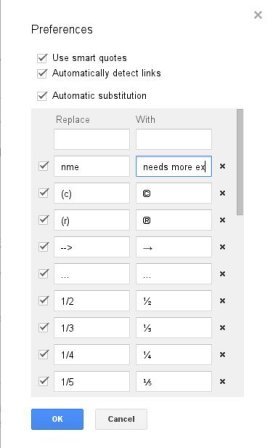
Through the Tools, we go to editor’s Settings. Among the best things about this place is the automatic replacement function. We can define the words and phrases, in which we often make typos, thus making the service correct such phrases automatically.
The last two options are the Table, and Help. Their names are self-explanatory. However, it should be mentioned that the Help file offers a link to the useful shortcuts which definitely make things easier.
Unfortunately, some shortcuts do not work, these include Ctrl + L and Ctrl + R to align to the left and right. They are used in the Chrome browser. Combinations like Ctrl + Shift + L and Ctrl + Shift + R serve as shortcuts to this functions. There is no other way as get used to it.
History of changes and Sharing
While studying the menu, it is recommended to have a look at the full revision history which shows who made what changes and when. Clicking on it, opens one of the most interesting word-processing modules, where are all the changes are listed chronologically. What makes it easy to track the progress of the work.
One of the best things about Google Docs is the fact that we can share documents with others. In the upper right corner we can find the Share button, which lets us can share a document with our colleagues or friends or even gives them ability to edit it.
Simply use the Add people option and enter their e-mail addresses. All the recipients should have or create a Google Account to view the documents.
Then you can define which whether the users can edit or only view the document. You can switch between Can view, Can edit or Can comment. You can also specify which people will be informed via email when you share a document with them.
The Who can see option lets us change the visibility of the document. The default option is Private – only the people listed below can access. Anyone with the link option makes the document partially public (a link to share can be found on the top of the panel).
The third option Public on the web makes the document accessible to anyone. The last two options are highly valuable when you want to show the file to someone who does not use or does not want to use Google services.
Overall, the text editor in Google Docs is quite powerful. We are seriously asking ourselves whether we really need to pay the thick wad of cash needed to buy MS Office Suite if we can have similar capabilities using Google Docs. In our next article, we will briefly discuss another component- spreadsheet.