These days, Google account is not just Gmail, but also YouTube videos, chat’s history, Google+ account, Contacts, Calendar events, and so on. After several years of using Google account, our database has certainly an impressive collection of data and it's difficult to just leave it, and create a completely new and empty account. Sometimes, we are obliged to change the account because we leave our job or change a name. Typically, people who create a new account often return to the old one, or use two accounts at the same time, which is not very convenient.
![]() What to remember when migrating an account?
What to remember when migrating an account?
Moving one Google Account to another requires a username and password for both the old account that you want to move, and a new account you have just created. It is also necessary to have access to two different browsers at the same time, or one that supports private mode. It will be of great help as we gain the ability to log into two Google accounts at once.
If we want to move the history of mails, attachments and chats, it is also useful to have an email client. In this case, we recommend Mozilla Thunderbird. It is true, that you can go through the whole process without any additional software, but Thunderbird offers much faster and more convenient way to do this.
A few useful tips!
It is true that Google introduced many interesting tweaks and tools responsible for managing data in our Google accounts, as well as functions for transferring content of one account to another, but it still does not provide a comfortable way to transfer everything with a single mouse click.
Also worth noting is the fact that the data transferred to a new account will be deleted from the old account due to the authorization of some operations. It is a so-called one-way transfer. Every time we get to this point, Google will send us alerts before the process starts.
Migrating Gmail account to another account
The main element that we want to move to the new account is certainly Gmail’s mailbox content. Unfortunately, in this case, Google has not provided a suitable, convenient and fast-acting tools that allow users to move the entire history of electronic messages to a new account. However, the process can be done manually - it may be time consuming if you store messages from the past few years.
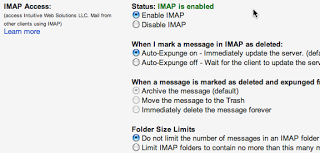
1. First of all, you need to go to settings in the old account and make sure you enabled ’advanced IMAP features’.
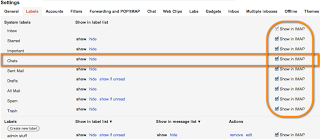
2. Then go to Gmail Labs and make it show all your labels, including those in the mail client. You can skip Spam and Trash, if you do not want to copy messages from this folders.
3. If you are moving everything to the new account, you probably want to take your filters, whose settings is a kind of a pain. To do this, go to "Settings" and then select the "Filters". In order to export the selected filters, activate the window next to a particular item, and then click on the "Export" button to download the mailFilters.xml, which is highly useful for a new account.
4. The next step involves installation of the Mozilla Thunderbird to connect to the OLD Gmail account. Once you installed all the options responsible for IMAP, you can transfer your account to Thunderbird without any hassle. Then, fire up the program and follow the onscreen instructions to connect OLD Gmail account with the application. If Thunderbird does not start downloading messages automatically, click the "Download" button in the upper left corner of the program’s window.
The download process takes time, depending on the speed of your Internet connection. When all the messages are downloaded, make sure the account works properly and start adding information to the new Gmail account. All you need to do, is go to the "Menu" and find "Options" and "Account Settings." At the bottom, on the left of the new window, find the "Operations" and select "Add a new e-mail account ..." from the drop-down menu. Then you can easily fill in the form with details concerning new Gmail account. Once you complete it successfully, a new Google account appears in the main window.
5. After saving the new account in Thunderbird, we need to copy a folder with messages. This operation can be done manually, but we may lose important messages in case of any breakdown. However, there is a solution to this problem, namely the Copy folder. Once you downloaded this email program, run Thunderbird, and then install the add-on from a file.
After successful installation, go to "Options" and then "Account Settings" and make sure that all the options related to saving messages on your hard drive are ticked in the "Copies & Folders" on the OLD account.
6. Once we installed Copy Folder and set all the options, we can start migrating messages to a new account. From the start, copy all messages to the hard disk. Although, we can transfer messages directly between accounts, it is good to be sure we are on the safe side in case of errors.
We start coping by right-clicking on the OLD account in Thunderbird Panel, and then we select "Copy To"> "Local Folders"> "Copy Here" from the context menu. All messages will be copied to the hard disk to the default folder - "Local Folders" – placed on the list on the left hand side of the window. Keep in mind, that copying thousands of e-mails can take up to several hours.
7. Last but not least step involves transferring message copies from a local drive on Google Gmail account. It is good to remember that when you move a message, it is recommended to keep the folder’s structure and sequence of messages, just to be sure all the messages are in the right place - new messages in your inbox, sent items in Sent and so on.
Then, right-click on each item in the ‘Local Folders’, press "Copy To" and then select the new account and the proper folder, that is received for received, sent to sent etc. Do this for all your messages, including your Inbox and Sent Mail.
8. After copying all the messages, log in to the destination account, then go to "Settings" and click the "Filters". Then select "Import filters" in order to move previously exported filters to the new account.
9. The following step is optional, but it is certainly useful for careful users, who do not want to miss any messages. We could be informed about all the incoming mails in the old account by setting the e-mail relay - so that you will not miss any messages from people who do not have a new address. To do this, go to "Settings"> "Transmission and POP / IMAP" and then click on the "Add address for further transmission" to insert a new e-mail address.
In the next step, log in to Gmail account and then go to "Settings"> "Filters" and click the "Create a new filter". In the following steps, insert the address of resource account, set the app to skip the Inbox and create a new label with any name. From now on, all incoming messages from the old account will be directed to the new tab.
Migrating Google Calendar and contacts
1. To migrate your calendar, you need to log in on your OLD account and go into your Google Calendar settings and click on the Calendars tab. You'll see an option to export all your calendars, at once, to your hard drive in iCalendar format. Then you can unzip them in order to educe all calendars ( on the condition that you have several separate calendars).
2. Next, go to your new account, find Settings > Calendar Settings > Calendars and create a new one. Remember to create the same number of calendars you have on your OLD account. If you have 3 calendars on your old account, you have to create three new accounts on your new account and name them the same way.
3. In the next step, click "Import calendar" for each calendar and then select the ICS file you downloaded earlier. Repeat the process every imported calendar. Do this for all calendars.
4. As far as contacts go, you can easily export those by going to contacts, selecting ‘More’ from the context menu and hitting the "export" link in the upper right hand corner. The app will ask which contacts you want to import. There are two options, you can take all of them or select the one you wish to have in your new account. After this, you can re-import them into your new account. While downloading a file, select a Google CVS format.
5. To import contacts, log in to your new account and go to your contacts, click "more", but this time select the "Import" button. To import all the numbers, contacts, addresses, simple select the previously saved CSV file. It is also a good time to send invitations to all your friends, family or co-workers.
Migrating Google Voice

Moving a Google Voice account is surprisingly easy, but if you ignore a few rules or make a mistake, it may cause a lot of problems. Not to mention the possibility of losing contacts.
First of all, if you transfer all the data from the old account to the new Google Voice, all messages, phone numbers and information on the NEW account will be clobbered. If you are moving data from your old account to a completely new and empty, it is okay. If both the new and old accounts have Google Voice numbers associated with them, however, the destination account's number, messages and data will be completely replaced.
If you do have a Google Voice number associated with the destination account, make sure the number's voicemail PIN is not the same as the source account's. If it is, the transfer will fail. If you have any doubts, visit the Google Voice Transfer Assistant, keeping in mind the previously mentioned risks and tasks required to make the transfer. Then you can use another tool, namely – Account Transfer.
The whole process of migrating contacts can take even several days.
Migrating data from one account to another

If our new account is created in the same domain as the old one, transferring data stored in Google Drive is easy. However, if we use two different domains, the best solution is to copy and paste files.
When both accounts are in the same domain, just log in to your old account and go to Google Drive. Then select the files you want to transfer to a new account, right-click on the ‘Share’ button and then insert the new e-mail as a " Collaboraton. From this place, select the NEW address and choose an "Owner" option from the drop down menu for all files. It is the fastest and most efficient way to transfer files to a new Google account.
Migrating Google+ profile

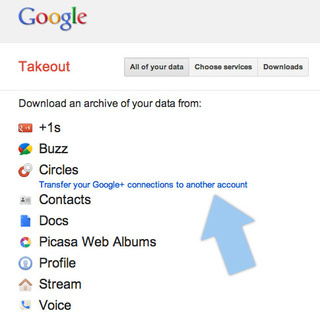
Migrating your Google+ profile from one account to another is actually very easy, but it's a very specific process. To start with, create a Google+ profile on the new account, as Google can only transfer a profile to an account that is signed up for Google+. Once you've taken care of those things, log in on your source account and go to Google Takeout. Then select an option called Circles, and click "Transfer your Google+ connections to another account."
 Then you will be asked to sign into your new account and confirm that you definitely want to make this transfer. Please, remember that the transfer goes in the one direction only. The transfer will be occurred after seven days.
Migrating your various other services with Google Takeout
At the very end, we will discuss the issue of transferring all the smaller items from the old account to Google. Migrating your other data is extremely easy because you can just download whatever you want using Google Takeout and transfer it into your another account. That means contacts, docs, e-books and other information, it is the easiest and fastest way to flush the resource account. All you need to do is click the "Create Archive" button and it'll download all elements from the list. If you don't want to download all information stored on your account, you can also choose specific types by selecting the "Choose Services" tab and choose any services you want to download.
Migrating data between two Google accounts may seem too difficult, but once you learn what to do it's not very hard and doesn't take much time. If you follow these tips and suggestions, you shouldn’t have any problems concerning this particular issue.