If you are using Windows 10 it’s now possible to manually choose how individual USB storage devices interact with your operating system. Now you can set USB devices to 'Better Performance' or 'Quick Removal', for two completely different use cases. Currently, the default option for all devices connected to Windows 10 is Quick Removal.
How to Fix Error 0x80070424 For Windows Update, Microsoft Store.
One of Windows 10’s most recent changes that has mostly gone unnoticed is the option that allows users to prioritise how USB Storage devices interact with the operating system. In the past, all USB storage devices connected to Windows 10 devices would automatically favour performance and transfer speed over quick removal.
As a result, USB storage devices were required to be safely removed (Ejected) manually before being physically removed from devices. Although in most cases failing to safely remove a device wouldn’t cause any problems, there was still a chance data could be damaged or corrupted.
Because of this risk, although very minor, Microsoft have changed the default setting of all connected USB storage devices from ‘Better Performance’ to ‘Quick Removal’ starting from version 1809. Although the latest change focuses on safety over performance, it’s still possible to manually change the setting for individual devices should you prefer to use Better Performance over Quick Removal.
Related: Google Chrome ‘Managed by your Organization’ Message Explained & Fixed.
How Do You Change USB Storage Settings From 'Better Performance' to 'Quick Removal' or 'Quick Removal' to 'Better Performance'.
For most people having USB Storage devices set to favour Quick Removal is the most useful configuration to use, however, it isn’t for everyone. So to change the setting you’ll need to do the following.
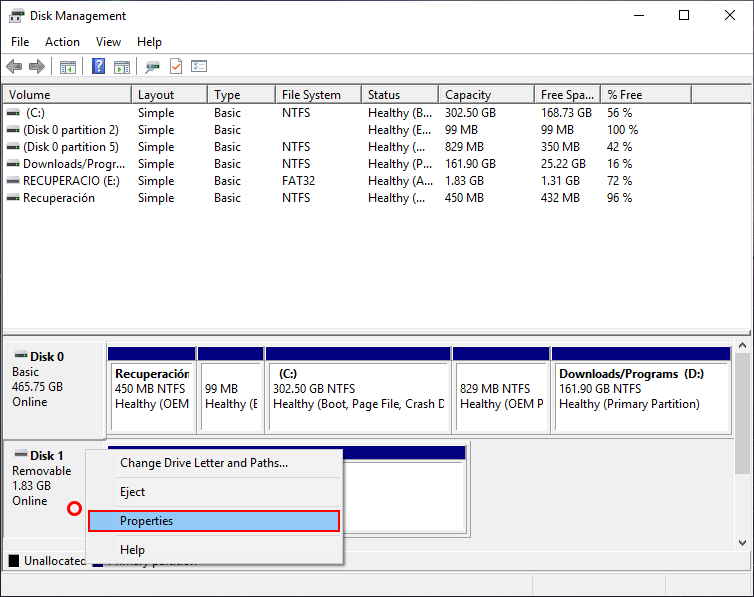
First, insert the removable device into your computer then wait for it to register. Once the device registers, right-click the start menu and select Disk Management. This will open a list of all the internal and external storage devices connected to your computer. From this list find the USB storage device you wish to change from Quick Removal to Better Performance or Better Performance to Quick Removal, then right click on it and select Properties.
This will open a new window, where you will need to change from the General tab to the Policies tab. When you are on the Policies tab you will see to options at the top of the list:
Quick Removal (Default): Disables write caching on the device and in Windows, but you can disconnect the device safely without using the Safely Remove Hardware notification icon.
Better Performance: Enables write caching on Windows, but you must use the Safely Remove Hardware notification icon to disconnect the device safely.
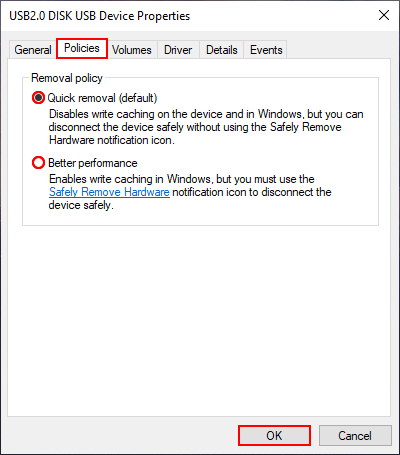
Simply select the one you wish to use, then click Ok. Once done, that particular USB storage device will use your selected preference whenever it is connected or disconnected from your computer. Just remember that this change isn’t universal so you will need to make the change to all the USB devices you wish to use unless of course, you are happy with Quick Remove being the default.
Although this change is designed to reduce the chance of damaging USB storage devices, it’s probably still a good idea to use the Safely Remove hardware option whenever possible, it doesn’t exactly take much more time to do. Alternatively, you should at least wait until the USB storage devices indicator light stops blinking. If it has one of course.