Spectre and Meltdown are two of the biggest security flaws to hit the tech scene in a very long time. In a scramble to fix the issue, both Microsoft and Intel rolled out patches to plug the Spectre leaks. Unfortunately, as these patches were rushed, a lot of systems are having major issues. If you are having any major problems after updating Windows recently, this guide will show you two different ways to disable Spectre Mitigation.

How to Stop Google Chrome Blocking Websites and Downloads.
If you have recently updated your Windows devices and are now suffering near crippling performance issues, like constant restarts, restart cycles, boot issues, and generally sluggish performance, you may need to disable Intel’s Spectre patch. Microsoft has released update KB4078130 for Windows 10 which disables the microcode update from Intel that was supposed to fix Spectre (variant 2 CVE-2017-5715 – “Branch target injection vulnerability.”) processor vulnerability. Update KB4078130 is available for all versions of Windows 7, 8 and 10.
If for some reason you can’t automatically update your system to KB4078130 or the update just doesn’t appear, below you will find out how to manually download and install the update. Alternatively, you’ll also learn how to disable Intel’s Spectre Mitigation from the Windows Registry.
How to Remove Intel’s Spectre Mitigation Code With Windows Update KB4078130. (variant 2 CVE-2017-5715 – “Branch target injection vulnerability.”)
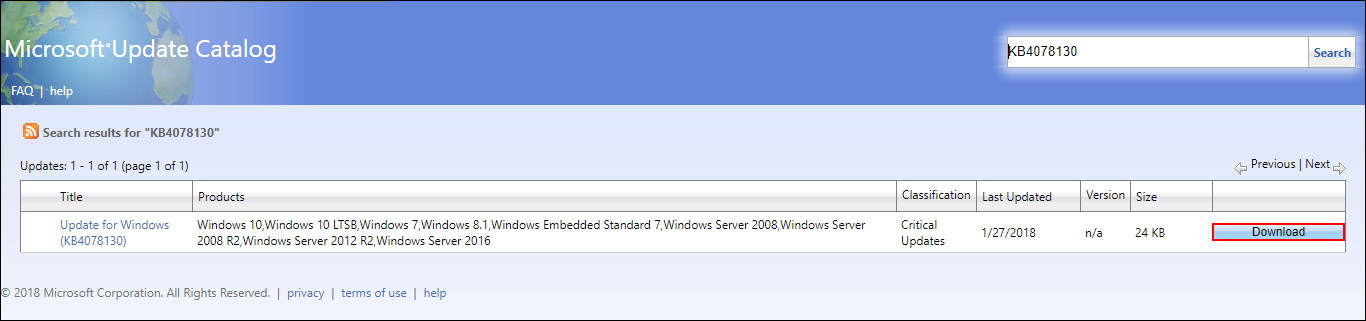
If your computer won’t automatically update to KB4078130 when you go to Settings > Update and Security, you will have to manually download and install the update from the Microsoft Windows Catalog website.
Download Windows Update KB4078130.
The above link will take you directly to the download page, when you get to the page, download the file and install it to your computer. The file is super small and only takes a second to activate on your system, it’s basically just a registry tweak, so don’t be surprised if it seems very uneventful.
How to Remove Intel’s Spectre Mitigation Manually. (Registry Tweak Via CMD)
If you are experienced with using Command Prompt and the Windows Registry, you don’t have to download the update to disable the Spectre patch, you can simply disable it in the registry using some simple commands. However, as this process will require you to changes to the Window Registry using Command, it’s important to create a Restore Point.
If you don’t know how to create a restore point, open the start menu, type Restore, then select Create a Restore Point when it appears on the list. From the new window that appears, click Create in the bottom right section of the screen, then follow the instructions given by Windows. Once you have successfully made a restore point, you can continue with the steps shown below.
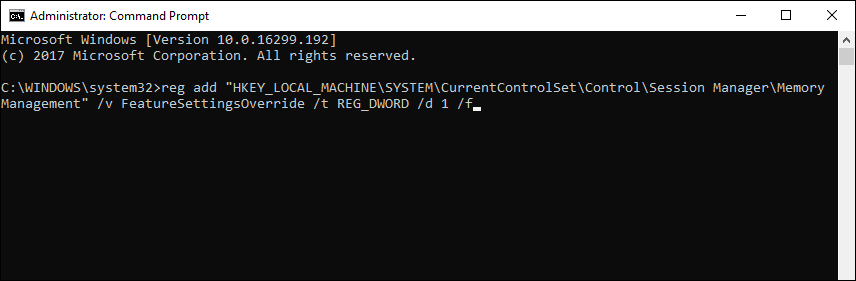
Open Command Prompt (as admin), then enter the following commands:
reg add "HKEY_LOCAL_MACHINE\SYSTEM\CurrentControlSet\Control\Session Manager\Memory Management" /v FeatureSettingsOverride /t REG_DWORD /d 1 /f
reg add "HKEY_LOCAL_MACHINE\SYSTEM\CurrentControlSet\Control\Session Manager\Memory Management" /v FeatureSettingsOverrideMask /t REG_DWORD /d 1 /f
Once both commands finish running, Restart your computer for the changes to take effect.
How to Re-Enable Intel’s Spectre Mitigation Manually. (Registry Tweak Via CMD)
If for some particular reason you wish to re-enable the bugged Spectre fix, enter the following commands:
reg add "HKEY_LOCAL_MACHINE\SYSTEM\CurrentControlSet\Control\Session Manager\Memory Management" /v FeatureSettingsOverride /t REG_DWORD /d 0 /f
reg add "HKEY_LOCAL_MACHINE\SYSTEM\CurrentControlSet\Control\Session Manager\Memory Management" /v FeatureSettingsOverrideMask /t REG_DWORD /d 1 /f
Again, Restart your device for the change to take effect.