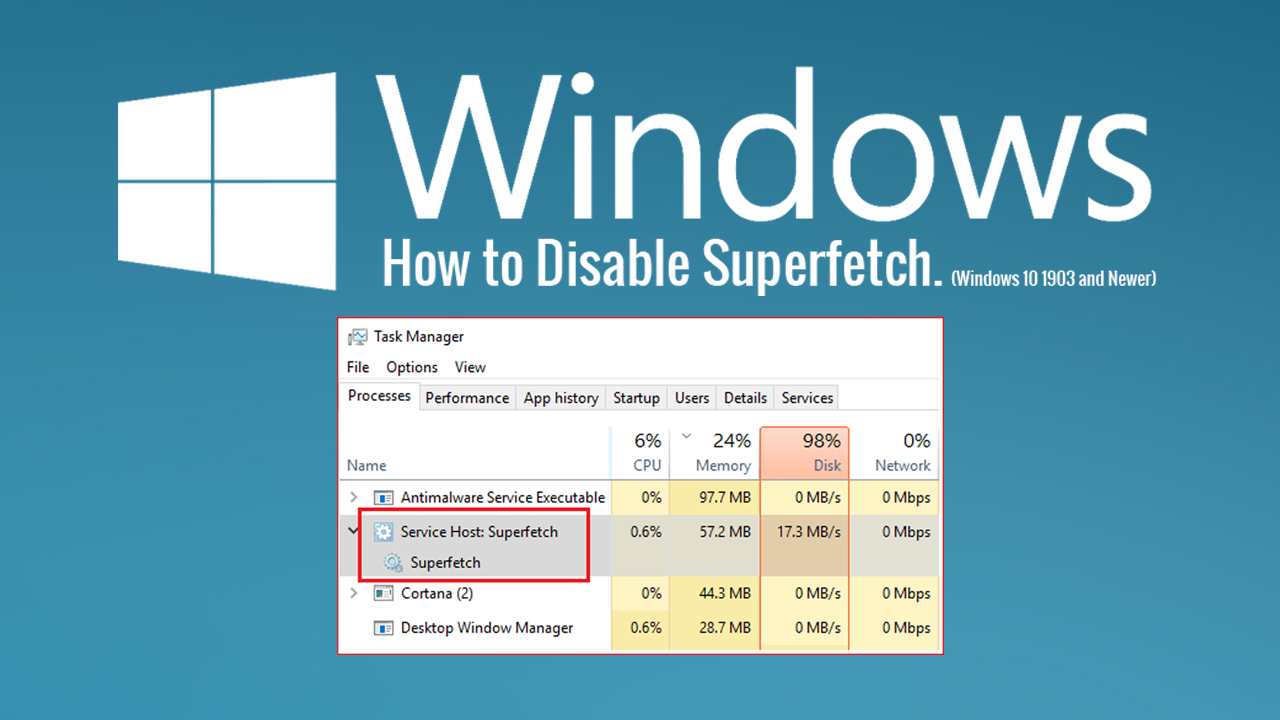
A short tutorial showing you how to disable Superfetch on Windows 10. A service on the operating system responsible for caching and fetching data on the fly. If you happen to have a slower system, superfetches resource usage may outway its benefits, so why not disable it?
How to Fix a USB Port That Remains Active After Using Safely Remove Hardware.
Windows 10 has a lot going for it for a free upgrade from older versions on Windows. It’s easier than previous versions to use, has a ton of useful preinstalled apps, and simplifies a lot of tasks that once took a lot of time to configure and use. That said, it isn’t without its issues, especially if you have updated older device to Windows 10.
A lot of the time when an older device is updated to Windows 10, the extra resource usage is quite noticeable and can cause the update to be more of a hindrance than a benefit. Before you go ahead and uninstall Windows 10 in favour of an older version, you should try disabling Superfetch. Although this feature is useful for speeding up tasks on newer, faster machines, it does have a tendency to do the opposite on older devices. Especially those updating from Windows 7. (Windows 8 devices are usually ok)
Related: How to Stop the Photos App on Windows 10 Opening When Connecting Your Phone.
How Do You Disable Sueprfetch on Windows 10? (Windows 10 version 1903 & Newer)
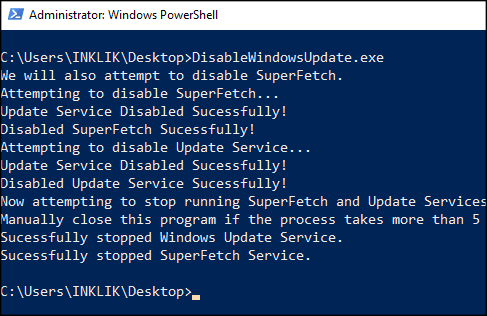
To begin, the first thing you’ll need to do is download a command-line utility called Disable Windows Update. Although this tool has been specifically designed to disable Windows updates, it also has the ability to disable Superfetch which of course is part of the process.. (The utility is open source which means you can inspect its source code should you wish to)
Download Disable Windows Update From Github.
When you have the tool on your computer, use it as you would any other .exe file. A PowerShell window will appear as soon as you double-click the file, and run a few quick lines of code. Disabling Superfetch in the process. After the tool has completed, a quick restart is advised to get the best instant results. It’s important to note that this process will need to be repeated whenever Windows 10 is updated to a newer version. Generally smaller cumulative updates won’t reset the change, but you should check from time to time. Major 6 monthly updates will always require you to re-run the utility. Microsoft always makes sure Windows Updates are enabled for security reasons.
Note: With Superfetch disabled, you will have to manually search for Windows 10 updates.
On a Side Note…
While you are updating your Windows 10 knowledge make sure you also check out the following guide which will show you how to completely uninstall WordPad from your Windows 10 PC. An outdated and rarely useful word processing program on the operating system. If you have upgraded to Microsoft Word, WordPad will only get in the way when you search for Word items using the start menu.
How to Uninstall WordPad on Windows 10. (Remove WordPad on Windows 10)