If you are using a Windows 10 mobile device and would like to save a little more battery life while you are out and about, this article will show you how to disable WiFi background scanning. With WiFi background scanning disabled, Windows 10 will stop constantly searching for WiFi networks to connect to.

Related: How to use Spotlight collection images as wallpapers on Windows 10.
Windows 10 has a lot of different power saving options that automatically optimise how programs and hardware interact on your device. Although most of these options are enabled by default and can be managed or customised from Power settings in the Setting app or within the Control Panel. There is another important system process you can change that will save battery power on your device.
WiFi background scanning is one of the most battery-intensive features on modern devices and can account for a large percent of battery drain when you aren’t connected to a network. For example, if you have WiFi enabled while you are travelling to work on a train, Windows will constantly scan for new WiFi networks for you to connect to. This process is ongoing indefinitely until you connect to a network. Thankfully WiFi background scanning can be disabled and re-enabled relatively easy so you can switch between having it enabled or disabled whenever you require it.
Quick steps to disable background scanning for WiFi networks on Windows 10:
- Open the Run tool by pressing Windows Key + R.
- Type services.msc into the text box then press Enter.
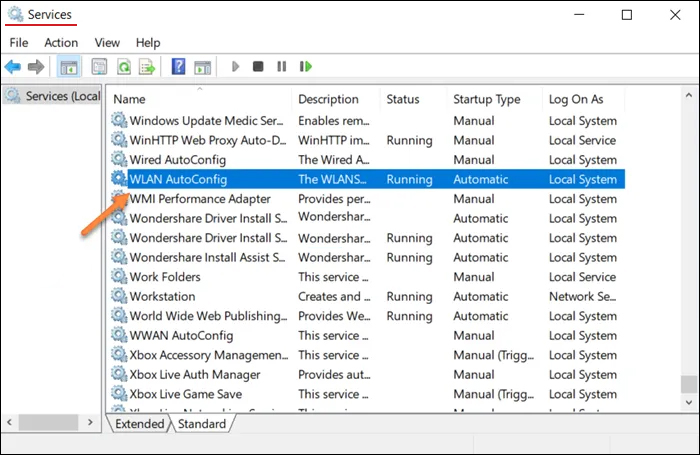
- In the services window search for WLAN AutoConfig.
- Right-click it and change the Startup type to Manual.
- Finally, click Stop and Restart your system for the change to take effect.
Note: Alternatively, you could just use the WiFi button in the taskbar or on your device to disable your WiFi connection for a while. This is the quickest and easiest method.
How do you disable WiFi background scanning to save battery power on Windows 10?
To begin the process of disabling WiFi background scanning on Windows 10, you’ll need to do the following.
- First open the Run tool by pressing the Windows Key + R, then type services.msc into the text box and press Enter.
- This will open the Services window where you will need to find WLAN AutoConfig in the list of options. When you find it, right-click on it and select Properties
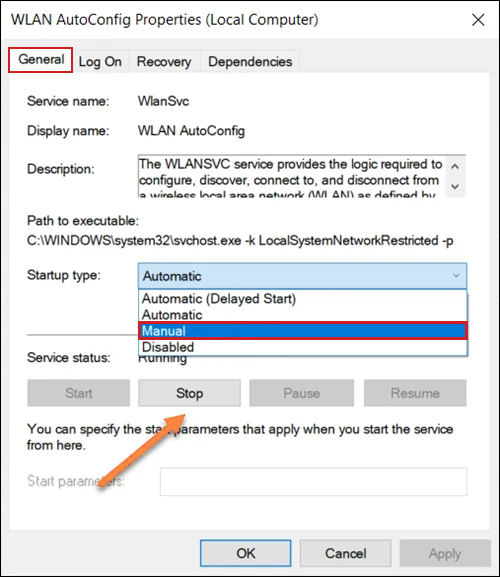
- In the Properties window that appears, stay on the General tab change the startup type to Manual
- Finally, click Stop under the Service Status heading. Then Restart your computer for the change to take effect.
After you have made the change to WLAN AutoConfig, Windows will stop automatically searching for new WiFi networks to connect to. And in turn, saving you a considerable amount of battery in the process.
How do you make Windows 10 automatically search for WiFi networks again?
If you find yourself needing to search for WiFi connections again, you can return to the same location using the steps shown above. However, this time change the startup type for WLAN AutoConfig from Manual back to Automatic, then click Stop. After another system restart, the changes will take effect.