If you are trying to record decent audio on your computer but can’t seem to get rid of annoying crackling sounds from your Microphone. This article will show you how to fix what is causing microphone crackling on Windows 10. A surprising common and bizarre issue that can thankfully be fixed relatively easy and without any crazy Windows 10 knowledge.
Related: How to stream to multiple platforms at the same time. Twitch, YouTube, Facebook, etc.
Good quality audio is one of the most important things you can strive for if you are creating content for YouTube, Podcasts, Twitch, etc. You’d be surprised to know that most people will put up with poor video quality but almost always refuse to watch or listen to content with horrible audio quality. Obviously having both is the objective but if you can only afford to have one, always prioritise audio where possible. More often than not it’s cheaper, uses far less bandwidth and can be set up a lot quicker.
Although you probably think that getting a decent microphone is all you have to do to get good audio quality, there are a few more factors that will affect the quality of your audio. Plug and play isn’t what it used to be. When setting up a microphone the first thing you need to look for is feedback and interference, followed by software artifacts. Which usually appears as microphone crackling.
Tip: Make sure you don’t speak directly into your microphone, you want to have the microphone on a slight angle so you are speaking past it, this will reduce some of the annoying speech sounds you hear sometimes.
Seeing as interference and feedback are pretty straight forward (keep your microphone and it’s connection away from broadcasting devices like Bluetooth/wifi adapter and SSDs/HDDs), this guide will be focusing on reducing the crackling sounds in your microphone when you connect it to a Windows 10 PC.
How do you fix microphone crackling on WIndows 10? Fix a crackling and noisy mic on Windows 10.
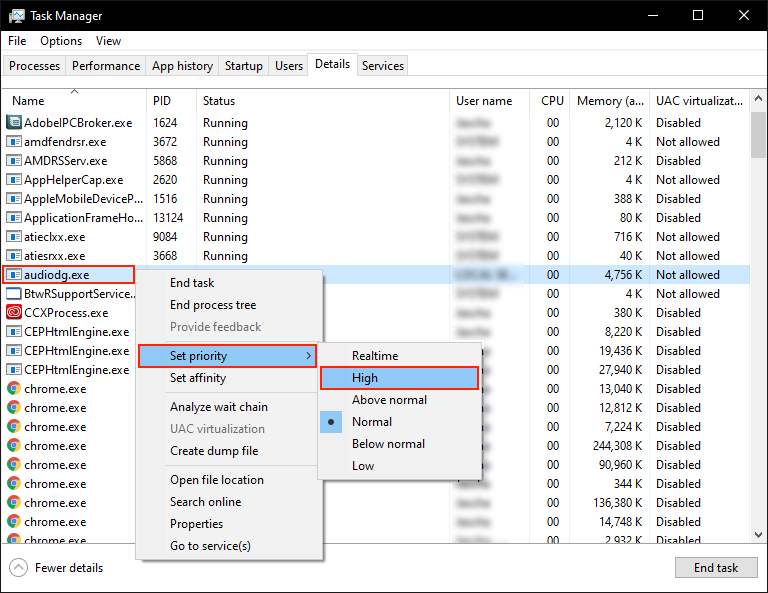
- In order to fix a cracking microphone on Windows 10, you’ll need to do the following. First open Task Manager by pressing Ctrl+Alt+Delete. Next change to the Details tab at the top of the screen.
- Now that you are on the Details tab, find an entry called audiodg.exe (it’s usually near the top of the list) When you find it right-click on it and go to Set Priority > High.
Note: Before you change your affinity settings, check to see if allocating a higher process for audiodg.exe fixes the problem. If it doesn't, then change Processor Affinity as shown below. You don't need to change it unless you still have a crackling sound.
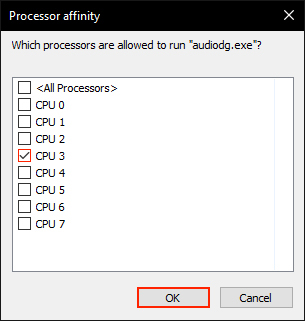
- Next, right-click the audiodg.exe entry and select Set affinity, then Unselect all CPU cores except one(any will do). It should look something like the screenshot below. Now simply confirm the change and it will take effect immediately.
You can test your microphone now and it should be 100% crackling free. Unfortunately, after a system Restart, the priority will revert back to its default setting and you will have to repeat the steps shown.
How do you force audiodg.exe to run at a higher priority by default with a set affinity?
Normally there are two ways to do this however, the best option and my preferred option doesn’t seem to be working at the moment. I’m currently trying to figure out why so will update this article as soon as I have a solution. This option doesn’t require any additional programs or tools and just requires some changes within shortcuts.
The second option, which is currently working requires you to use a third-party program called Process Lasso which will take care of the processes for you. Although I like the idea of the tool, I’m not a big fan of having stuff running in the background where possible. It just chews into system resources.