Instagram Reels are highly popular on Instagram and now outweigh Photos on Instagram by a huge margin. However, you may have noticed that the quality of Reels can vary significantly. While the original video's quality is crucial, it's important to consider Instagram's settings to ensure you upload Reels with the highest possible quality.

Related: How to Lock Individual Chats in WhatsApp | Lock WhatsApp Conversations.
When publishing a Reel on Instagram, the quality is limited by the videos and photos used in the original content. For example, you may have noticed that the original content on your device is higher quality than the final Reel published on your Instagram account. Another factor affecting Reels quality is the internet speed during the publication process. If you upload a Reel while connected to a public Wi-Fi network or using mobile data, the quality will be scaled back to save your data rather than kept stable for quality.
So in order to post Instagram reels with the absolute best quality possible there are a range of different things you need to take into account. Obviously, you will need to record in the best possible settings but you also need to take care of some stuff when you finally get around to uploading your Reels to Instagram.
Post Production when recording on a Camera. (Phone exclusive users can skip this part)
If you are recording content on a camera and editing it in a program like Premiere Pro and then transferring it to your Android or iOS device to upload you need to use a specific set of export settings to get the video Instagram ready. Here’s the highly debated part of everything. What bitrate to export at? Some say 30MBPS while others say 6-12. However, this is something that you should experiment with. Going too low will reduce your quality significantly, whereas going too high triggers Instagram’s compression tools to step in and smash your quality.
How to Configure Instagram for Maximum Reels Quality
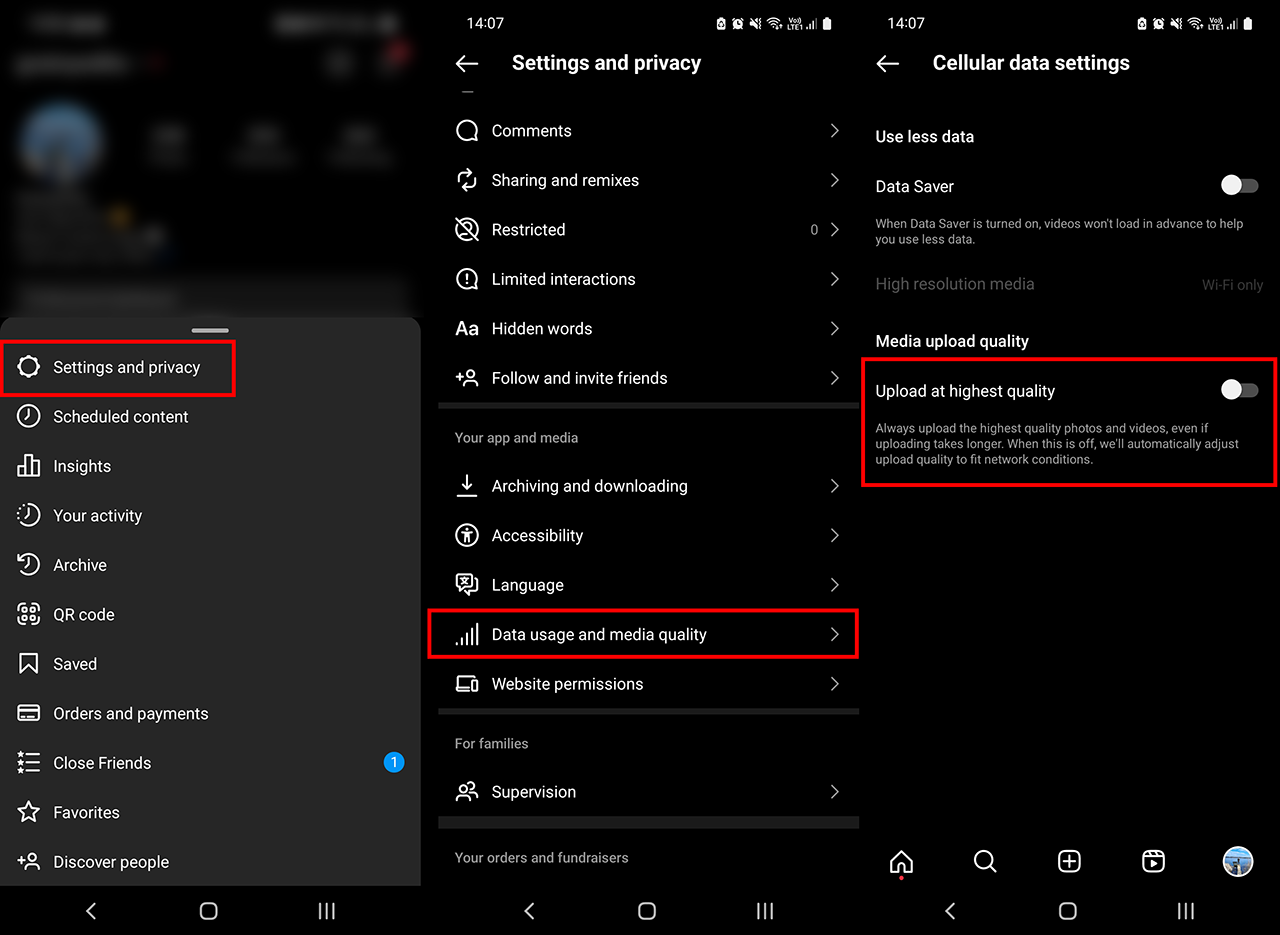
- Launch the Instagram app and access your profile.
- Tap the icon with three horizontal lines.
- Select "Settings and Privacy" from the menu.
- On the next screen, choose "Data Usage and Multimedia Quality."
- You'll be directed to a new screen where you need to enable the option "Upload in Highest Quality."
- On the same screen, consider disabling the "Use Less Data" option for optimal results.
How to Publish Reels in the Highest Quality on Instagram (during Upload)
- Open the Instagram app.
- Access the creation tab (+) and specifically choose the Reels section.
- Proceed to create your new Reel.
- When you're ready to publish the Reel, tap the "Next" button.
- You'll be taken to the configuration screen for your publication. Scroll down and select "Advanced Settings."
- On the following screen, enable the "Upload in Highest Quality" toggle switch.
Using OBS to record content? Boy, do we have some handy guides for you!
If you’re streaming or recording content on your computer you are more than likely using OBS and if you’re using OBS you’ve probably got some questions! If so make sure you check out our OBS guides here. You’ll be surprised how quickly you can increase your quality with a few simple tweaks in OBS.