If you have recently updated your NVIDIA graphics drivers and or enabled Gsync or FreeSync on a brand new monitor and now have major flickering issues in games. This article will show you several different things you can do to solve the problem and fix flickering when Gsync and FreeSync are enabled on your monitor.

Related: How to fix an SSD or SD card that won’t delete data or format.
Gsync and FreeSync are pretty much standard features on most mid-range monitors these days and they both make a huge difference in picture quality when used in games. Everything looks crisp and runs way smoother and allows you to take some pressure off your CPU and GPU. While using Gsync and FreeSync should be as simple as enabling the option in the monitor’s settings and calling it a day, there are some other major issues that you will have to deal with at some stage. Especially if you are using an NVIDIA GPU.
By now you have probably noticed some huge issues with screen flickering and black screen tearing when playing games with Gsync or FreeSync enabled when coupled with NVIDIA graphics. The good news is that there is nothing wrong with your monitor, the issue is entirely driver and setting-related, though this is where the good news ends because getting everything to work together is a bit of a nightmare. Anyway, there are quite a few different things you can do to solve this problem so let’s get started.
Fix screen flicking when Gsync, FreeSync is enabled | Gsync, FreeSync causing flickering in games solution.
As we mentioned above this fix has multiple aspects to it so you will need to run through them in order to get the best results. Keep in mind that this is "potentially" a driver issue that NVIDIA hasn’t solved for a long, long time. While you can use each of these options individually I suggest trying them all at the same time.
Note: If you are using multiple monitors all connected to the same GPU try disconnecting all of the other monitors to see if the problem goes away. Having multiple monitors connected to a single GPU can sometimes cause interference issues, perhaps this is an issue with low-quality cable/port shielding or something else but it does make a difference sometimes.
OPTION 1: Use an older driver version. Geforce driver 466.27.
So far the best way to solve this issue is to roll back to an older NVIDIA graphics driver version, in particular, Geforce driver version 466.27. This seems to be the most stable driver release to date and in most cases will fix the problem instantly for everyone across multiple GPU generations 10, 20, 30 & 40 series models. The only downside to this is that some newer games and programs may have other issues. Though I’ve yet to come across any. If you don’t want to use such an old driver, try one of the other options below first then come back to this as a last resort. Although this driver version was designed for Windows 10 it works perfectly fine on Windows 11 operating systems as well. You can still use old NVIDIA graphics drivers on Windows 11 PCs.
Note: If you happen to have landed on a newer stable release as good as the results on 466.27 please drop it in the comments. I’ve tried tons of versions but got tired of testing each and every one.
OPTION 2: Just use the Driver Windows installs.
Another driver solution you can use is to uninstall the official drivers from Device Manager, and then just let Windows install some generic driver. Whatever drivers Microsoft are using seem to work very well as well.
OPTION 3: Set a custom screen resolution in NVIDIA Control Panel.
The next thing you can try to stop flickering after enabling Gsync or FreeSync is to manually set a custom screen resolution in NVIDIA Control Panel.
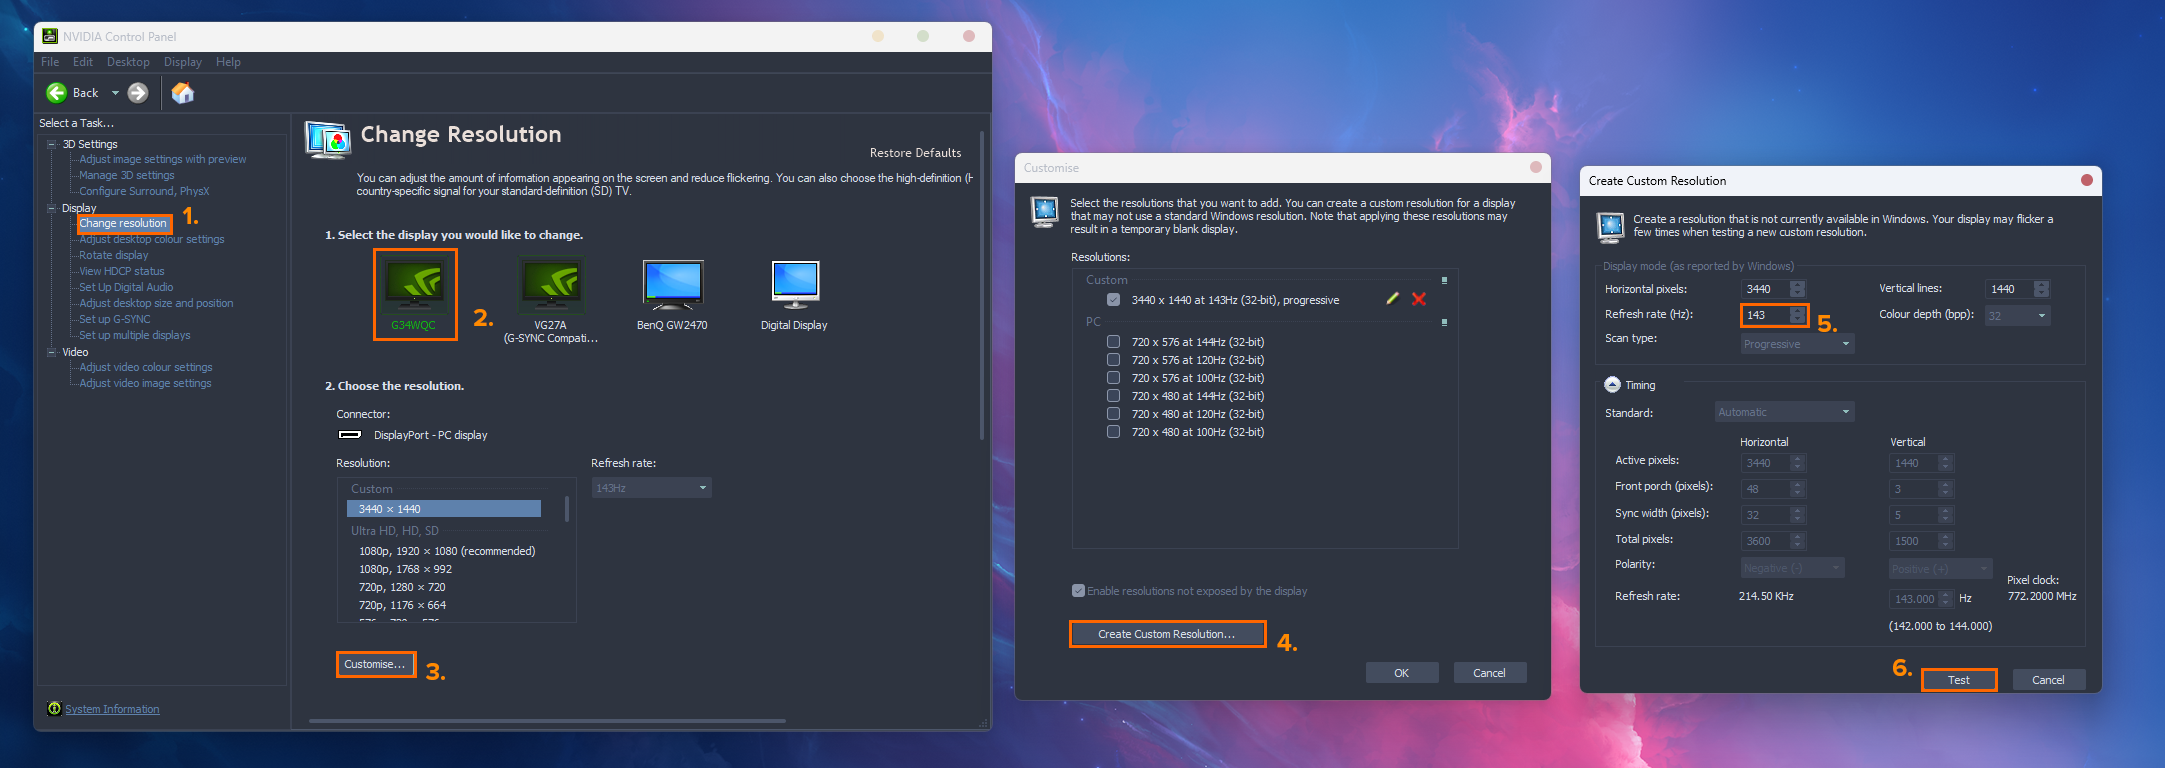
- To do this open NIVIDA Control Panel then go to Display Resolution in the left panel.
- Next, select your monitor, then click Customise below the list of resolutions.
- A new window will open, here click Create Custom Resolution.
- Now in the next window configure your screen resolution to your monitor's maximum resolution, then set your max refresh rate to 1 frame under the max for your monitor. If you have a 144hz monitor set it to 143, etc.
- Now click Test, then accept the changes.
- Once it has been saved select your new Custom Resolution from the main Change Resolution page. Then click Apply to make sure it is set.
You can now start a game and check to see if the problem has been resolved. If it hasn’t you will need to complete OPTION 3 as well. They have a tendency to work best together.
OPTION 4: Set a custom maximum monitor refresh rate in NVIDIA Control Panel.
The final option and one that works best when used with the first two is to manually set a maximum refresh rate for your monitor in NVIDIA Control Panel.
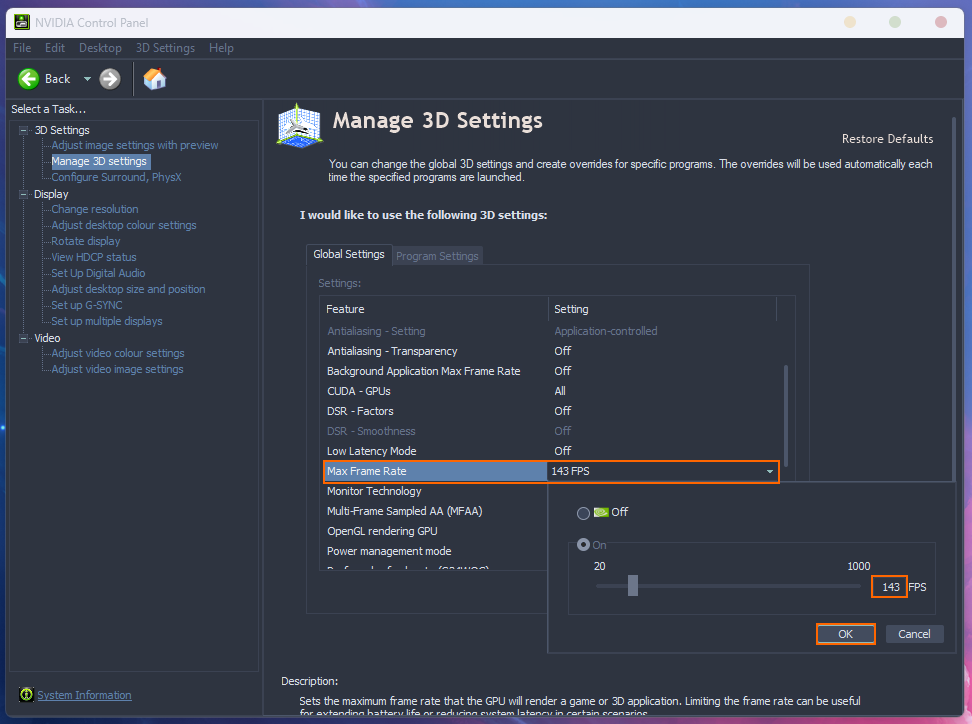
- To do this open NVIDIA Control Panel, then change to the Manage 3D Settings tab on the left.
- Here scroll down and find the Max Frame Rate option and change the setting to 1 frame below your monitor's maximum refresh rate. If you have a 144hz monitor set it to 143, etc.
Once you have made the change you can check to see if your games work without any flickering. As we mentioned plenty of times before, all of these options work best when used at the same time, however, for obvious reasons using driver version 466.27 may not work for everyone. That said, there may be a newer and equally stable version in the mix, it’s just I haven’t found it yet.
Make sure that you also cap max FPS in the games you are playing.
Even after you have followed all of these steps you will still need to use the FPS capping options found in the graphics menu of games. Make sure you set this to the max possible FPS your monitor can go or slightly below it if the game has fully adjustable options. This will also help with flickering issues.