Table of Contents
If you are using Microsoft Edge and have a fair bit of content that loads on the New Tab page. This article will show you how to quickly and easily enable New Tab page Preloading. With preloading enabled for the New Tab page, all the content that is normally on display will be ready to go by the time you switch to a new tab.
Related: How to stop users from installing extensions in Microsoft Edge.
The New Tab page on Microsoft Edge is usually a pretty quick page to load by default however if you have loaded it up with extra content, it may be a little slower to load than you’d like. Even if you have a decent Internet connection. As a result, Microsoft has added a brand new feature that allows you to quickly and easily enable New Tab page preloading.
With new tab page preloading enabled, Edge will preload your New Tab page content in the background so it will be ready to go by the time you switch to the page. Currently, there are three different ways to enable background new tab page loading. The first is by far the easiest and can be done straight from Edge. The second is more advanced and is done using the Windows 10 Registry Editor. The first is using the Group Policy Editor, however, this option is limited to Windows 10 Pro users only, so we’ll be skipping it for the time being.
How do you enable New Tab page preloading on Microsoft Edge?
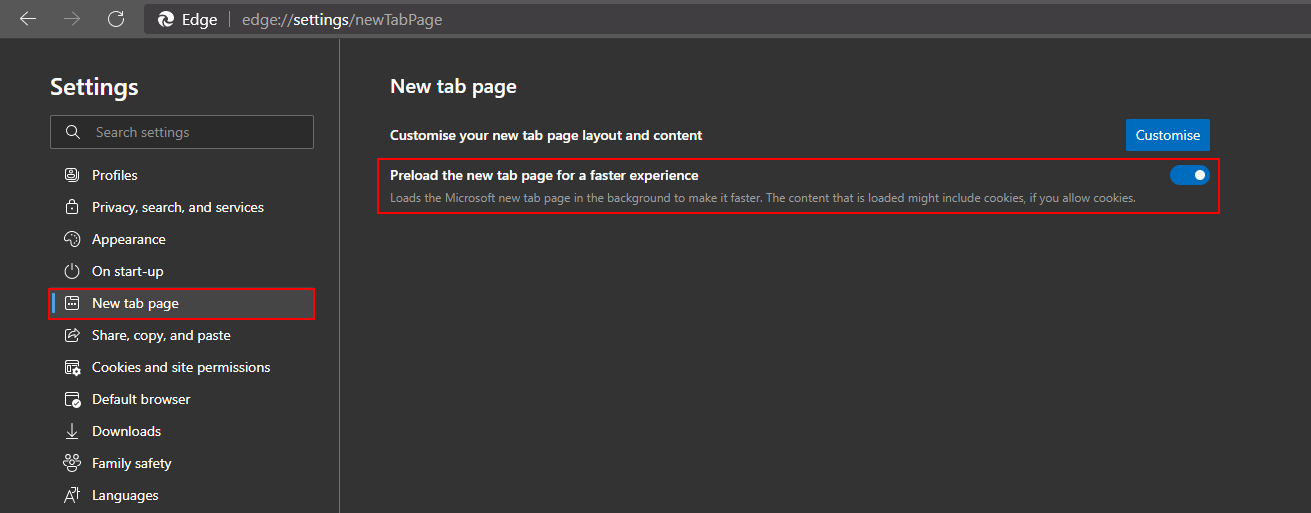
Seeing as making this change in Edge is the quickest and easiest method we’ll start there. To begin, update edge by going to Settings > About and waiting for Edge to do a quick automatic update check.
- Now that Edge is up to date, open it again, then go to Settings > New tab page. Here you will see a single toggle called Preload the new tab page for a faster experience. Flip this toggle On (blue) and the change will take effect after you restart Edge.
How do you enable New Tab page preloading on Edge using the Windows 10 Registry Editor?
If you like a challenge and want this feature to be kept on always, you can use the Windows 10 Registry editor to make the change. However as this method is a little more complex, you’ll want to create a system restore point first. To create a restore point, open the Start menu, type Restore, then select Create a Restore Point when it appears on the list. In the new window that appears, click Create in the bottom right section of the screen, then follow the instructions given by Windows. Once you have successfully made a restore point, you can continue with the guide below.
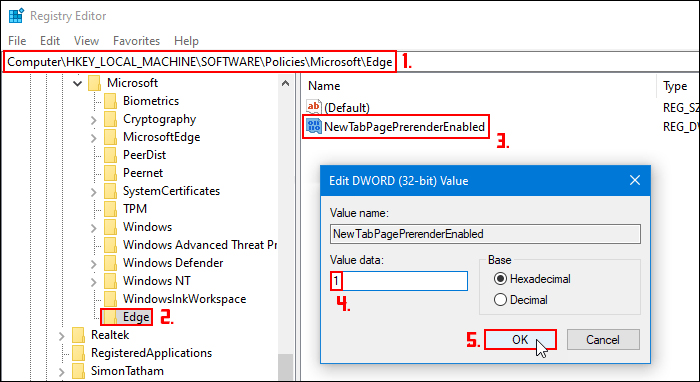
- Now that you have a system restore point set, open the Registry Editor by searching regedit from the start menu and selecting it when it appears at the top of the list.
- Next, use the left-hand pane in the Registry Editor to navigate to the following location:
HKEY_LOCAL_MACHINE\SOFTWARE\Policies\Microsoft/Edge
Note: If you don’t see an Edge key (folder) right-click the Microsoft key (folder) and select New > Key and name it Edge.
- Now, right-click the Edge key (folder)and select New > DWORD (32-bit) Value and name it NewTabPagePrerenderEnabled.
- Finally, double-click NewTabPagePrerenderEnabled and change its Value data to 1.
All that is left to do is a quick system Restart and the change will take effect. If you ever want to disable the feature using the registry editor, return to the same location and change the Value data to 0.