Table of Contents
If you have switched from Google Chrome or another browser to Microsoft Edge and would like to disable address autofill and credit card autofill or both of them. This article will show you how to disable both features within Microsoft Edge. Don’t worry, we’ll also show you how to re-enable them if you change your mind.

Related: How to enable video commenting on PDFs in Microsoft Edge.
Autofill is quite a handy feature to have enabled in your browser and saves you having to enter the same data each and every time you sign up for a new service or make changes to an existing one. It isn’t for everyone though and does sometimes fill and remember incorrect data. Thankfully autofill can be disabled on most browsers, though each and every browser has a slightly different set of steps for doing so.
On Microsoft Edge, there are two different autofill types, address autofill and credit card information autofill. Both of which can be disabled or enabled individually. So if you want one on and the other off, you can set it up that way. Now that Edge has full Windows 10 integration, most features can be adjusted from the Windows 10 Registry Editor so follow along as we guide you through the steps. Just make sure you set a system restore point first.
Quick steps for disabling credit card and address autofill in Edge:
- Open the Registry Editor.
- Navigate to the following location:
HKEY_LOCAL_MACHINE\SOFTWARE\Policies\Microsoft/Edge/Recommended - Right-click the central pane and select New > DWORD (32-bit) value.
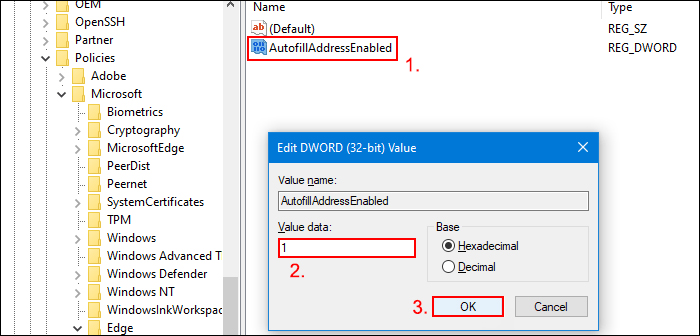
- Name this file AutofillAddressEnabled.
- Right-click the central pane again and select New > DWORD (32-bit) value.
- Name this file AutofillCreditCardEnabled.
- Finally, double-click AutofillAddressEnabled and change its Value data to 1.
- Double-click AutofillCreditCardEnabled and change its Value data to 1.
Note: You don’t have to disable both if you don’t want to. To do this just create the DWORD value for the one you want disabled not both.
How do you disable address and credit card autofill in Microsoft Edge?
As the steps in this guide use the Windows 10 Registry Editor, you’ll want to make a System Restore point just in case you make a mistake. This will give you a safe point to revert back to if you make a mistake during this process.
To create a restore point, open the Start menu, type Restore, then select Create a Restore Point when it appears on the list. In the new window that appears, click Create in the bottom right section of the screen, then follow the instructions given by Windows. Once you have successfully made a restore point, you can continue with the guide below.
- Now that you have a system restore point set, open the Registry Editor by searching regedit from the start menu and selecting it when it appears at the top of the list.
- Next, use the left-hand pane to navigate to the following location:
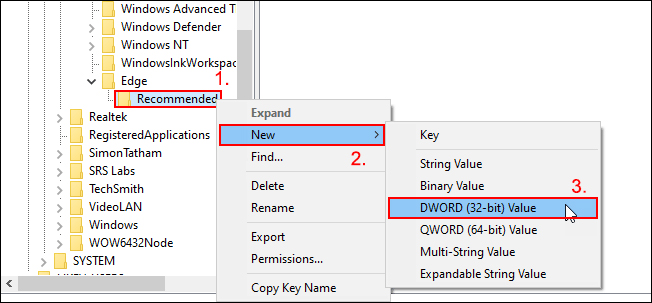
HKEY_LOCAL_MACHINE\SOFTWARE\Policies\Microsoft/Edge/Recommended
Note: If you don’t see an Edge key (folder) right-click the Microsoft key (folder) and select New > Key and name it Edge. You’ll need to do the same for Recommended as well. When you complete these steps you should be in the location shown above.
- Once you have the Recommended key(folder) selected, right-click the middle pane and select New > DWORD (32-bit) value.
- Name this entry either of the following:
AutofillAddressEnabled
AutofillCreditCardEnabled
Note: If you want both features disabled, create another DWORD (32-bit) value and name it the other option.
- When you have created the entries you require double-click on them and change the Value Data to 1. Finally, Restart your computer and the change will take effect.