If you're looking to optimise the quality and file sizes for video exports out of Premiere Pro this article will show you the best export settings to use in Premiere Pro. The sheer number of export options in Premiere Pro can get pretty overwhelming so we've put this guide together to give you the best possible quality with the smallest possible file sizes.

Takeaways:
- What are the best Settings to use when exporting videos in Premiere Pro?
- Exporting with the smallest file sizes and the best quality video in Premiere Pro.
Table of Contents
How to Export Video Files with Small File Sizes in Adobe Premiere Pro.
Settings to use for optimal file sizes.
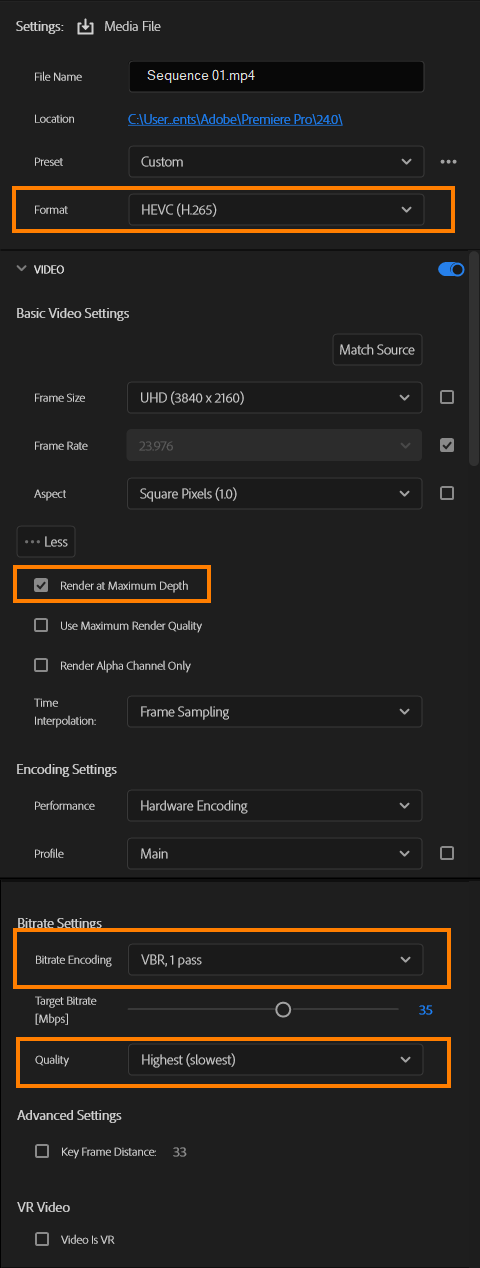
- Now that you're ready to export your video give it a name and choose where you would like to save it.
- Set the Format to HEVC (H.265) but if that isn't a viable option for your H.264 is your next best option.
- Under Video, click Match Source to export using the Frame Size and Frame Rate.
- Now make sure that Render at Maximum Depth and Use Maximum Render Quality is checked off. Unless you have a fairly fast paced piece of content. If so it's best to tick Use Maximum Render Quality.
- For the Bitrate Settings, set the Bitrate Encoding to VBR, 1 pass, which will give a smaller file size than CBR or VBR, 2 pass.
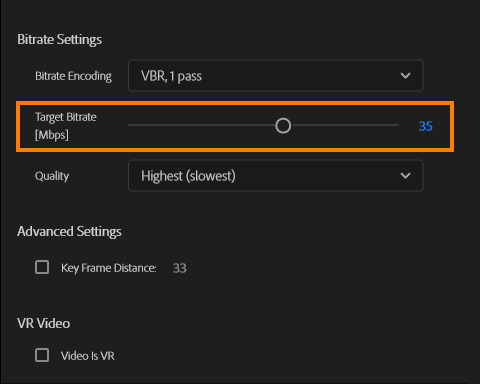
- Decreasing the Target Bitrate is the biggest factor in reducing the video’s file size. Just don't set it too low.
- If you picked HEVC (H.265) codec, set the Quality to Highest (slowest). This will render your video in higher quality without increasing the file size!
TIP: Look above the Export button in the bottom left corner to see the estimated file size while making changes.
Reduce File Size Without Losing Quality In Premiere Pro
To bet the perfect balance between file size and quality in Premiere Pro here's an awesome method to use. We're going to focus on Target Bitrates.
- First download VLC media player.
- Next, open one of your most demanding clips in VLC.
- While it is playing click Tools > Media Information > Statistics, then pay attention to the peak the Bitrate reaches.
- Now that you know your target bitrate you can jump back over to Premiere Pro and use it as your base Bitrate.
- Use the same settings as shown above but this time set the bitrate to just above the maximum bitrate that you saw when you viewed the footage in VLC.
The setting you use for this will vary a little bit so try to pick the most intense part of your footage to base it off for the best results. Don't just pick a calm quiet moment without much movement or you will run the risk of distortion in your final product.
What are the Best Export Settings to use in Premiere Pro Max Quality but Tiny File Sizes?
This is probably the most common question people come searching for when looking for Premiere Pro content and one of the most simple to answer though there are a few variables to contend with. Video file size vs video quality. Generally, this ultimately comes down to the video codec that you are going to use with H.265 being the most versatile at the moment, while its compression isn't immaculate it is able to compress editing content to acceptable levels for platforms like YouTube etc. Once uploaded to YouTube it usually processes quite fast as well. Though you may have some issues using H.265 on TikTok and Instagram.
Aspect ratios and resolutions also play a part in file size and quality but with the settings and information shown above picking the right encoder and avoiding the presets will get you some great results. You use the same settings in any editing software as well. so if you use Davinci Resolve feel free to emulate there.