If you are using Google Chrome and are getting The DNS_PROBE_FINISHED_BAD_CONFIG error that prevents websites from loading. There's a solid chance you have some Internet and network issues that need to be fixed. Thankfully, there are quite a few quick and easy steps you can take to solve this issue. There's a good chance that you're probably familiar with some of them as well.

Takeaways:
- Learn how to fix Chrome Error: DNS_PROBE_FINISHED_BAD_CONFIG
- Chrome error Error: DNS_PROBE_FINISHED_BAD_CONFIG Solution for Windows 11
Table of Contents
How to Fix the Chrome Error: DNS_PROBE_FINISHED_BAD_CONFIG on Windows 11
Before you even consider doing anything else in this guide, make sure you have done the following things first. There's a 99% chance they will solve the problem.
-
Turn off your computer
-
Unplug your router from power
-
Wait 30 seconds
-
Plug it back in and wait for it to reconnect
-
Restart your computer and try using Chrome
Flush the DNS Cache, Reset TCP/IP and Winsock
These commands clear and reset DNS and networking configurations.
-
Open the Start menu and type cmd
-
Right-click Command Prompt and select Run as administrator
Enter the following commands one by one, pressing Enter after each:
ipconfig /flushdns
ipconfig /registerdns
ipconfig /release
ipconfig /renew
netsh winsock reset
-
Close the Command Prompt
-
Restart Chrome and check if the issue is resolved
Change DNS Server to Google DNS
Switching to a public DNS like Google’s can help bypass provider-specific issues.
Windows 11:
-
Right-click Start and select Network connections
-
Select your connection and click Properties
-
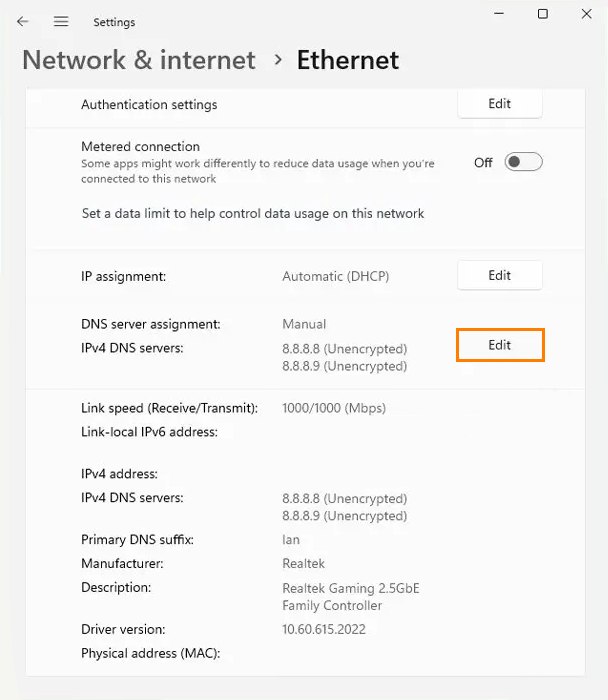
Under DNS server assignment, click Edit
-
Enter the following:
Preferred DNS: 8.8.8.8
Alternate DNS: 8.8.4.4
-
Click Save
Windows 10:
-
Right-click Start, then go to Settings > Network & Internet
-
Click Change adapter options
-
Right-click your connection and choose Properties
-
Select Internet Protocol Version 4 (TCP/IPv4) and click Properties
-
Choose Use the following DNS server addresses and input:
Preferred DNS: 8.8.8.8
Alternate DNS: 8.8.4.4
-
Click OK
Temporarily Disable Antivirus and Firewall
Security software may block DNS traffic.
-
Open your antivirus software and disable it
-
Go to Control Panel > System and Security > Windows Defender Firewall
-
Click Turn Windows Defender Firewall on or off
-
Select Turn off Windows Defender Firewall for both private and public networks
-
Retry accessing a website in Chrome
Update Network Drivers
Outdated drivers can cause DNS resolution problems.
-
Right-click Start and open Device Manager
-
Expand Network adapters
-
Right-click your adapter and choose Update driver
-
Select Search automatically for drivers
-
Follow the prompts and restart your computer if needed
Reset Chrome Settings
Misconfigured browser settings can also cause DNS issues.
-
Open Chrome and go to Settings
-
Click Reset settings on the left sidebar
-
Select Restore settings to their original defaults
-
Confirm by clicking Reset settings