Table of Contents
If you use USB drives or SD cards on Windows long enough, you are bound to come across two rather common errors. 'Unable to access' errors and 'unable to format' errors. You can reduce your chances of receiving this error to almost 0 by using the ‘Safely Remove Device’ option, however, if it's too late for that, this guide will show you how to fix both of these errors.
Why You Should Always Use the 'Safely Remove Device' Option on Windows.
When trying to access USB Drives and SD Cards on Windows, you may occasionally come across ‘Please insert a disk into USB drive’ or ‘Windows was unable to complete the format’ errors. Most of the time, these errors are caused by corrupted data or removing your device without safely ejecting it. The good news is that your drive probably isn’t physically damaged and just needs a little love and attention, a fresh start in life. Unfortunately, to fix these errors, any data on the device will be erased during repair.
Repair USB Drives and SD Cards That Won’t Format on Windows.
We’ve already mentioned it above but you need to be aware that the following process will erase all the data on the USB drive or SD card. It's also important to make sure that you have selected the correct drive. Double check, then triple check, you don’t want to wipe you main drive by accident.
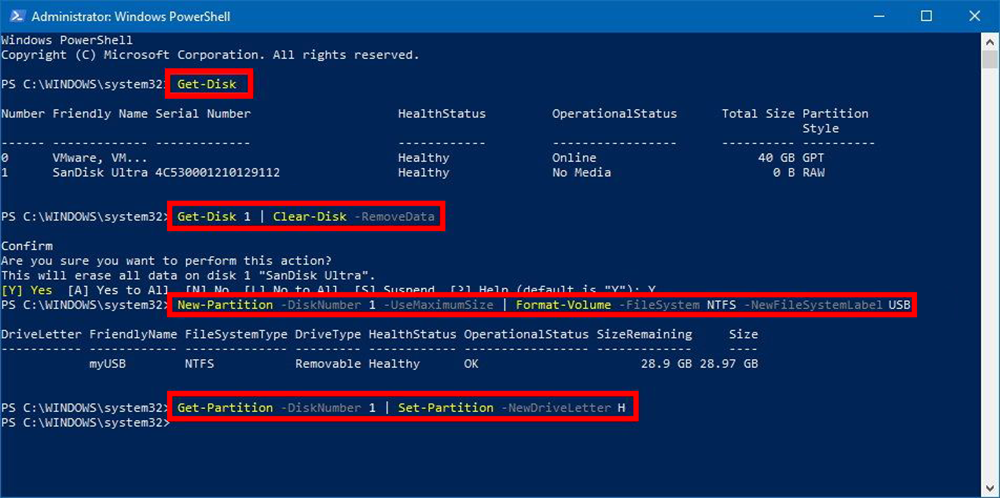
To begin, open the start menu and search PowerShell. When it appears on this list, right-click on it and select Run as administrator. In the open PowerShell window type the following command which will identify the removable drive you want to fix.
Get-Disk
Next type the following command to erase the drive completely.
Get-Disk 1 | Clear-Disk -RemoveData
Note: Make sure you change 1 to the disk number of the drive you are repairing. This is super important because if you enter the wrong number you will wipe the contents of the wrong drive.
Now type Y and press Enter to confirm you want the selected drive to be erased. Once the drive has been erased, you can create a new partition using NTFS and assign a new name for the USB drive or SD card. To do this type the following command into the PowerShell tool.
New-Partition -DiskNumber 1 -UseMaximumSize | Format-Volume -FileSystem NTFS -NewFileSystemLabel USB
Note: Make sure you change 1 with the disk number of the drive you erased earlier and change USB to the name you want your drive called.
The next Step is to assign the drive a letter, so enter the following command.
Get-Partition -DiskNumber 1 | Set-Partition -NewDriveLetter H
Note: Make sure you change 1 with the disk number of the drive you erased earlier and change H to the letter you want your drive to be allocated.
As soon as you have allocated your drive a letter, you can close the PowerShell tool and open Windows File Explorer to access the repaired drive.