Table of Contents
If you sometimes boot up your Windows PC only to spend an eternity trying to find what you are looking for amongst endless icons, it might be time for a cleanse. Here are a couple of great programs to give you a clean tidy Mac-like experience and organize some of that clutter.
How to Shutdown Your Windows 10 PC Using a Slider.
There are quite a lot of programs on the internet that you can use to customise your desktop giving it a much more simplistic, tidy and user-friendly look. In this short article, we will be looking at “Icon Docks” Docks are tiny programs that use a visually appealing interface to store and launch your programs from. They are also very customizable. Below are two of the better options available for free.
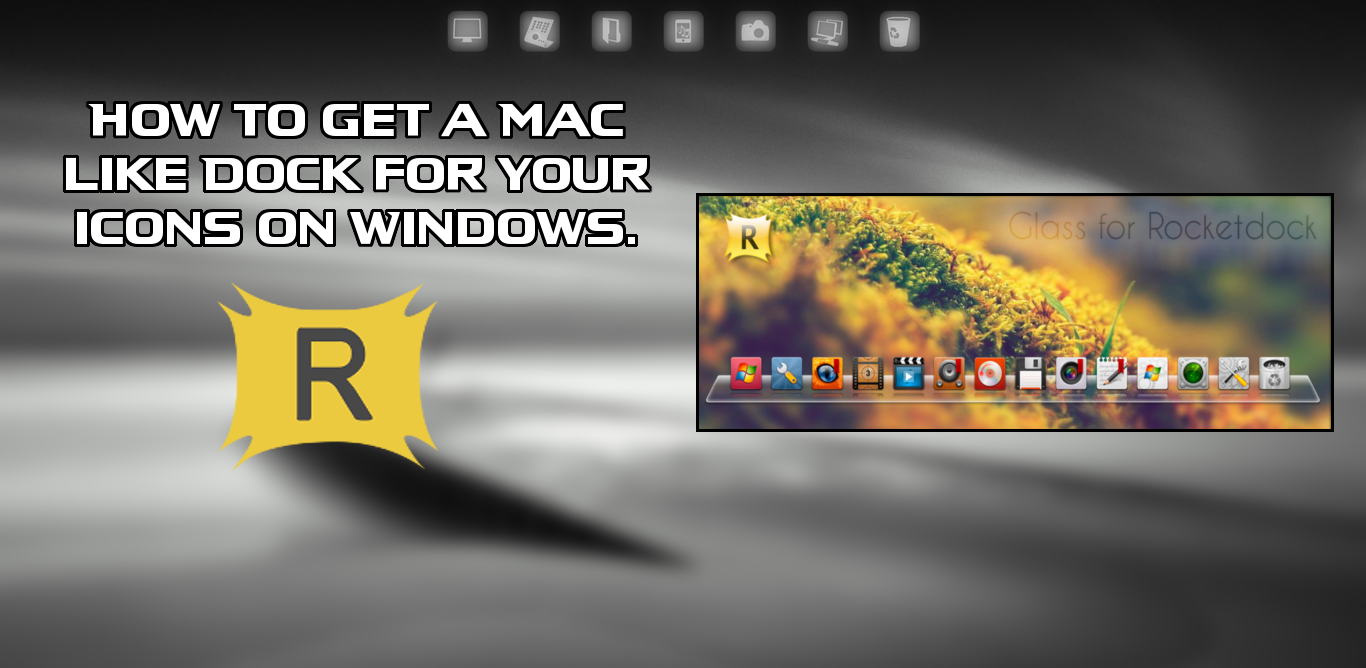
Option 1: RocketDock.
RocketDock is an App/Program launcher or icon dock, for Windows that can be set up and displayed on any side of your desktop screen, top, bottom, left or right. Its design is based on the Mac OS X launcher. It stores your desktop icons and shortcuts that you use to launch programs and open files. Apart from this RocketDock is also very customisable, which you will see a little later on.
Option 2: ObjectDock.
ObjectDock is another option for Windows which is basically the same as RocketDock. It Does all the same things as RocketDock and allows you to add widgets, like weather, temperature, clocks and battery status.
There is also a paid version available, if you really want some extra features, personally though I think everything the free option does is plenty.
![]()
Finding, Using and Installing RocketDock.
For the purpose of this article, we will be using RocketDock to show you how it works and what it looks like. If you wish to use an alternative dock, ObjectDock or another the process will be very similar.
Getting started. First, you will have to download RocketDock, which is very easy to find, you can search "RocketDock" via Google, it is always the first result to display. If you are having trouble with a Google search you can also download it here: https://rocketdock.com/download
Once you have RocketDock downloaded the installation process is quick and easy, it also won’t try to install any sneaky programs in the background like some other programs often try to get away with.
Note: RocketDock is only available in 13 Languages, below is a screenshot of the ones available to save listing them individually.

When you have completed the installation of RocketDock, you will have to open it manually, as it does not auto-launch the first time around. Once you have launched RocketDock it will be displayed at the top of your screen in the always on top position. On first installing, it looks quite ugly but with a few icons and some fine tuning you can make it look quite attractive.
The first thing you will want to do is turn off “Always on top” this can be done by accessing the dock settings with a right-click anywhere on RocketDock and selecting “Dock Settings” from the menu. Once you have the menu up click on the position tab and set layering to “normal” While you are also in the position tab you can choose the location of the Dock on your screen either top, bottom, left, or right. Rocket dock also has support for multiple monitors so if you are using 2, 3 or more you can choose which monitor to place it on. You can also adjust the centering and edge offset so it sits just perfectly on your screen.

Keeping the menu tab open you will also want to go back up to the "General Settings" tab and tick the box to "run at startup". The rest of the customisation and settings are completely up to you, feel free to experiment.
Changing Icons on RocketDock.
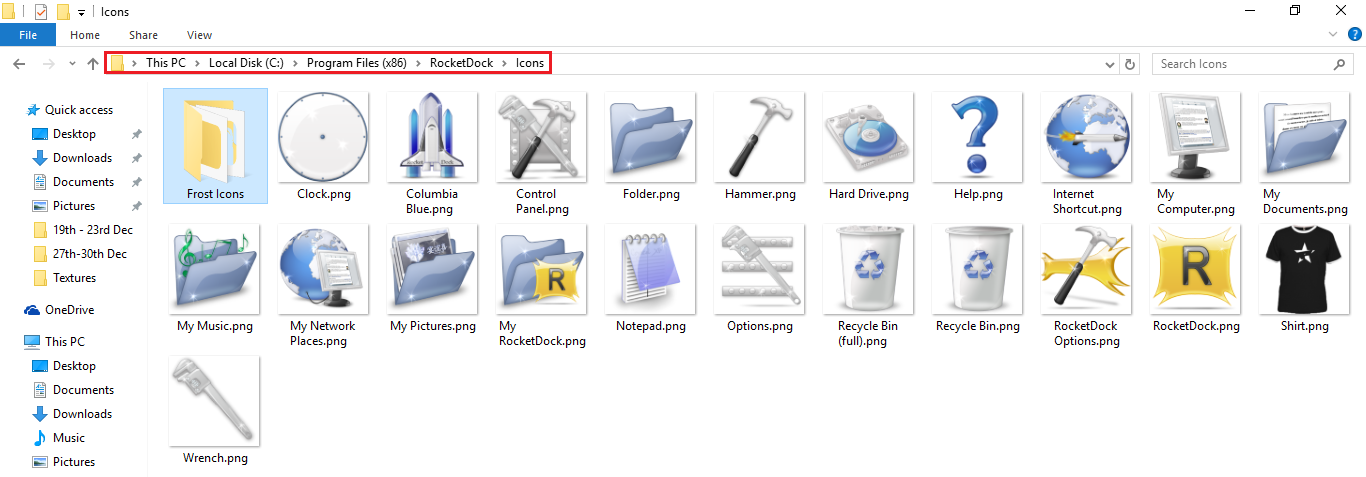
To change the look of icons in RocketDock you will first have to download some. If you don’t already have a stash you can find a good selection from the RocketDock website Icon page, located here: RocketDock Icons or just search for anything you like using Google.
Once you have downloaded your Icons you will have to place them into the RocketDock icon folder which is located here: C:\Program Files (x86)\RocketDock\Icons.
With your new icons placed into the icon folder, you can now begin to change them. Simply right-click on the icon in RocketDock and choose "Icon Settings". Now from the left-hand menu, you can select the icons folder if you placed an entire folder into the directory. Or if you just placed an individual icon into the directory it will be in the main window to select.
![]()
Adding Icons to RocketDock
Adding icons to the Dock is also quite easy, the best method is to just drag a shortcut from your desktop into the dock then customise the icon how you wish. You also have the option to create an icon directly from RocketDock by right-clicking on the dock going down to "Add" and selecting "Blank Icon". If you choose this method you will have to set the path of the file you wish RocketDock to open.
That pretty much sums up how to use RocketDock, one last thing you can do to hide the non-removable icon from your windows desktop is to right-click on your desktop go to view and select hide desktop icons. If you do get stuck with anything feel free to ask at the bottom in the comments section. If you decided to choose ObjectDock the process is going to be very similar.