Steam OS is Valve’s Linux-based operating system designed primarily for gaming on Steam Deck, but as of recently, it can now be installed on a standard PC to create your own console-like gaming system. There are a few limitations and things you need to know before you even consider doing this. All of which this guide will walk you through, including how to avoid a common EFI error that seems to pop up for a lot of people during Steam OS installation.

Takeaways:
- How do you install Steam OS on a PC
- Can you install Steam OS on a computer?
- Is Steam OS worth installing on a PC instead of Windows?
Table of Contents
Steam OS on PC Important Note
The official Steam OS recovery image provided by Valve is currently built specifically for AMD-based systems. If your PC has an Intel CPU or an unsupported GPU, the installer may not function correctly or may fail to boot entirely. You can check Valve’s documentation or explore community builds if you are using non-AMD hardware. But I would honestly avoid it unless you have an AMD system. There's also going to be a fair few other limitations that are going to pop up as well, so I would only do this if you are planning to have a dual-boot situation with Windows as your second boot drive and daily use OS.
Steam OS is still somewhat limited in desktop capabilities due to its focus on Flatpak packages and gaming. If you're looking for broader compatibility, especially with Nvidia or Intel graphics, you may want to explore custom distributions like Bazzite or Nobara, which are more flexible and come with wider driver support.
Common Installation Error: EFI Waiting for a Response
The problem
When attempting to install Steam OS on an AMD-based PC, you may encounter the following error during boot:
EFI: Waiting for a response
The solution
This issue is typically caused by Secure Boot being enabled in the BIOS. Here is how to resolve it:
-
Enter your system’s BIOS (commonly by pressing the Delete or F2 key during startup)
-
Locate and disable the Secure Boot setting
-
Proceed with the installation of Steam OS
-
After installation, you can optionally re-enable Secure Boot if needed
How to Install Steam OS on a PC (Step-by-Step Guide)
-
Go to the official Steam OS website at steampowered.com/steamos
-
Navigate to the Steam OS FAQ section
-
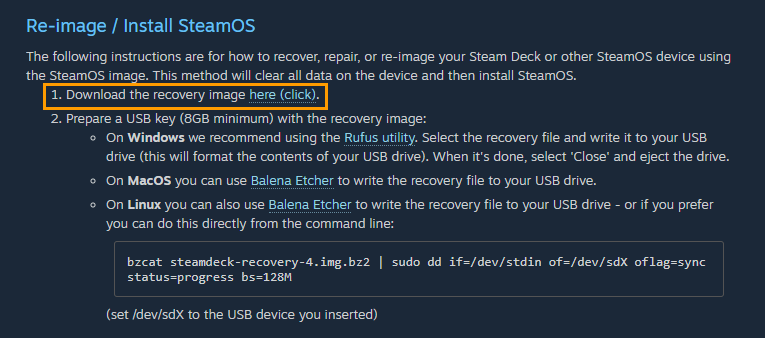
Click the link for the Steam OS Recovery Image
-
Accept the agreement and download the file
-
Save the downloaded image to a known location on your system
Alternatively, you can go straight to the location here, then click the Download the recovery image option.

Create a Bootable USB Drive
Now that you have the Steam OS files, you'll need to create a bootable USB drive to install it. For Windows users, use the Rufus tool.
-
Open Rufus
-
Select your USB drive
-
Choose the Steam OS image file
-
Start the flashing process
For macOS and Linux users, use the tool balenaEtcher
-
Launch Etcher
-
Select the Steam OS image
-
Select your USB drive
-
Click Flash to begin
Boot into the Steam OS Installer
-
Insert the bootable USB drive into your target PC
-
Turn on the computer and enter the BIOS boot menu (usually by pressing Delete, F12, or Esc)
-
Select the USB drive under UEFI boot options
-
Wait for the Steam OS installer to load. This may take a few minutes
Install Steam OS
Once the desktop interface loads
-
Select the option to Reimage Steam Deck (this applies to PCs as well)
IMPORTANT: Steam OS will overwrite the entire disk. It does not allow you to choose which drive to use. If there are multiple drives connected to your system, disconnect any drive that you do not want erased
-
Confirm installation and allow the system to complete the process and reboot
Complete Initial Setup
After rebooting
-
Select your language
-
Choose your time zone
-
Connect to a network using either Wi-Fi or Ethernet
-
Allow the system to update and reboot again when prompted
-
Log in to your Steam account
Controller and Interface Setup
Steam OS is designed for controller navigation. You may plug in a supported controller, such as an Xbox or PlayStation controller. Steam will guide you through button layout and control mapping
-
Steam button corresponds to the Xbox or Home button
-
Quick Access is often mapped to a combination of buttons, depending on the controller
Final Setup and Game Installation
-
Check for additional system updates from the main menu
-
Download games from your Steam Library
-
You can view games that are verified or playable on Steam OS from the Compatibility section.
Running Games Not from Steam
Steam OS allows more than just Steam-native games. You can install launchers like Heroic Games Launcher and Lutris to run games from platforms such as Epic Games, GOG, Amazon Games, Ubisoft, EA, and others. Since most people are going to want to do this, the steps for each are shown below.
Switch to Desktop Mode
-
Open the Steam menu
-
Select Power
-
Choose Switch to Desktop
This will take you to the KDE Plasma desktop environment.
Install Heroic and Lutris
-
Open the Discover software centre
-
Search for and install Lutris: Lutris allows you to run games from various third-party platforms
-
Then, search for and install Heroic Games Launcher: Heroic supports Epic Games, GOG, and Amazon Games
Set Up Heroic Games Launcher
-
Launch Heroic
-
Log in using your Epic Games or other account
-
Open the Wine Manager and install the latest version of Proton GE
-
Once the game is downloaded, open your Library in Heroic
-
Click the three-dot menu in the top right
-
Select Add to Steam
-
Switch back to Game Mode
-
In the Steam library, go to Non-Steam and you’ll find the game ready to launch
Running through Steam gives you access to overlays, controller support, and the Gamecope compositor for smoother integration.
Set Up Games with Lutris
-
Launch Lutris
-
Wait for the initial setup to complete
-
Go to Runners, then find and install Wine-GE Proton from the Wine version manager
-
Once Wine is installed, add a new game by clicking + Add Game
-
After configuring your game, right-click on it and choose Create Steam Shortcut
-
Return to Game Mode
-
Under Non-Steam in your library, you should now see the game listed
