Table of Contents
If you are looking for some new ways to improve Windows 10 system performance but don’t really want to go making a ton of crazy, risky changes. This article will show you how to configure Search Indexer settings so that your operating system will stop trying to index content at certain times. For instance, if you are playing a game, working in a resource-intensive app or if you are running low on battery.
Related: How to force all programs and apps on Windows 10 to open maximized.
Over the last few years, Microsoft has spent a lot of time and money fixing major problems with Windows 10 system resource usage. Cortana has been scaled back, search has been optimised, and countless background processes have been curtailed to use less system hardware. Game mode was also introduced and upgraded, allowing for a far better Windows gaming experience than ever before. Although a lot of progress has been made across the operating system, there are still plenty of opportunities for Microsoft to improve things further.
One such feature that a lot of people who are using Windows 10 probably miss is a tiny option deep within the settings app called Indexer Performance. This tiny little feature is what Windows 10 uses to further manage search indexing. By default, it is disabled giving the search index tool free rein over what and when content is organised for search. Which means it generally runs at full speed whenever it needs to. Thankfully it can be adjusted to run at more optimal times.
Once enabled the indexer will stop searching and updating its database with new information in the background. It will also throttle its processes at certain times. For example, when the device is in power saving mode, low power mode, gaming mode or when processor usage goes above 80 percent or disk usage goes up above 70 percent.
Quick steps to enable Indexer Performance mode:
- Open Settings.
- Go to Search.
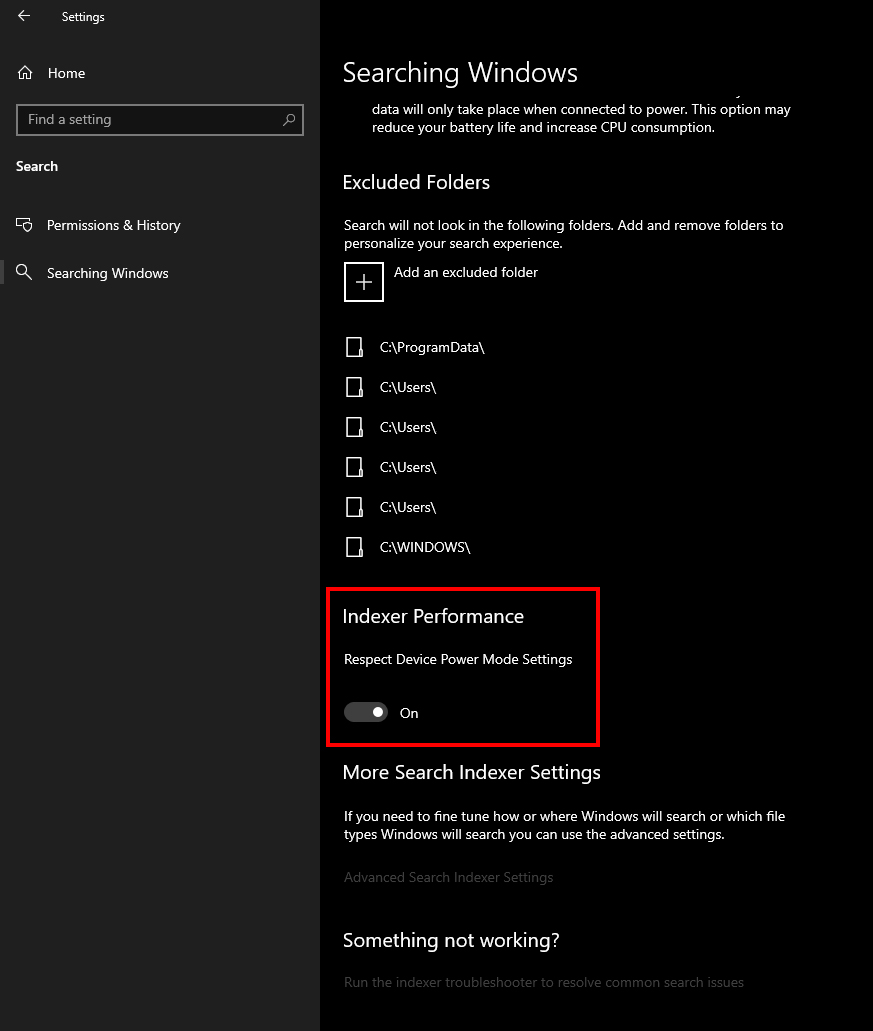
- Change to the Searching Windows tab.
- Enable Indexer Performance.
How do you reduce the amount of system resources wasted by search indexing on Windows 10?
- To begin, the first thing you need to do is open the Settings app on Windows 10, then click Search.
- Once you are on the Search page, change to the Searching Windows tab in the left-hand pane.
- Next, scroll down and make sure the toggle below Indexer Performance is enabled.
The change will take effect instantly, however, probably won’t be all that noticeable to the naked eye. If your PC is a little dated though, you may notice some performance gains. If you aren’t someone who is constantly adding new content to locations and always using Search, you won’t negatively be affected by this change. If you do notice that search is taking longer, you can return to the same location at any time to flip the toggle off again.
Another quick and easy way you can improve overall system performance is to switch your third-party antivirus program (Avast, Avg, Norton) for Windows Defender. Defender is far more resource-friendly and bloatware-free than every single other protection tool on the market. It’s also preinstalled on Windows 10 and constantly updated.