Table of Contents
If you have an older model NVIDIA graphics card from the GTX series, this article will show you how to quickly and easily take advantage of NVIDIA’s brand new software and driver update that grants RTX Voice capabilities to GTX model cards. A feature that adds background noise suppression and other sound managing tools to a range of different programs and applications.
Related: How to fix C++ Runtime error in NVIDIA GeForce Experience.
With graphics card shortages reaching new levels of unavailability, NVIDIA has quietly been rolling out features that were once exclusive to RTX cards to GTX models. Although not all of these features are going to be beneficial on older model cards, there may be some useful scenarios where you can make use of certain features.
For example, the NVIDIA RTX Voice software plugin that uses AI to remove background noise from all microphone inputs is now freely available for all GTX model cards. Although RTX Voice does a superb job of removing background noise, it’s quite a huge memory (ram) hog. I recently installed it with the intention to use it for my gaming streams in OBS and SLOBS, however when I noticed it was using over 700Mb in system ram I decided its only real useful purpose is for basic tasks like ZOOM, Skype, Teams, etc.
The current list of programs and apps that support NVIDIA RTX Voice.
OBS Studio
Streamlabs
XSplit Broadcaster
XSplit Gamecaster
Twitch Studio
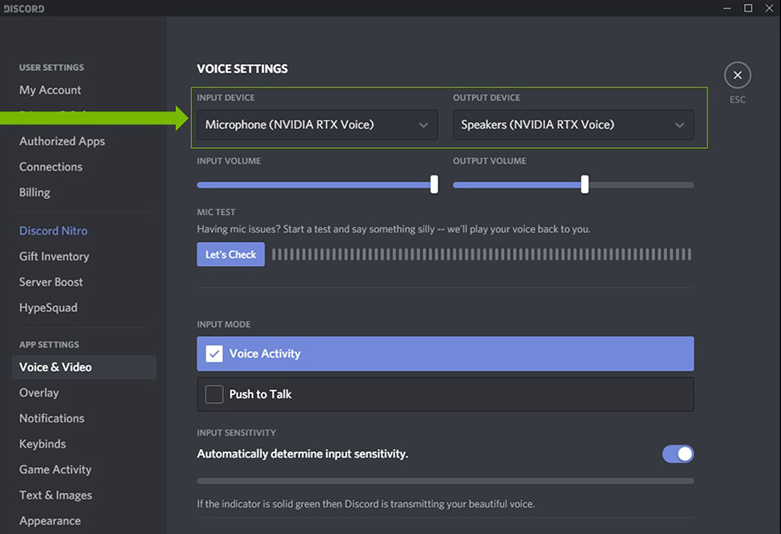
Discord
Google Chrome
Battle.net Chat
WebEx
Skype
Zoom
Slack
Teams
Steam Chat
How do you use NVIDIA RTX voice with older GTX model cards?
To begin, you’ll need to make sure you are using Driver 410.18 or newer and have the most recent version of Windows 10 installed on your computer. Once you have met these requirements you’ll need to do the following.
- First, download RTX Voice for GTX model cards, then install it on your computer as you would any other program.
- Once you have RTX Voice installed on your PC, you’ll need to configure it to work with your chosen input device. To do this open RTX Voice and select your input device from the list. If you have more than one that you switch between, you’ll need to do this each and every time you change devices.
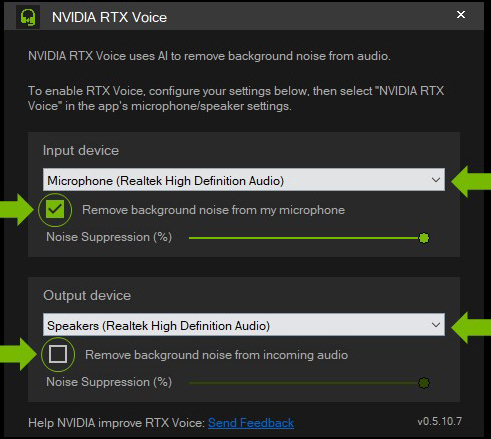
- Now that you have RTX Voice managing your input devices, you can enable it within each app or program as you choose. To do this simply open the software you wish to use, then go to Settings and find the location of input and output and select NVIDIA RTX Voice.
Note: If the program or app has built-in noise reduction disable it or you’ll end up with low volume sound.
You can follow the same process for any of the software listed above, and a shortlist of software that isn’t officially supported. I’ve found that most software seems to detect RTX Voice as a special device so it is quite versatile. However, as I mentioned at the very start 700MB of system memory or quite a big chunk of system resources to dedicate to noise removal. Personally, I find that sticking with noise removal services within each different software seems to do just as good of a job without the resource hit.