A few years back Microsoft announced that it was removing Paint from Windows moving forward, only to be greeted with huge backlash from the community who absolutely love the nostalgic art tool. Fast forward to early 2024 and Microsoft has finally embraced paint and started adding tons of new features including Generative AI tools and finally, after a long time coming, Layers! So if you're kinda new to layers, especially in Paint this guide will walk you through the process.

Takeaways:
- How to update MS Paint to get access to the new Layers feature.
- Using layers in Microsoft Paint. One of the most important features to come to Paint in a decade or more.
Table of Contents
Make Sure Microsoft Paint is up to Date.
To start using the latest features in Paint, you'll need to make sure Windows 11 and MS Paint are up to date
- First, make sure you're using Windows 11. Paint's new features are not available on Windows 10 and won't be added in the future. To update Windows 11 go to Settings > Windows Update and click "Check for updates."
- Once you've updated Windows, make sure you have the latest version of Paint.
- Open the Microsoft Store app, click the Library icon in the bottom left-hand corner., then select "Get updates." If any updates are available, they will be downloaded and installed.
How to Use Layers in Microsoft Paint - Use layers in the MS Paint App.
- To start working with layers, click the Layers button.
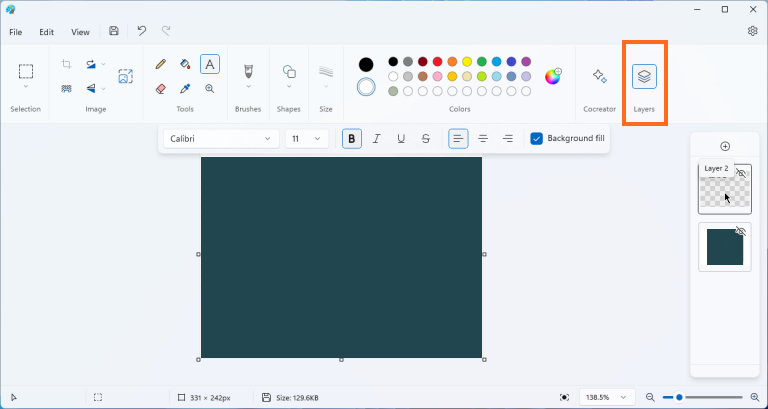
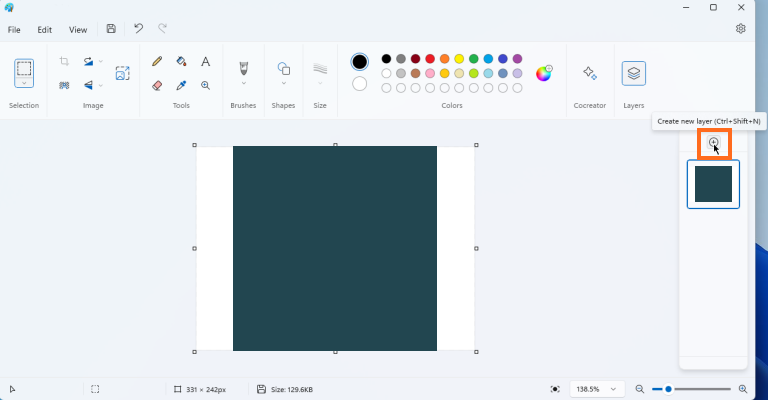
- Then click the Create New Layer button (the plus icon) on the sidebar. This action will create a new layer for you to add content. For example, you might want to add text in the new layer, making it easier to work with the text separately from the image in the initial layer. This is really handy when you need to delete certain parts of an image as you won't have to deal with as many other aspects.
- To work with the new layer more efficiently, you can hide the original layer by clicking the first layer's thumbnail and then clicking the Hide layer icon (the eye). This will hide the content in the original layer, allowing you to focus on the new layer.
- To change the content in a specific layer, select its thumbnail and proceed with the desired changes. You can also hide other layers if needed. If you find that you no longer require a particular layer or its content, right-click on its thumbnail and select Delete Layer.
- To duplicate the elements in a layer to a new layer, right-click on it and select Duplicate Layer. If you make a mistake while working with layers, you can undo any changes by clicking the Undo icon on the menu bar or pressing Ctrl-Z to undo each of your last actions.
- To change the order of a layer among the thumbnails, right-click on it and select Move Up or Move Down. You can also merge a layer with the one directly below it by right-clicking the thumbnail and selecting Merge Down.
Keep in mind that once layers are merged, you won't be able to work with their elements separately anymore. So don't do any merging until you've made all the necessary adjustments. Layers can then be merged until there's just one left. Good practice while using layers is to only Merge or Flatten everything when your project is completed. It's basically the same process for all editing software.
Important: Layers aren't preserved when you save the image. Make sure no further changes are needed before saving the image.