If you have recently updated Windows 10 to the latest version but don’t like the new Email notification sound, or didn’t like the original one. This article will show you how to change the email notification sound for a custom one of your choosing or remove the email notification sound entirely. The choice is yours!
.jpg?fm=webp&s=6be98d585217b62414a669a99b9b9dba)
Table of Contents
Related: How to View Windows Defender Protection History on Windows 10.
Notifications and notification sounds are quite handy to have enabled on most devices, but they can become quite annoying if you get too many or just don’t like the default sound. Just like on all other devices Windows 10 allows you to change the sound of notifications, including the default sound of incoming emails.
Unlike most other devices though, the process for changing sounds on Windows 10 is a little more complicated than you’d expect. It’s also a process on the operating system that hasn’t really changed much over the last decade. No doubt the entire system is due for an overhaul with the phasing out of the Control Panel (sad face) But for now, the process remains in its vintage stage. So let’s get started!
Quick steps for changing or removing the email notification sound on Windows:
- Open the Start menu and search Change system sounds.
- In the new window that opens change to the Sounds tab.
- Find New mail notification in the list under Program Events.
- Now use the drop-down box under Sounds to select a new sound.
- If you want to remove a sound, set it to None.
Note: You can customise any Windows sound using this tab so feel free to go crazy.
How do you change the new sound that Windows uses for Email Notifications? Remove email notification sound on Windows.
If you aren’t happy with the current email notification sound on Windows 10 or just want to get rid of the sound entirely, you’ll need to follow the steps shown below. It should be noted that you can use the steps in this guide to change any Windows system sounds so keep that in mind.
If you want to use a custom sound you have sourced from another location, you’ll need to make sure it is in the following location C:\Windows\Media and be in WAV format. Seeing as you will struggle to find decent WAV format files, just get an MP3 format file and convert it to WAV using https://convertio.co/.
- To begin, open the start menu on your computer and search Change system Sounds. When the option appears on the list open it.
- In the new window that appears change to the Sounds tab, then use the list under the Program Events heading to search for and find New mail notifications.
- When you have selected New mail notifications, use the drop-down box under Sounds to select a new sound to use. If you want to add your own custom sound, click the Browse icon and select an item from the list. You should have added the file to C:\Windows\Media first though but it isn't compulsory. Remember the file format you use has to be WAV as well.
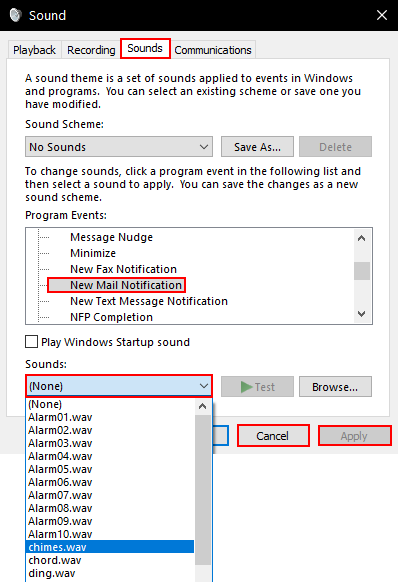
Once you have finished making adjustments to all your sound and notifications, make sure you click Apply and Ok at the bottom of the screen to save your changes. Otherwise, you’ll be going back through the list again trying to remember what you changed.