If you are using Windows 11 it is now possible to configure how certain files, apps, etc download on your device. This means that you can save music, documents, files, and apps to different folders automatically. The feature still needs a little tweaking but so far it seems to be working quite well and is worth using.

Table of Contents
Related: How to fix Windows Terminal not working. Cannot find wt.exe.
Although Windows 11 was released with next to no new features and a few basic design changes. The last six months have seen some nice improvements added to the operating, which aim to add basic quality of life functionality to the operating system. One such addition is the ability to configure where certain files, files, maps, and apps are saved by default. This is fantastic if you want to use a different drive or if your computer has limited space on the main storage.
At this stage, the feature is still a little basic as it doesn’t offer the fine-tuning for save paths that you’d expect. For example, you can configure it to save music content to C:\Users\Jasch\Music or video content to C:\Users\Jasch\Videos etc. It will only allow you to change the primary drive that content is saved to, D: drive or E: drive for example. Which is fine if you are really pressed for space. Hopefully in future updates, this will be expanded upon, though it may stake some time.
How do you change the default save locations on Windows 11?
In order to change the default location that certain content saves to on Windows 11, you’ll need to do the following. First make sure that you have the latest version of Windows 11 installed on your computer, then do the following.
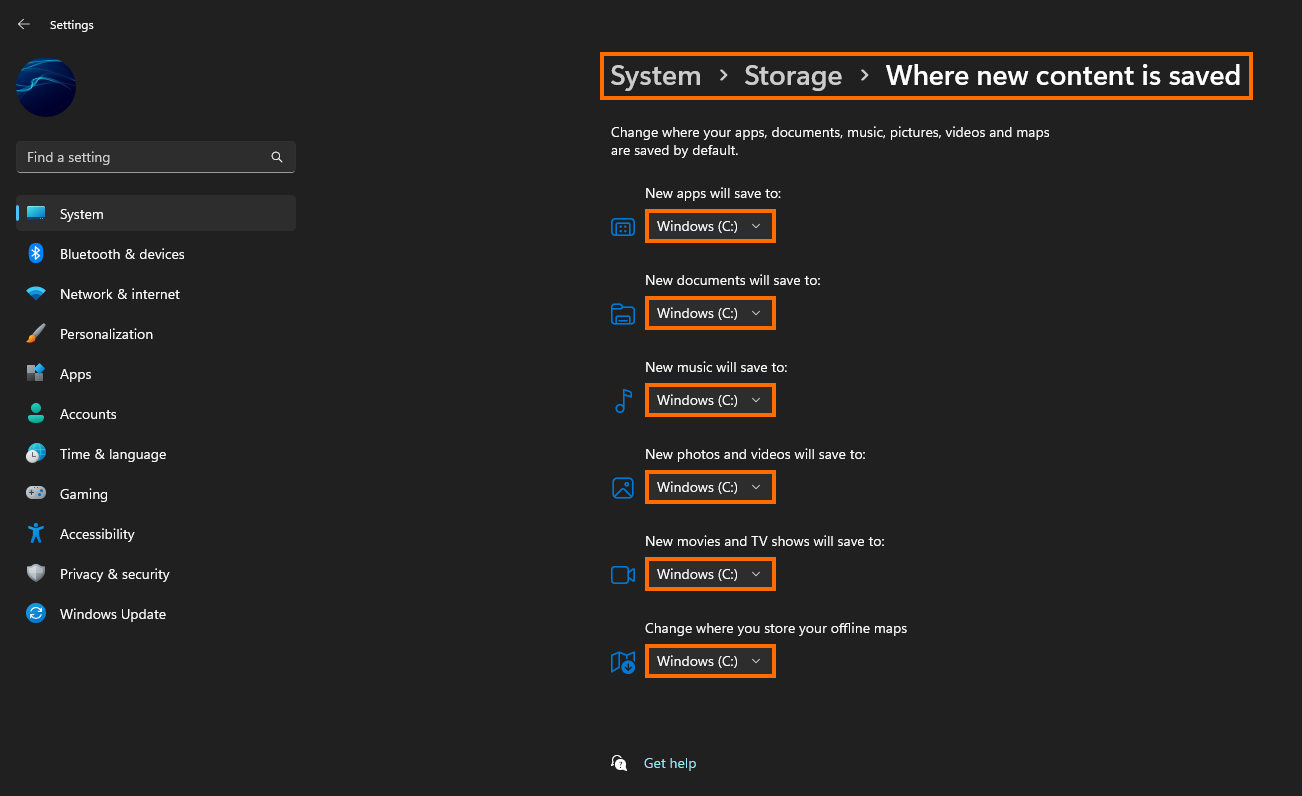
- To begin, press the Windows Key + I keyboard shortcut to open Settings.
- Next, stay on the System tab in the left-hand pane, then click Storage in the central pane.
- Now scroll down and click Advanced storage settings and click Where new content is saved.
- Here you will see a list of all the different file types, etc that you can save to different locations. By default they will all be set to Windows C:
- Now all you have to do is use the drop-down menu to select a new location to save that particular type of content. However, it is currently limited to the core location of the drive. So C: D: E: etc. This doesn’t exactly give you all that much sway over things but it is handy if you don’t have much space left on C: to save your data.
Once you have made the change it will take effect instantly and can be changed as often as you like. If you are configuring this with an external/removable drive, just be aware that Windows will automatically default back to C: if you remove the drive and continue to download content to any of those locations. As we mentioned above, we expect this feature to be expanded upon later on down the track, which would make it far more useful.
More Windows 11 guides?
If you are just starting out with Windows 11, make sure you check out our full list of Windows 11 guides linked below or check out our YouTube channel for even more Windows 11 related content. All our WIndows 11 guides in one place.