If you are using Windows 11 and are having some problems with programs and/or apps that use Java you may have a Java version conflict on your hands. While these are relatively easy to fix you’ll first need to investigate what version of Java you currently have installed. This will allow troubleshoot the issue and get your Java-based software working again.

Table of Contents
Related: How to add Task Manager back to the Taskbar Context Menu on Windows 11.
Most people have heard of Java at some stage, though they probably don’t know a single thing about it. In short, Java is a programming language used to create software and apps across multiple platforms and operating systems such as Windows 11. Applications that are written in Java and installed on Windows 11 will need Java Runtime Environment (JRE) installed on your computer.
As with all software, JRE has several different versions, which means everything needs to match accordingly. For example, if you install an app that has been created with the latest version of Java but the Java environment that you have on your computer is much older, the app may not work or be limited in function. More often than not they will fail to install or open.
The good news is that Windows 11 allows you to check the version of Java that you have installed on your computer allowing you to check if you need to update Java Runtime Environment (JRE) and uninstall it if you find conflict issues. So how do you check? It’s easy.
What version of Java do I have installed on Windows 11?
In order to find out what version of Java you have installed on your computer, you will need to do the following.
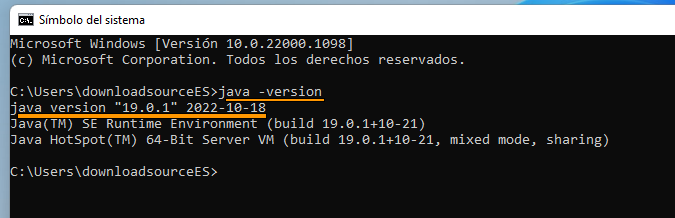
- First, open Command Prompt on Windows 11 by searching CMD from the Start menu.
- When Command Prompt is open copy and paste the following command into the window and press Enter.
Java -version
- After you enter the command you will see all the information about your Java version.
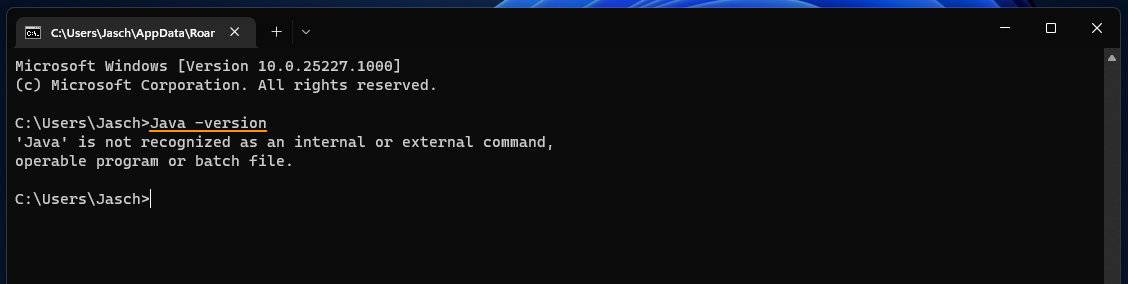
- However, if you don’t have Java installed at all, you will see the following message.
"Java is not recognized as an internal or external command, program or executable batch file"
How do you install Java on Windows 11?
To install Java on Windows 11 you will need to visit the Official Java Website and download Java for Windows 11. Once you have the file on your computer just install it as you would any other program and everything is done.
How do you uninstall Java on Windows 11?
If you don’t want Java on your computer anymore you can uninstall it from Settings > Apps > Installed apps. Then just click the three dots next to Java and select Uninstall.
Alternatively, you can go to Control Panel > Programs and Features > Java. Then right-click on it and select Uninstall.
What happens if I still have conflicts with Java versions?
Now that you have updated Java on Windows 11 you may not be entirely problem free. You will also need to make sure that the software you are trying to use is also fully up to date. If it isn’t you are just moving the version conflict to the side rather than solving it. Sadly some older software won’t have updates so you won’t be able to update it. In situations like this, you may have to look for alternative software.