If you are using Windows 11 and don’t yet know how to make a System Restore Point. This article will show you how to quickly and easily create a System Restore Point and how to use a System Restore point you have created on Windows 11 to go back to a working system state.

Table of Contents
Related: How to fix Final Fantasy XIII-2 on Game Pass not updating or uninstalling.
It doesn’t matter what operating system you are using Windows, iOS, Linux, Android, Chrome, etc. It’s super important that you have a backup and if possible a recent system restore point. This will allow you to revert back to a working system state should something happen to your device or if you make a change you can’t manually undo.
For example, if you install a program or change something in the Registry on Windows 11 that prevents your computer from booting, having a system restore point will allow you to quickly and easily revert back to a state prior to that change. Although Windows 11 automatically creates system restore points from time to time they aren’t always going to be as up to date as possible, so it’s important to know how to create system restore points on Windows 11 manually. And how to use them.
How do you make a System Restore Point on Windows 11?
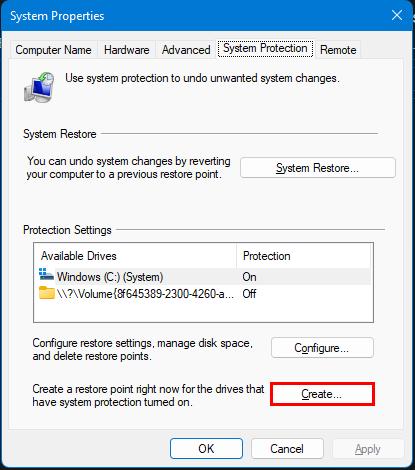
To create a System Restore Point on Windows 11, you’ll need to do the following:
- Open the Start menu and type Create a Restore Point, then select it when it appears.
- A small window will open with a few different options.
- Click Create near the bottom, then enter a name for your Restore point and follow the steps shown by Windows to finish the process. It will usually take less than a minute.
How do you use a System Restore Point on Windows 11?
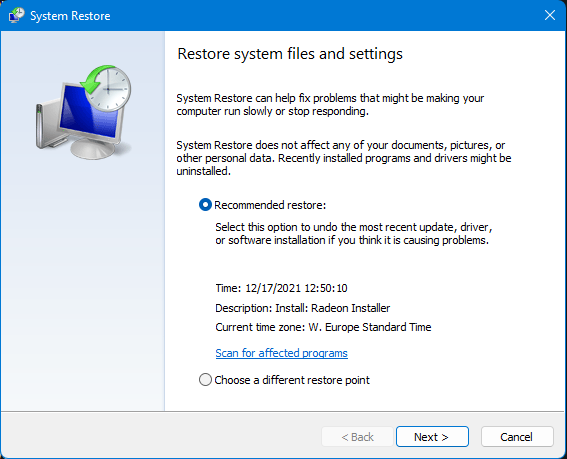
- If you need to use a System restore point at some stage search Create a Restore Point again, then click System restore near the top of the window.
- This will open a new window where you’ll have two different options.
- Recommended Restore.
- Choose a different Restore point.
- If you aren’t really concerned about the exact point you go back to the Recommended option is fine. However, if you want to go back to a specific date, or if the Recommended point doesn’t work you can choose the section option and manually choose a restore point date.
- Simply choose the option that works for you then follow the steps shown by Windows. Once the process starts it can take a few minutes or a few hours depending on how long you have been using your Windows installation.
How do you use a System Restore Point on Windows 11 if your computer won’t boot properly?
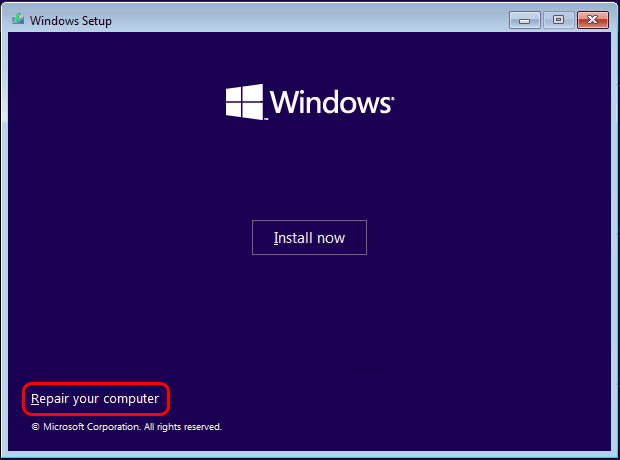
If you can’t boot into Windows 11 to run the System restore tool, you’ll need to do the following.
- First, create a bootable Windows 11 USB drive.
- Once you have this, set your computer to boot from a USB drive. (this will be different on most PCs so search for the method for your device)
- Now that your computer is booting from a USB device click the Repair this computer option and follow the steps shown.
You may have to do this a couple of times depending on your situation. Sometimes certain system restore points just don’t want to work. If you’re looking for More Windows 11 guides, check our library here.