If you are using Windows 11 and would like to change some of the options that are found on the quick menu in the Taskbar. The menu that appears when you click the network, sound or battery icon. This article will show you how to add or remove items from that list with a few simple steps.

Table of Contents
Related: How to prevent changes to the Start menu on Windows 11.
Windows 11 has a lot in common with Windows 10 and may not seem like a major update for people who really dig down deep into the operating system. But for casual and everyday users Windows 11 is quite a big upgrade from Windows 10, especially from an appearance and features perspective. A lot has changed cosmetically on Windows 11 especially the taskbar and system tray options.
Although some features have been removed from the Windows 11 Taskbar, including the quick connect VPN option (I’m not too happy about that one myself) Some interesting features have been added. For example, Quick Settings which can be found if you click the Network, Volume or Battery icon in the taskbar. This new menu brings up a small tab with all those options along with a brightness slider and a few other quick options.
Interestingly, the options on this menu can be customised which also thankfully includes a new VPN pin! There are quite a lot of other useful options that can be added or removed from this list as well, so what you use is entirely up to you. If you want you can add everything to the list, though that will probably make it a little crowded.
How do you change the options found on the Quick Settings menu on Windows 11? Customise Windows 11 Quick Settings Choices.
Changing the Windows 11 Quick Settings options is one of the quickest and easiest changes you can make to the operating system. Which is fitting because they are supposed to be quick!
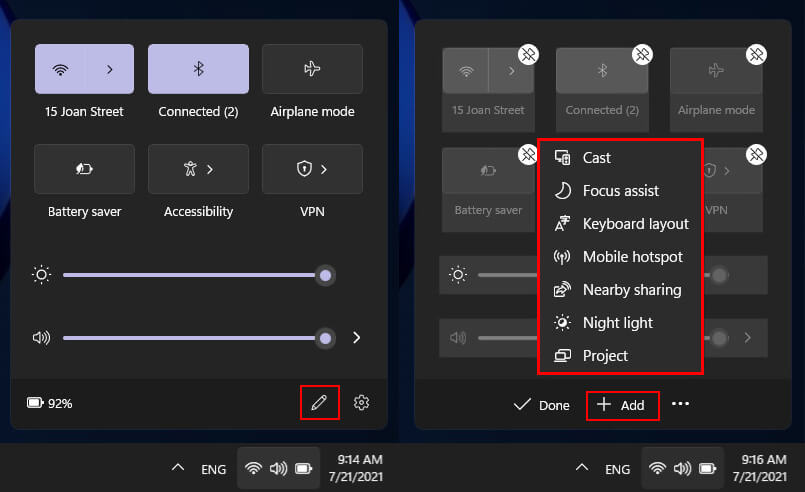
- To begin customising the Quick Settings options on Windows 11 click the Network, Sound or Battery icon to bring up the Quick Settings menu.
- Once you have it on the screen click the small pen looking icon (edit) next to the settings cog in the bottom right-hand corner.
- This will switch to editing mode where you can drag the icons around or remove them using the unpin option on each icon. To add new options click Add at the bottom of the menu then choose which options you would like to add (you will have to do this one at a time) Once you have added the options you think you’ll use the most simply click Done and the changes will be saved.
- You can change these options as many times as you like and in time there are bound to be more added.
I just hope that some of the options get expanded upon. For example, the Bluetooth icon shows how many devices are connected but it doesn’t allow you to view them from the icon. Clicking the icon will simply enable or disable Bluetooth.
If you want to change the colour that is being used for the active icons in the Quick Settings menu, you’ll need to go to Settings > Personalisation > Colours, then change the accent colour that you are using. Just remember that this will change the accent colour for your entire system not just for the Quick Settings area.
Anyway, that wraps up this guide, thanks for stopping by. If you want to check out any more Windows 11 guides, you’ll find all of our Windows 11 stuff here.