If you have updated to Windows 11 and have just finished laying out your Start menu to perfection and don’t want it changed. Either by yourself accidentally or by another person who uses your PC. This article will show you how to prevent changes from being made to the Start menu on Windows 11.

Table of Contents
Related: How to change the name of your computer on Windows 11.
The Start menu on Windows 11 is probably the biggest change to take place in the operating system update. Windows 11 now boasts a super minimalist Start menu design that does away with live tiles and a visible app list. Instead, it focuses on Recent Files and pinned shortcuts. Although this change is well-intended I find the recent files section far too big to be useful, taking up 50% of Starts real estate.
As Start is one of the most important areas of the operating system most users spend a fair amount of time configuring it to best suit their requirements, placing and organising a range of different programs and app shortcuts onto the interface. Because of the time invested in this process and the ease of access it adds, most people won’t want this layout to be changed by accident or by other users.
Although this won’t really be an issue on Windows 11 PC’s that aren’t being shared, it can be a problem when multiple users operate the same machine. A family PC for example. Thankfully it is possible to remove almost all start menu customisations options on Windows 11 so follow along as we guide you through the process.
How do you prevent changes on the Windows 11 Start menu? Lock the Windows 11 Start menu.
Before you jump straight in and start making changes to the registry, you’ll want to make sure you have an updated System Restore point set. This will allow you to go back if you make a major mistake during the changes. If you haven’t made a manual System Restore point in a while, do the following.
- Open the Registry Editor by searching regedit from the start menu.
- Next, use the left-hand pane to navigate to the following key.
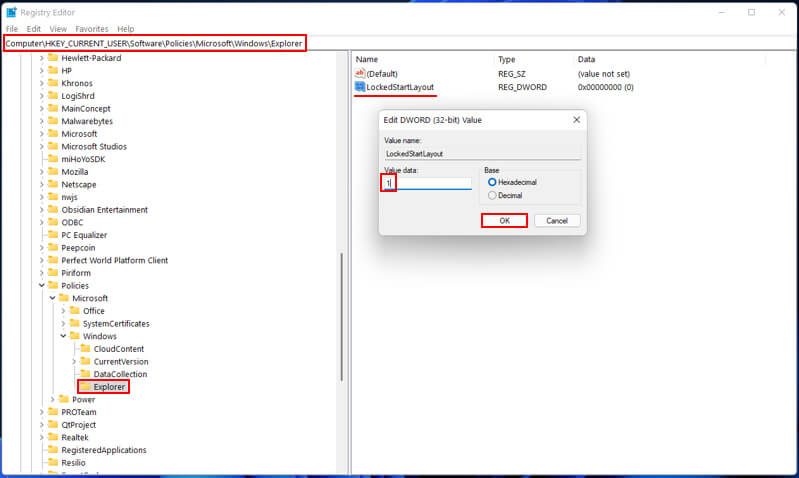
HKEY_CURRENT_USER\Software\Policies\Microsoft\Windows\Explorer
Note: If you do not have an Explorer key, right-click the Windows folder select New > Key and name it Explorer.
- When you have the Explorer folder selected, right-click anywhere on the central blank space select New > DWORD (32-bit) value. Name this file LockedStartLayout.
- Finally, double click the newly created LockedStartLayout and change its Value data from 0 to 1 then click Ok and exit the Registry Editor. After a system Restart, the changes will take effect and the start menu will be locked down.
Now all the options to pin/unpin or move apps, programs, etc will be gone. If you need to change something on the Start menu after making this change you will have to go back to the exact location and change the Value data from 1 back to 0. Then Restart your computer again. This process will also work on Windows 10. While you’re here make sure you check out all of our other Windows 11 guides. There’s a good chance you’ll learn something new that you didn’t know was possible on Windows 11. You can check out all of our guides here.