Table of Contents
Remote Assistance on Windows 10 is a very useful tool for anyone who can’t fix an issue on their own and needs external support from friends, family or a Microsoft official. Sadly, just like a lot of other helpful tools this tool can be exploited, so follow along as this guide shows you how to disable Remote Assistance.
How to Use Firefox Monitor to Check if Any of Your Email Accounts Have Been Compromised.
If you aren’t 100% familiar with Windows Remote Assistance, it is one of Windows most useful help tools, allowing you to give trusted users access to your PC. Using Remote Assistance, an individual can take full control of your computer and fix any issues you may have been having. Sadly this same tool can also be exploited using a variety of different methods.
Although most of these exploits require user input on both ends, inexperienced users may be susceptible to fake requests of help and other scams. So if you would like to completely disable Remote Assistance on Windows 10 continue with the steps shown below.
How Do You Disable Remote Assistance on Windows 10?
As there are two ways to disable remote Assistance you can decide which one to use. The first is via the Run tool and can be done quite easily. The second is via the Registry Editor, which is a little more complicated however will yield a more secure result.
Disable Windows 10 Remote Assistance Via Run.
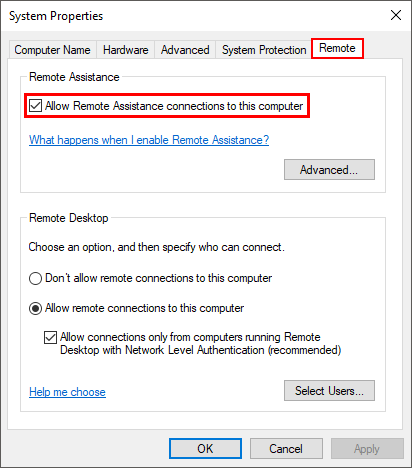
To begin, open the Run tool by pressing Windows Key + R, then type SystemPropertiesAdvanced into the tool and press Enter. Now in the new System Properties window that appears, change to the Remote tab and untick the Allow remote assistance connections to this computer. Once you have done this, click Apply, then Ok to save the change.
Disable Windows 10 Remote Assistance Via the Windows Registry Editor.
As this process requires you to make changes in the Windows 10 registry it is important to make sure you have a System Restore point set in case you need to revert back to a previous state. If you’ve never made a restore point before do the following.
Open the start menu, type Restore, then select Create a Restore Point when it appears on the list. In the new window that appears on the screen, click Create in the bottom right section of the screen, then follow the on-screen instructions. When you have a restore point set, continue with the steps shown below.
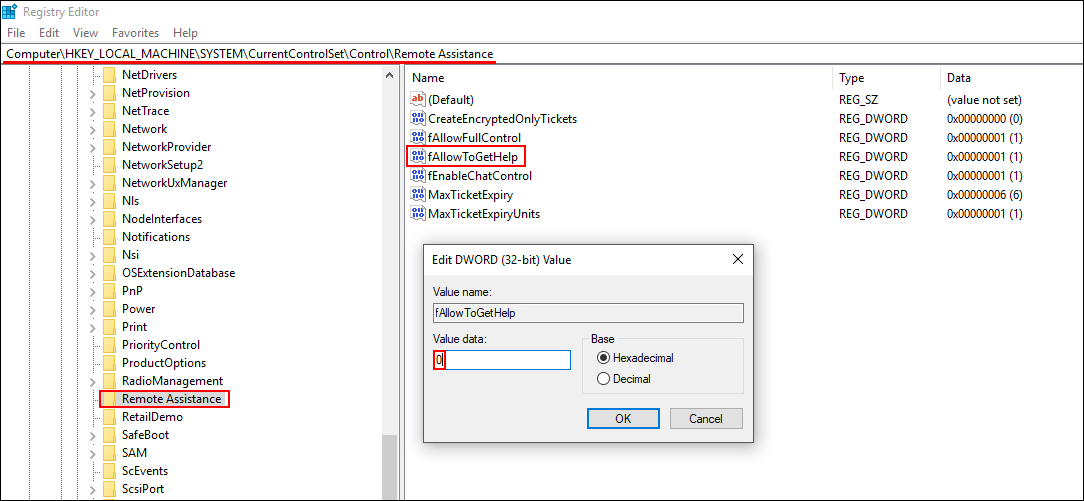
Open the Windows Registry Editor by pressing Windows Key + R, then type regedit into the Run tool text box and press Enter. When you have the tool open in front of you, navigate to the following location:
HKEY_LOCAL_MACHINE\SYSTEM\CurrentControlSet\Control\Remote Assistance
Now that you are in the correct location, make sure the Remote Assistance key (folder) is selected in the left-hand pane, then double-click fAllowToGetHelp in the central pane and change its value from 1 to 0. After you have made the change click Ok and close the registry editor.
For the final step, you will want to close the Remote Assistance port in the Windows firewall. To do this open Command Prompt (as admin), then enter the following command.
netsh advfirewall firewall set rule group="Remote Assistance" new enable=no
If you ever need to enable Remote Assistance again, return to the same registry location and change the value from 0 back to 1 and enter the following command into Command Prompt (as admin)
netsh advfirewall firewall set rule group="Remote Assistance" new enable=yes
Although making these changes will drastically reduce the risk of someone starting a remote connection with your computer using Remote Assistance, it still won’t completely prevent access.