If you are using Windows 11 and need to make some high-level changes you may need to use the hidden Administrator account. This account is hidden by default on Windows 11 (and previous versions) but can be enabled at any time using a variety of different methods. However once you have used it, you should disable it again to keep your security nice and high.

Table of Contents
Related: How to fix error 0xc000012f WINWORD.EXE - Bad image error on Windows 11.
The hidden Administrator account on Windows is something that a lot of users aren’t aware of. It is a high-level administrator account that doesn’t have any UAC (User Access Control) Restrictions (among others). It is a rank above standard Windows admin accounts which still have UAC restrictions.
This hidden account is the only account on the system that can make some specific changes which is why it is disabled by default to keep Windows as secure as possible. Unless you specifically need this account, it’s best to keep it disabled, so don’t just enable it and leave it enabled thinking you’re going to be a super admin user.
There are currently three different ways you can enable the hidden admin account on Windows 11, all of which we’ll list below. You can use whichever one you are most familiar with but they will all give you the same result. I personally use the Command Prompt method as it is as simple as copy and pasting a command or two. However, you do you!
How to enable the hidden Administrator account using Command Prompt on Windows 11.
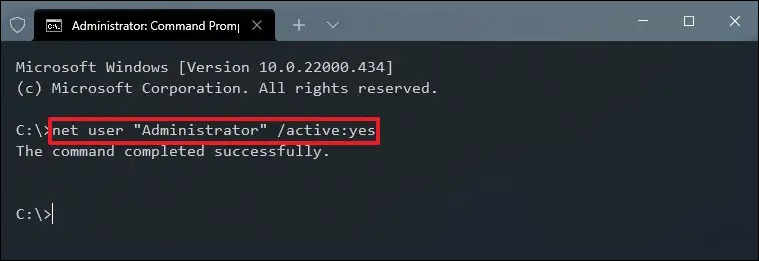
To enable the local (hidden) Administrator account with Command Prompt on Windows 11, you’ll need to do the following:
- Open the Start menu, then search for CMD, then right-click Command Prompt when it appears and select Run as administrator.
- Now type the following command into the window and press Enter:
net user "Administrator" /active:yes
- When the command completes (almost instantly), you can sign out of the current account and sign in with the Administrator account which will appear on the login screen as a different account to your own.
Note: Remember to disable it when you are finished using it. To do this enter the following command: net user "Administrator" /active:no.
How to enable the hidden Administrator account using PowerShell on Windows 11.
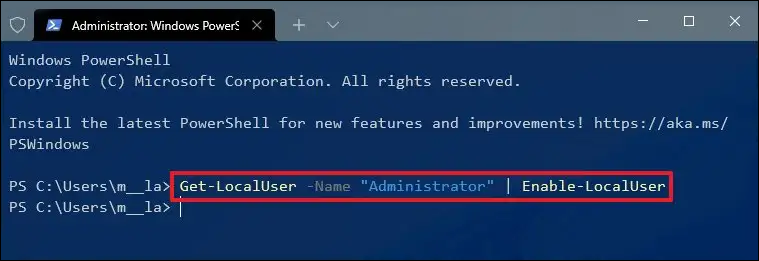
If you’d rather make the change using the PowerShell tool on Windows 11 you’ll need to follow these steps instead:
- Open the Start menu and search Powershell, when it appears, right-click on it and select Run as administrator.
- Next type the following command into the PowerShell window and press Enter.
Get-LocalUser -Name "Administrator" | Enable-LocalUser
- After you have entered the command you can sign out of Windows and you’ll see the new Admin account on the sign-in page.
Note: Remember to disable it when you are finished using it. To do this enter the following command: Get-LocalUser -Name "Administrator" | Disable-LocalUser.
Enable Administrator account using Computer Management on Windows 11.
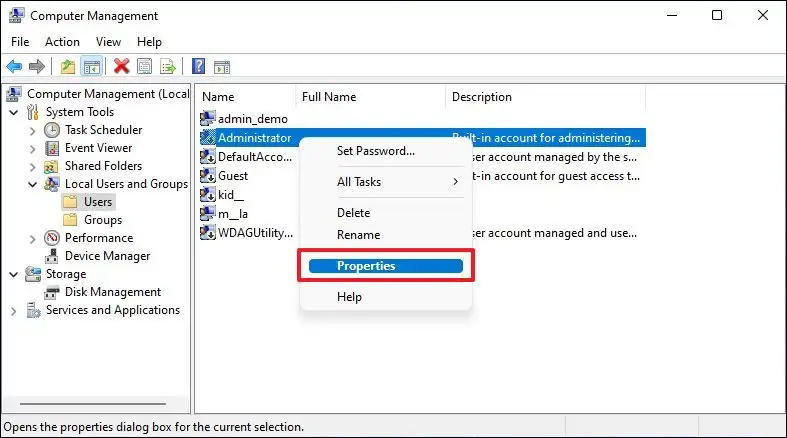
The final tool you can use to enable the hidden admin account on Windows 11 is the Computer Management tool:
- Open the Start menu and search Computer Management, when it appears open it.
- Next, expand the Local Users and Groups section.
- Expand the User section, then right-click the Administrator account and select Properties.
- Clear the Account is disabled option, then flick Apply, Ok to save the changes. As with all the other methods, you’ll need to sign out of your account to find the Administrator account waiting on the sign-in screen.
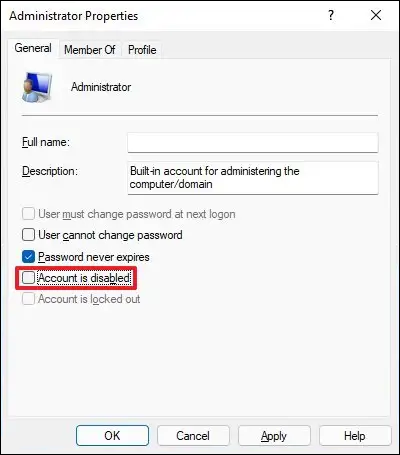
Note: When you want to disable the account again just go back to the same location and make sure to check the Account is disabled option. This isn't available on the home version of Windows 11.