Table of Contents
If you have recently upgraded from a 60hz monitor to a brand new 144hz monitor but can’t get it to register in Windows 10 as a 144hz monitor. This article will show you several different things you can do to force Windows 10 to register the monitor as a 144hz capable screen. Although Windows 10 should and usually does do this it isn’t always reliable.
Related: How to get the best colour settings for your Gigabyte G34WQC monitor.
Now that 144hz monitors have had a decent price drop it makes sense to upgrade from an older 60hz screen. Especially if your screen has seen a solid few years of use. 144hz panels are an amazing upgrade, provided that you have the system hardware to support constant 144FPS playback. If you’re computer or console can’t push at least 144 frames per second, you won’t be able to use the screen at its maximum quality. At least not in games.
Even if you can’t run all your games at 144hz, the experience still translates well across programs, apps, low-end games, video editing, photoshop, and just about everything else your screen is displaying. You just won’t notice it as much as not much else moves as fast as games. With the exception of 4k and 8k video.
Although Windows 10 is usually pretty good at detecting 144hz monitors, there are some models and instances where you may have to manually update your graphics software and Windows 10 to get monitors to activate 144hz properly. Thankfully, this isn’t too much of a hassle to fix so follow along as we guide you through the process.
Note: Some monitors require you to be using a Display Port cable in order to use 144hz mode or higher. You can find information on this if you search for your monitor online. Either way, Display Port is a far better option, so if your computer and monitor have a DP slot, start using it. I will also mention that you can’t force a monitor to a higher refresh rate if it isn’t hardware supported. A 60hz monitor will never have a 144hz option.
How do you get your monitor to register as 144hz on WIndows 10? Fix a monitor not showing as 144hz on Windows 10.
To begin, you’ll want to make sure you have the latest graphics drivers installed on your computer. How you do this will depend on your graphics card manufacturer, so we won’t go into detail on how to do this for your particular model and brand. Although you can update your graphics drivers from Device Manager, I wouldn’t suggest it as you wont to be using the official drivers for your hardware. Windows can and often does grab generic drivers.
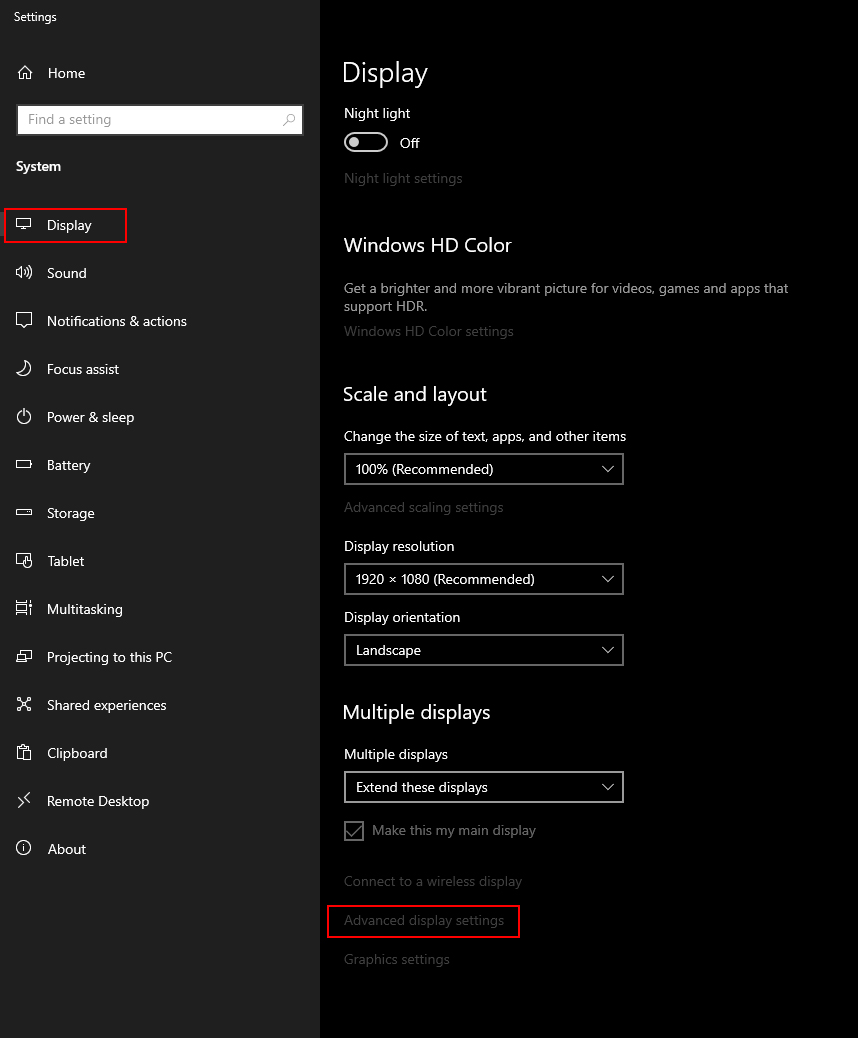
- Now that you have the correct graphics drivers for your system you’ll need to do the following. Open Settings, then go to Display in the left-hand tab and scroll do the very bottom of the page and click Advanced display settings.
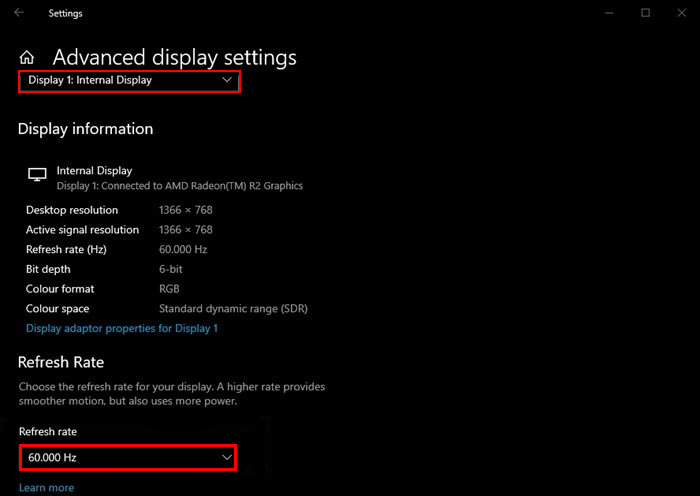
- On this screen select the monitor you wish to change to 144hz (if you have more than one) then use the drop-down menu at the bottom of the screen to change the value to 144hz. This will make sure your monitor is working at its intended maximum refresh rate.
Note: As mentioned above, make sure you are using a Display Port cable if your monitor and PC have Display Port connections.
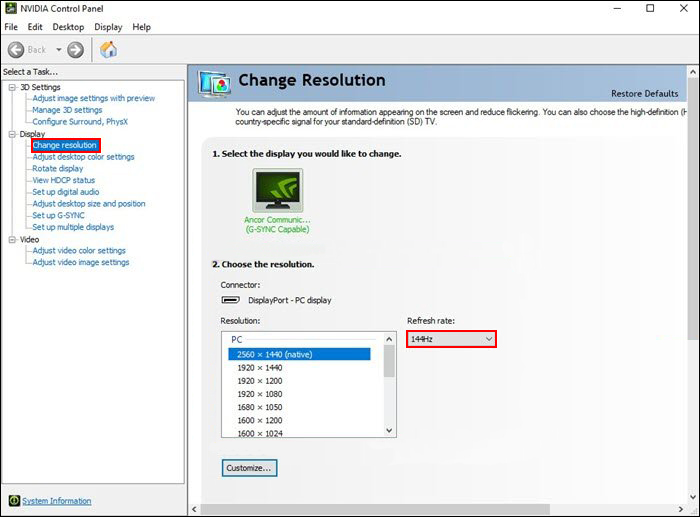
If you have an Nvidia graphics card you can take the further step of opening Nvidia Control Center by right-clicking on your desktop and selecting it. Once you have it open, go to Display > Change resolution. Then use the Refresh rate drop-down box to change the default refresh rate to 144hz. If you don’t see the option check your cable and your graphics drivers.