If you are using Windows 11 or even Windows 10 you may have seen that some features and areas of the operating system and even your Internet browser show "Some Settings are Managed by Your Organization". This can happen for a range of different reasons so there are quite a lot of fixes so follow along as we guide you through quite a few different ways you can fix Settings being Managed by your Organisation on Windows PCs.

Table of Contents
Related:How to go back to Windows 10 from Windows 11. (Windows 11 Rollback)
There are a lot of different ways administrators, businesses, schools, and parents can control how you use your Windows computer which usually results in you seeing a simple notice that says "Some Settings are Managed by Your Organization" when you access certain areas of features. So is there anything you can do about it? Well, it depends on your exact situation but if you are getting this error message on your personal computer and don't have any work, admin, or school limitations you'll find a long list of steps you can follow below that will help you solve the problem pretty quickly. Just keep in mind that these steps are a general overview of the error so some really specific locations you get this error message may not be covered fully.
What Causes This Error Message to Appear on Windows?
The error usually appears on your computer whenever you attempt to make changes to the Settings app and sometimes in your browser and will prevent you from making changes. Below are the 3 main reasons you will see this error.
- You are using a company or school-managed account/PC.
- Viruses and malware are restricting access to system settings.
- Third-party programs are interfering with Windows settings.
Depending on the exact scenario we can solve the problem, however, if you are using a company or school-managed PC/Account you may not be able to.
Fixing “Some Settings Are Managed by Your Organization” on Windows.
The first thing to fix the "some settings are managed by your organization" error is to restart your computer. While this may seem like a waste of time it will fix any temporary bugs. Once you have done this you can move on to the move in-depth steps shown below. But before doing so check if the problem has been resolved.
Check for Windows Updates or Remove old ones.
The next thing you need to do in order to solve this problem is check for Windows updates. There have been plenty of instances in the past where bad Windows updates have caused this problem so installing the latest update can solve the problem. This is true for Windows 11 home, School and Pro versions. If everything is already fully up to date but you suspect a recent update caused the problem you can uninstall that update and check to see if everything is working again. If you haven't uninstalled a Windows update before check out our full guide here.
Uninstall Third-Party Applications and Programs.
Next, think about some of the third-party programs that you have installed recently or even a little while ago. What was their job/function? Is there a chance that their processes and functions have blocked access to certain features of Windows? Some programs will make changes that give them exclusive rights to certain things which will make Windows settings show managed by your organisation messages in some locations.
This doesn't mean that the app or program is bad or malicious it just means that it is now managing that aspect of the operating system so you may need to use it to make changes instead of the Windows Settings app. If that isn't the case you should remove the software as soon as possible and the error message will go away. Again only you will know what you have added and if it is really required to be on your system. Double check you may just need to configure things a little differently.
Change Diagnostic Data Settings
Microsoft checks the data on your device to improve Windows and keep it up to date. If certain settings related to Diagnostics & Feedback are disabled, it does sometimes show this error message. Even if you're the sole owner and user of your computer. Below you'll find the steps to revert these settings back to defaults.
- Press Win + I on your keyboard to open the Settings menu.
- Select Privacy & security from the left pane.
- On the right side of the page, scroll down to Windows permissions and click on Diagnostics & feedback.
- If the "Send optional diagnostic data" switch is off, make sure you toggle it to On.
Once you complete the above steps, close the Settings window and restart your system.
Edit Local Group Policy Editor Settings (Not available on Windows Home)
These steps will only work on Windows Professional and Enterprise editions. That said, if you don't have Group Policy Editor on your computer because it is Windows Home Edition you won't have to worry about these settings anyway.
- Right-click on Start and select Run from the menu list.
- Type gpedit.msc in the text box and click OK.
- In the Local Group Policy Editor window, navigate to the following:
Computer Configuration > Administrative Templates > Windows Components > Data Collection and Preview Builds
- Now move to the right pane, right-click on Allow Diagnostic Data, and select Edit from the context menu.
Note: On Windows 10 or an earlier version, you will see Allow Telemetry instead of Allow Diagnostic Data.
- On the next pop-up page, check the Enabled radio button.
- Under the Options section, click the drop-down menu and select Send optionally diagnostics data.
- Finally, click Apply > OK to save the changes.
Now that you have changed the Group Policy Settings that should fix the problem. if it hasn't you'll need to continue down the list.
Tweak the Registry Editor Settings.
As this process requires making changes to the registry, it is important to make sure you have created a backup via a Restore Point in case you make a mistake and need to revert back to a previous state. To create a restore point do the following:
- Search Create a Restore Point from the Windows search box or start menu, then select it from the list of results.
- On the System Protection, tab select Create and follow the instructions given by Windows.
Now that you have a Restore Point you can start the process.
- Search for regedit in the Start menu and click on it to open.
- When a UAC dialogue box appears, select Yes to confirm your action.
- In Registry Editor, navigate to the following key
HKEY_LOCAL_MACHINE\Software\Policies\Microsoft\Windows\WindowsUpdate
- Now go to the right side pane and look for the Wuserver key.
- Then right-click on it and choose Delete from the context menu.
- If a pop-up menu appears on the screen, click Yes to confirm.
Once you have made these changes, close the Registry editor window and restart your computer. Next time you start your PC, the error message will be gone.
Fix Windows Update Showing "Some Settings Are Managed By Your Organization"?
Once you have successfully created a restore point, open the Windows Registry by searching regedit from the start menu. When you have the Registry tool open in front of you, navigate to the following location (you can copy and paste the address into the registry editor to go directly to the location)
HKEY_LOCAL_MACHINE\SOFTWARE\Policies\Microsoft\Windows\DataCollection
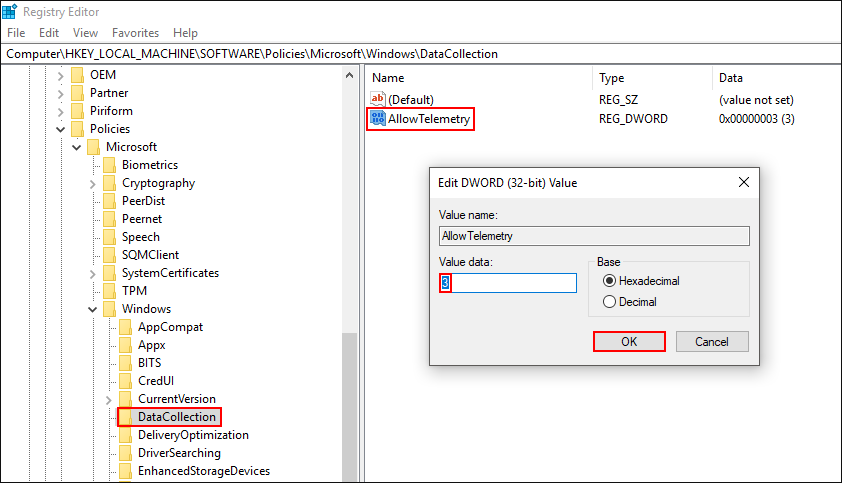
When you get to the correct Registry Key location, find AllowTelemetry in the right-hand pane, double-click on it and change the value from 0 to 3. This will change the setting from Disabled to Enabled. Now close the registry editor and Restart your computer. If you enter this folder and don’t see AllowTelemetry, right-click and create a new Dword (32-bit) value and name it AllowTelemetry. Finally, double-click on the entry and change the value from 0 to 3 then Restart your computer.
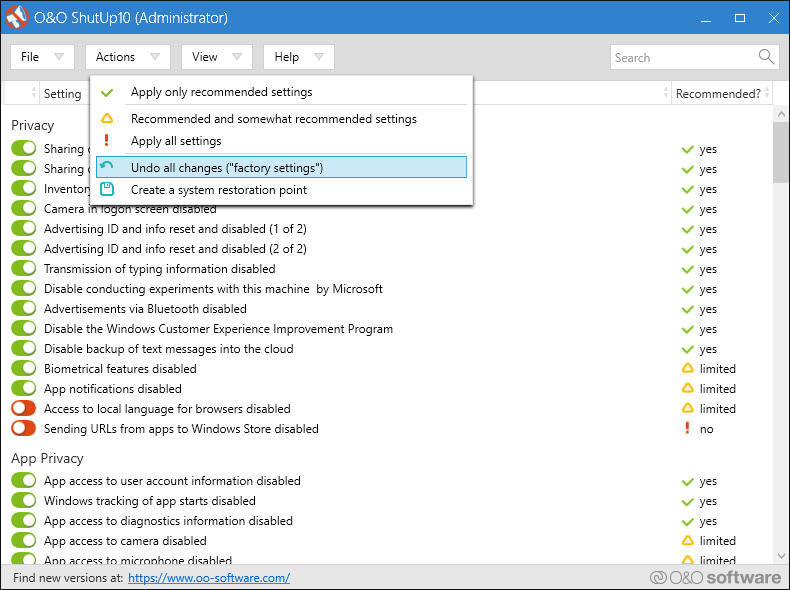
Try Using Shutup10
If this hasn’t fixed the issue for you, download ShutUp10 open it, click Actions and choose Undo All Changes (factory settings) this will remove all ‘Some Settings Are Managed By Your Organization’ across your system. After you have updated Windows, you can use the tool again to block all tracking and telemetry if you wish or simply go through Windows settings and manually make the changes.