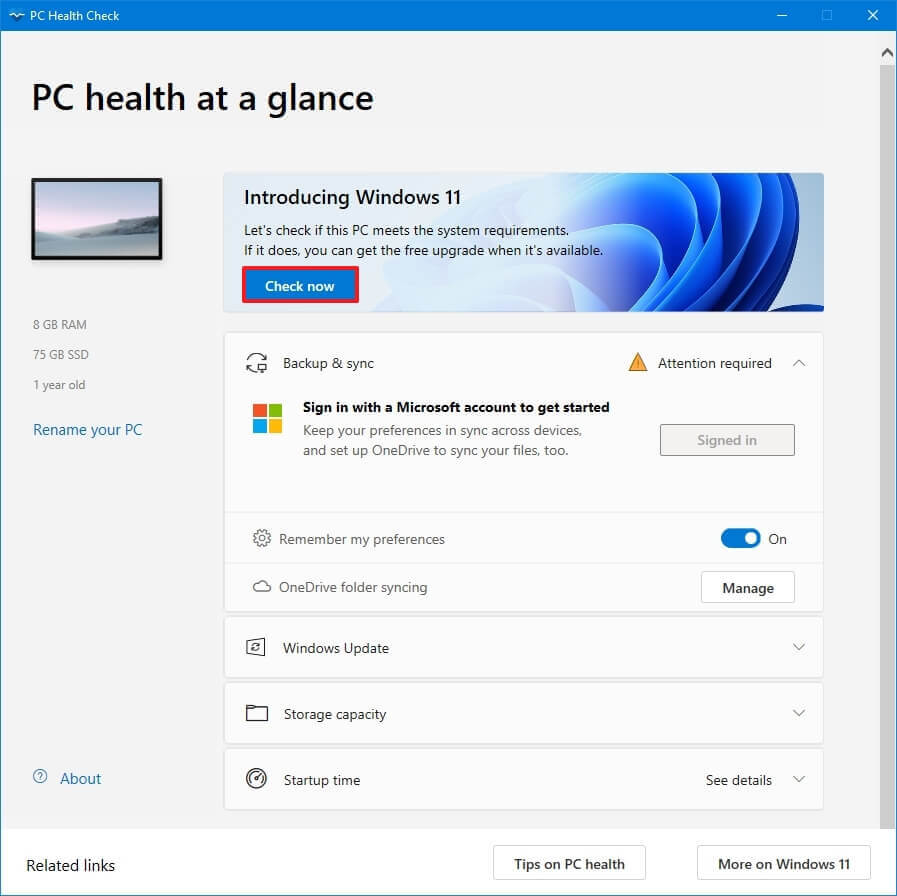
If you are trying to use the Windows PC health checker app to see if you can run Windows 11 you’ve probably received the This PC can’t run Windows 11 error message. Don’t worry! So did 90% of the other people who went to check. Thankfully the solution is really easy and only requires you to have Secure Boot and TPM enabled in the BIOS.

Table of Contents
Related: How to personalise Windows 11 without activating it.
Now that Microsoft has confirmed that Windows 11 will be a free upgrade for everyone from Windows 7 right through to Windows 10. A lot of people have downloaded the Windows health checker tool to see if their system is compatible with Windows 11. For a lot of people, the health checker returned a negative result, stating that their system wasn’t Windows 11 compatible. Which for a lot of people would come as a shock as the base requirements for Windows 11 are only a TPM 2.0 chip, 64-bit processor, 4GB of RAM, and 64GB of storage.
Thankfully, there is a really good chance that if you are receiving the “This PC can’t run Windows 11” it’s a false positive caused by the fact that you don’t have Secure Boot and TPM enabled in the BIOS on your device. As most devices purchased in the last few years have all of this stuff it’s simply a case of adjusting your BIOS settings. We’ll give you are quick run-through of the process below, however, it does vary quite a bit from machine to machine as each manufacturer has different BIOS layouts.
Quick steps for Enabling Secure Boot and TPM State in the BIOS.
- Restart your PC
- During boot press the key that will take you to the BIOS/UEFI settings.
- Change to the Security, Boot or Authentication Tab, varies on each device.
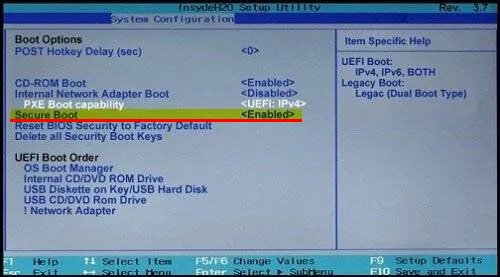
- Find Secure Boot and Enable it. (it may take a while to find)
- Next, find TPM State in a similar location and Enable it.
- Save and exit.
- After your system Restarts, run the Health checker tool again.
How do you enable Secure Boot and TMP to fix Your PC can’t run Windows 11?
- First, boot into your BIOS using the boot key for your device or simply go to Settings > Update & Security > Recovery > Advanced Startup options and select Restart. This will boot your computer into Advanced start-up mode where you can boot to UEFI/BIOS using the Troubleshoot > Advanced options headings.
- Now for the annoying part, tracking down where Secure Boot and TPM State are located on your device. Personally, I would find a YouTube video for this part for your exact device or at least brand. HP BIOS for example. This will help you navigate a lot better.
- However, if you are pressed for time you can check under the following tabs Security, Boot, System Configuration, Authentication.
- Once you find Secure Boot and TPM State (it doesn’t matter which order) enable them, then go to the Exit option on your BIOS/UEFI screen and select Save and Exit. This is important because if you just exit, nothing will have changed and you will keep getting the same error message.
When your system restarts open the PC Health checker again and run the Windows 11 hardware check. This time around it should give you a positive result. Seeing as this is a major issue Microsoft is planning to change the way the tool works to prevent so many users from getting stuck by this process. Although it isn’t all too hard of a change, most users have no idea what a BIOS or UEFI is.