Table of Contents
If you have recently discovered the Windows 10 Selective USB Suspension feature for saving power on mobile devices and can’t seem to get it to work, this guide will show you how to reset and repair the feature. (if your hardware is compatible)
How to Add a Windows Registry Editor Shortcut to the Start Menu or Taskbar.
USB Selective Suspend is a new way to put individual USB ports on your computer to sleep, without disabling the entire USB hub. For example, if you have 6 USB ports on your device and are only using 3, you can set your computer to put the remaining 3 unused ports to sleep while they aren’t being used.
If you are using a Desktop PC or a computer that you always have connected to a power source, USB Selective Suspension isn’t going to be of any use to you. If you use your device on battery power quite often, it's definitely a feature to keep using. For anyone having issues either enabling or disabling the feature, continue with the guide below for troubleshooting steps. If you just want to turn on the feature or find out if it is turned on, check out the link below.
How to Enable or Disable USB Selective Suspend on Windows.
How to Troubleshoot Windows 10 USB Selective Suspension.
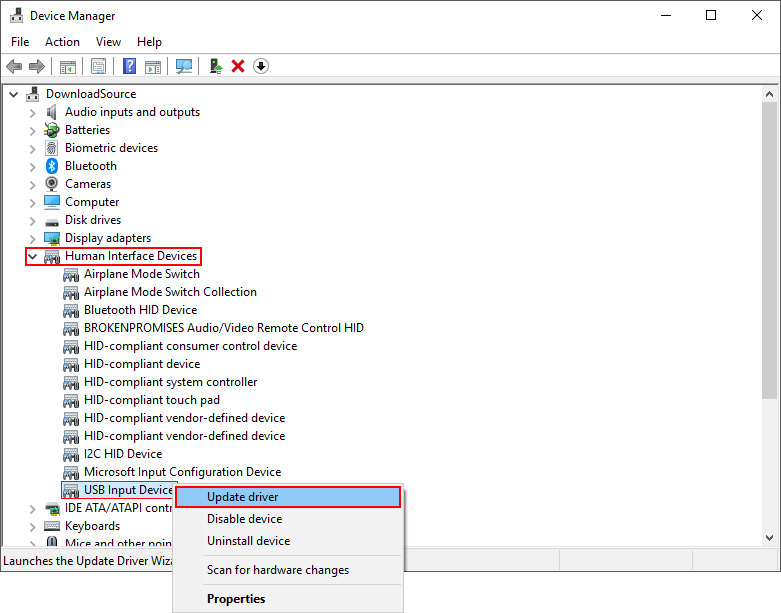
The first thing you need to do if you have a USB port that isn’t waking up after being put to sleep by Selective Suspension is check your USB drivers. To do this, press the Windows Key + X shortcut to open the Advanced Options menu. From this list click and open Device Manager.
When you have the Device Manager open, scroll down expand Human Interface Device, then right-click on USB Input Device and click Update Driver. For the next step, you have two options, the first is to let Windows automatically search for updates, which I would personally try first (it’s usually quicker) If fails, you will need to choose the second option and select the driver file from where you saved it on your computer.
The best way to find your driver files is to visit the Support section of your computer or motherboard manufacturer's website. Here you will be able to enter your model/serial number and get the correct file. As soon as you have the driver downloaded and installed restart your computer and begin the next step.
As the next step requires you to make some changes in the Windows registry, it’s important to make a System Restore. To do this, open the start menu, type Restore, then select Create a Restore Point when it appears on the list. From the new window that appears, click Create in the bottom right section of the screen, then follow the instructions given by Windows. Once you have successfully made a restore point, you can continue with the steps shown below.
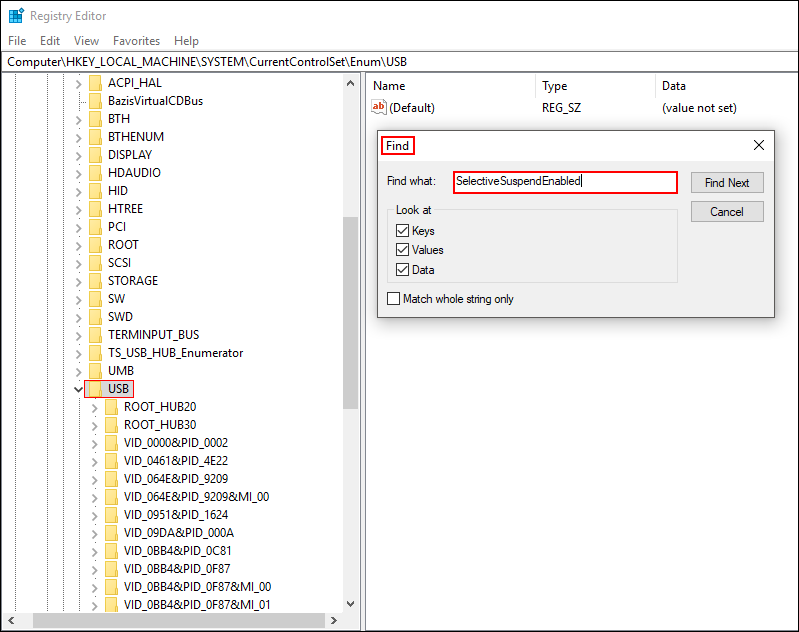
Now that you have a safe point to revert back to if you make a mistake you can continue. To begin, press Windows Key + R to open the Run tool, enter: regedit into the text box, then press Enter. When the registry tool is open in front of you, navigate to the following location:
Computer\HKEY_LOCAL_MACHINE\SYSTEM\CurrentControlSet\Enum\USB
At this location, make sure you have the USB key (folder) selected, then go to Edit > Find and search for the following SelectiveSuspendEnabled. When you find it set the value to 1 (enabled)