Table of Contents
If you are trying to browse the Internet using Google Chrome but can’t get any content to load because Chrome keeps showing the ‘Waiting for Cache’ error. This article will show you how to fix the problem and get rid of the error for good.
How to Bypass Dot Compliance Blocks That Restrict Website Access.
Google Chrome is a pretty good Internet browser and has more than enough features for the average user. It’s fast, easy to use, stable, and doesn’t require much maintenance to keep it in working order. That being said, all software, including Chrome does still have its issues. We’ve covered plenty of Chrome errors in the past but this one is certainly one of the most annoying.
Waiting for Cache… is quite subtle for a browser error but its lack of information is what makes it so frustrating. Thankfully it’s not all that hard to fix, though does require some very specific steps, so follow along as this article guides you through the process.
Related: How to Fix Google Chrome Only Working in Incognito Mode. (Private Mode)
How Do You Fix Chrome Stuck Waiting For Cache…?
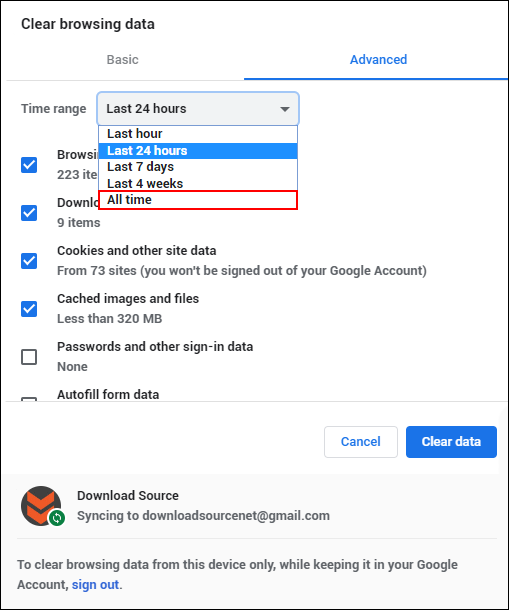
The first and quickest fix for Google Chrome getting stuck waiting for the cache to load is to clear the cache. This removes everything from Chrome’s cache and gives the browser a clean, error-free slate to work from. Nine times out ten this will fix the issue, thus the reason we are starting with it. To clear your Chrome cache, open Chrome, then press Ctrl+Shift+Del on your keyboard.
In the window that appears select All-Time from the drop-down list, then click Clear Data. If you haven’t done this before or in a while it will take a considerable amount of time to complete, so be patient. Once it is done, Restart Chrome and you shouldn’t have the Waiting For Cache… Error anymore.
Delete Your Chrome Profile and Create a New One.
If the first option hasn’t helped, you can delete your current Chrome profile, and create a new one. To do this close Chrome, then open the Task Manager (Ctrl+Alt+Delete) and make sure everything brandishing the Chrome icon is closed (right-click End Task).
Next, navigate to the following location using File Explorer.
C:\Users\(Your Username)\AppData\Local\Google\Chrome\User Data
Note: The AppData folder is generally hidden in File Explorer, so click View and make sure Show Hidden Files is ticked.
When you are in the correct location Delete all of the files in the folder. This will completely remove your Chrome profile. Now, open Chrome and create a new User Profile and the issue should be gone.
Reset Google Chrome to Factory Default.
If none of the above has helped so far, the next best option is to factory reset Google Chrome. This will reset Chrome back to its clean install defaults and should fix the issue. If you haven’t done this before check out our guide here. If after all of the above, including a full Chrome reset, you still have the issue. It’s best to cut your losses and uninstall and reinstall Google Chrome. Just make sure you run Ccleaner after removing Chrome, this will make sure you start from a completely clean state.