Table of Contents
The Windows 'show desktop icon' has always been a pretty handy tool to have nearby, allowing you to automatically minimize every window on your screen, bringing you straight to your desktop with one click. This is most handy when you want to hide your work in an instant from passers-by or for quick access to desktop shortcuts. However, if it’s current position bothers you, this guide will show you how to easily make another shortcut you can place on your Taskbar.
![]()
How to Fix Windows Getting Stuck on the Loading Screen/Getting Ready Screen.
As useful as the Windows desktop shortcut icon is, not everyone agrees with its current positioning. Although it is easy to use and fairly easy to find, some users would prefer to have it back on the windows taskbar. The main reason for this is when you try to click the show desktop icon whilst using dual monitor setups the mouse often goes onto the other screen.
If you are looking for ways to change the position of the Show Desktop icon to make it more user-friendly, this guide will show you how to do so. This method will work for Windows 7, 8 and 10.
Note: The right-hand shortcut will remain and a new one will be created on your left-hand quick launch bar or your taskbar.
How to Move/Create a New Show Desktop Icon in Windows 10.
The process isn’t the most simple, as you cannot just drag and drop the icon/shortcut from one side to the other. It is however still easy to do if you follow closely, you shouldn’t have any trouble.
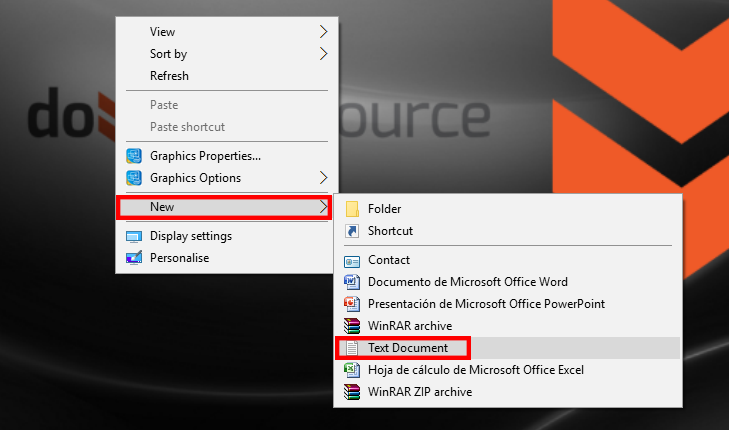
First, you need to click on an empty area on your desktop and select New > Text Document. Name the Shortcut Show Desktop.exe. You will see a warning that states the following:
“If you change the filename extension the file might become unstable. Are you sure you wish to change it?” Just click Yes to this question.
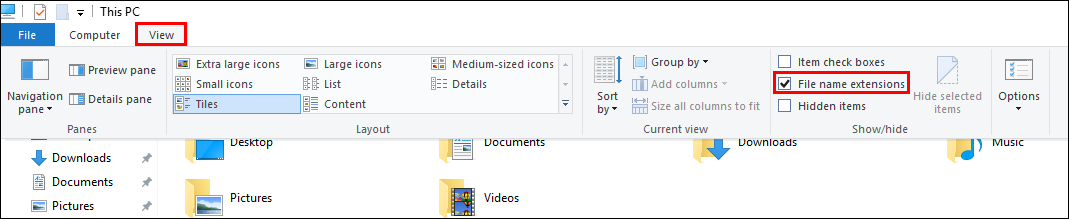
Note: You will need to make sure you have file extensions showing in order for this method to work. Simply open your File Explorer, click on View at the top and tick box File Name Extensions over in the right-hand corner.
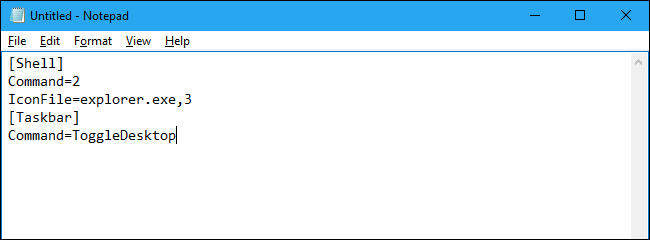
Now you can right-click on the new file you just created and select the option to Pin to taskbar, if you don't have pin to taskbar on your right-click menu you can just drag and drop the icon onto the taskbar. Next, you will need to create a new text file in Notepad copying and pasting the following into the document.
[Shell]
Command=2
IconFile=explorer.exe,3
[Taskbar]
Command=ToggleDesktop
Once you have entered the above information into your text document you can save the file using Ctrl+S or the usual File > Save As Method. Before you save the file you will need to change the location it’s saving too and set the save type to All Files (*.*) and name the file Show Desktop.scf Below is the location you will need to save the file to:
C:\Users\user name\AppData\Roaming\Microsoft\Internet Explorer\Quick Launch\User Pinned\TaskBar
![]()
Note: Replace user name With your Windows username. Also if you cannot find the AppData folder you will need to show hidden files. This can be done from the same View menu that you made extensions visible from. Just tick the Show hidden files box.
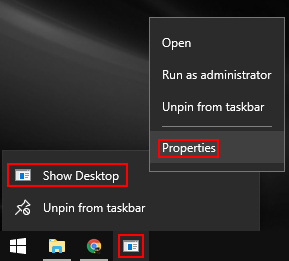
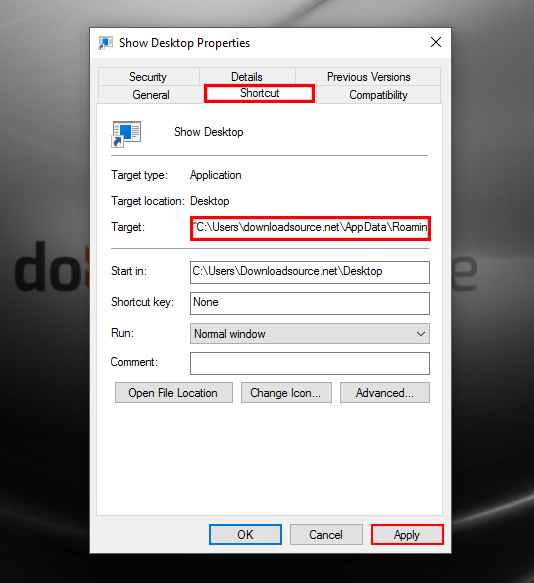
Once the file has been saved you can close Notepad. Next, you will need to edit the properties of the shortcut that you created earlier and pinned to the taskbar. Right-click on the Show Desktop.exe icon, right click again on the Show Desktop option on the popup menu that appears then select Properties from the menu.
In the Properties window, enter the below path into the Target Box on the Shortcut Tab.
(You are supposed to keep the below target in Quotes, however, if you get an error message about the path, remove the quotes and try to save again. It should now work)
“C:\Users\user name\AppData\Roaming\Microsoft\Internet Explorer\Quick Launch\User Pinned\TaskBar\Show Desktop.scf”
Note: Replace with user name your specific user name.
With the above step completed don’t close the Properties box. You now have the option to change the icon you want to use for the new shortcut. From the open Properties window and the shortcut tab click Change Icon.
Windows will automatically select the shell32.dll file in the %SystemRoot%\system32\ folder that contains most of the Windows icons, here you can choose an icon from the list. Once you have done so click Ok. (If you have icons saved somewhere else you’d rather use, feel free to navigate to that location instead)
If your icon doesn’t change straight away you can restart file explorer or Windows. Once either has been restarted your new icon should be visible.