If you are new to Davinci Resolve having switched from something like Premiere Pro you are probably quite happy with the performance you are getting. But what if we told you there's a ton of hidden performance tucked away in settings that you can unlock without having to upgrade your computer? Well, in this guide we are going to guide you through the steps for optimising the Davinci Resolve Render Cache for better Timeline playback, especially with Fusion Elements.

Table of Contents
Key Points.
- The differences between all DNxHR Media Formats.
- The best settings for the Davinci Resolve Render Cache to get smooth playback.
- How to set up the Render Cache in Davinci Resolve for better Proxy support.
- How to save Render Cache Settings as the default for all future projects.
The Best Render Cache Settings for Davinci Resolve for Smooth Timeline Playback.
First, make sure Davinci Resolve is up to date the newer the version you are using the better. While you can try to copy these settings on Davinci Resolve versions earlier than 18.5 we highly suggest getting at least 18.5 or newer. Below this section is a full detailed description on all of the DNxHR encoders.
- Open Davinci Resolve and a Project.
- Go to File > Project Settings.
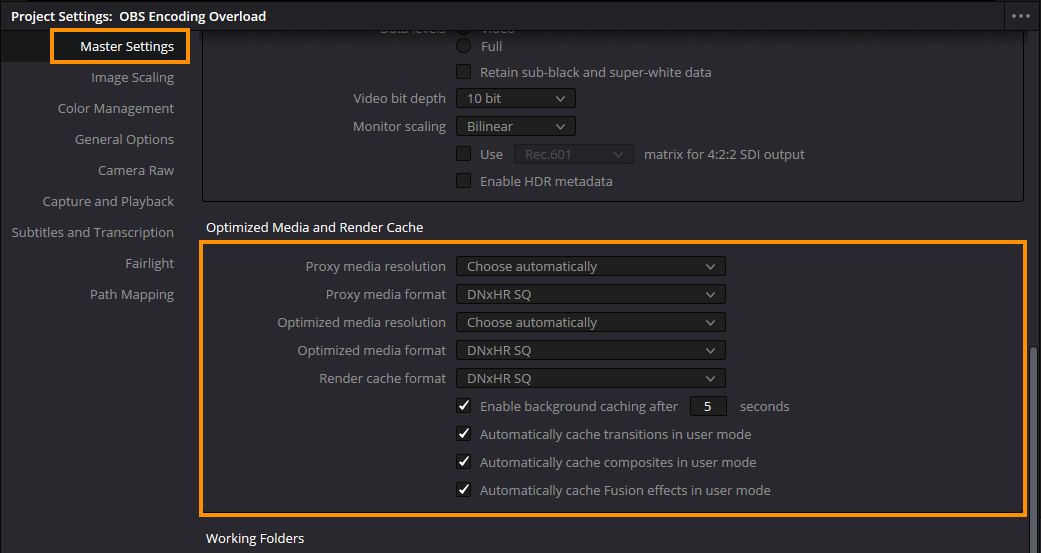
- Stay on the Master Settings tab on the left.
- Scroll down to the Optimised Media and Render cache section.
- Here you have quite a few options to choose from.
For the best playback that balances a bit of everything use the following settings:
Proxy media resolution: Choose automatically
Proxy media format: DNxHR SQ
Optimised media resolution: Choose automatically
Optimised media format: DNxHR SQ
Render cache format: DNxHR SQ
Make sure the 4 boxes below are ticked.
If you want to really improve playback and don't mind a bit of visual loss you can use the following settings:
Proxy media resolution: Choose automatically
Proxy media format: DNxHR LB
Optimised media resolution: Choose automatically
Optimised media format: DNxHR LB
Render cache format: DNxHR LB
Make sure the 4 boxes below are ticked.
What are the Differences Between DNxHR Media Formats?
DNxHR (Digital Nonlinear Extensible High Resolution) is a family of video codecs. These codecs are designed to support high-resolution video content with efficient compression, making them suitable for professional video production workflows. DNxHR codecs come in various flavours or "profiles," each with different specifications to meet different production requirements. Below is a full explanation of each.
-
DNxHR LB (Low Bandwidth)
- Bit Depth: 8-bit
- Chroma Subsampling: 4:2:2
- Data Rate: Variable, low bitrate
- Intended Use: Proxy or lightweight editing.
-
DNxHR SQ (Standard Quality)
- Bit Depth: 8-bit
- Chroma Subsampling: 4:2:2
- Data Rate: Variable, moderate bitrate
- Intended Use: High-quality editing, suitable for broadcast.
-
DNxHR HQ (High Quality)
- Bit Depth: 8-bit or 10-bit
- Chroma Subsampling: 4:2:2
- Data Rate: Variable, higher bitrate than SQ
- Intended Use: High-quality editing, suitable for broadcast and mastering.
-
DNxHR HQX (High Quality 10-bit)
- Bit Depth: 10-bit
- Chroma Subsampling: 4:2:2
- Data Rate: Variable, higher than HQ
- Intended Use: High-quality editing with 10-bit precision.
-
DNxHR 444 (Max Quality)
- Bit Depth: 12-bit
- Chroma Subsampling: 4:4:4
- Data Rate: Variable, highest among DNxHR codecs
- Intended Use: Mastering, highest quality with full colour precision.
The key differences among these profiles lie in the bit depth (the number of bits used to represent each colour channel), chroma subsampling (the reduction of colour information), and overall data rate. Choosing a specific DNxHR profile depends on factors such as the intended use (proxy editing, broadcast, mastering), storage considerations, and the desired balance between image quality and file size.
Note: If you are doing a lot of important colour grading and colour work it's best to work with DNxHR 444 however it's going to be pretty taxing on your hardware. Otherwise one of the 10-bit options might be good enough.
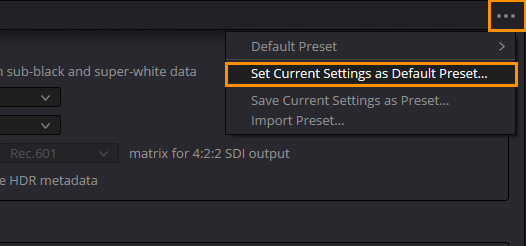
How to Save Davinci Render Cache Project Settings as Default.
To save these settings as default for all future projects click the three dots in the top right-hand corner of the Settings window and select: Set current settings as default preset. When the pop up window appears click Update, then Click Save in the main settings window to save the changes.
Why Optimise the Render Cache in Davinci Resolve?
Optimizing the Render Cache in DaVinci Resolve is super important for any post-production workflow. The Render Cache, tied to Optimized Media, significantly improves playback performance by creating lower-resolution proxy files during editing. Which in turn means smaller more efficient cache files and less drive space used.
In project and master settings, users can configure preferences for media and render cache. Enabling "Use Optimized Media if Available" ensures DaVinci Resolve utilizes these proxy files, reducing the processing load on the system. This is invaluable when working with high-res 4k video and complex effects.
Blackmagic recommends manually adjusting the Render Cache for an enhanced editing experience on some devices. Choosing ProRes 422 or DNxHR codecs for optimized media strikes a balance between quality and performance. Setting the Proxy resolution to half resolution maintains visual fidelity while optimizing system resources as well. Without causing issues with video file quality in the final project export.
Optimizing the Render Cache through optimized media, codec selection, and resolution settings in DaVinci Resolve is the best way to get smooth playback and an efficient post-production workflow. Configuring project settings prioritizes optimized media, maximizing performance and responsiveness for an improved editing experience.