If you are using Windows 11 and need to remove your wallpaper history but can't find out where or how to do it, this article will show you the quick and easy steps to accomplish that. Removing your wallpaper history from the wallpaper page on Windows 11 may seem a bit complicated at first, but it's actually super easy. So let's get started.

Table of Contents
Related: How to change to single view in Davinci Resolve. Single/Dual view swapping.
Whenever you open the Personalization panel in the Windows 11 settings menu, you will automatically see the last four wallpapers you have used on your system, along with the currently active one. For most people, this isn't an issue, but there is a small percentage of users who may find this bothersome. If you fall into this category and want to know how to remove the wallpaper history, follow the guide below.
Before proceeding with the steps, it's important to create a restore point as this process involves using the Windows Registry. To create a restore point, open the start menu, type "Restore," and select "Create a Restore Point" when it appears on the list. In the new window that appears, click "Create" in the bottom right section of the screen and follow the instructions provided by Windows. Once you have successfully created a restore point, you can continue with the following steps.
How to Remove the Windows 11 Wallpaper History.
Now, with a restore point set, open the Run tool by pressing Windows Key + R, type "regedit" into the box, and press Enter to confirm. In the Registry Editor, navigate to the following location:
HKEY_CURRENT_USER\Software\Microsoft\Windows\CurrentVersion\Explorer\Wallpapers
Inside the Wallpapers Key (folder) in the right-hand pane, you will find four different values:
BackgroundHistoryPath1
BackgroundHistoryPath2
BackgroundHistoryPath3
BackgroundHistoryPath4
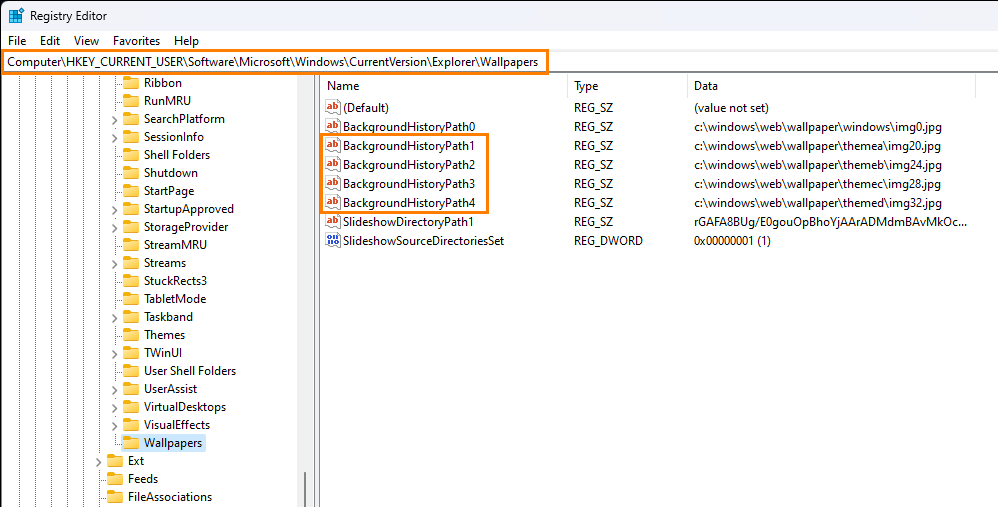
These entries represent the four previously used wallpapers. To delete them from the history, right-click on each entry and select "Delete." Note that you need to delete them individually.
If you only want to remove one or two wallpapers, simply delete the entry that corresponds to the order in which it is shown on the Personalization screen. For instance, if you want to remove the third wallpaper from the row, delete BackgroundHistoryPath3.
Whenever you delete one of the entries, it will be automatically replaced by one of Windows 11's default wallpapers. Once you have finished removing the wallpapers from the registry, close the editor and check the personalization page to see the changes. If you are interested in setting different wallpapers for different screens using the standard Windows tools without relying on third-party programs, refer to the guide below.
How do you set different wallpapers for different monitors on Windows 11?
Quick steps to set different wallpapers for each monitor on Windows 11.
- Open Settings on your Windows 11 device.
- Change to the Personalise option in the left pane.
- Next, click Background.
- Now right-click a recent image and select the monitor you want the image on.
You will have to set new images using the standard process first so that they appear on the recent images list. If you try this method and it shows Desktop instead of Monitor you currently have multiple desktops open and will need to close them until you only have the default one open. You can do this by pressing Windows Key + Ctrl + F4
How to set a different wallpaper for each monitor on Windows 11.