If you are using Windows 11 and would like to make file extensions visible all the time so you don’t have to spend extra time searching through a list of files with the same file name in different formats. This article will show you how to quickly and easily enable file extension visibility on Windows 11.

Table of Contents
Related: How to make Windows 11 remember window locations on multi-monitor setups.
Having the ability to see the extension format of files on Windows is one of the most valuable features available on the operating system. But for some reason, it is also a feature that is disabled by default. I’m sure there are plenty of good reasons for this but none of them could convince me they are far more important than being able to quickly and easily distinguish between file formats when files have the exact same name but a different file extension.
For instance, if you work with image and video files, you are probably saving your images in a range of different formats with the exact same file name. Image.jpg, image.png, image.webp, etc. Which means you have to manually check each and every file until you find the one you want. Thankfully Windows 11 has the option to force File Explorer to show file extensions on each and every file type. Which you can then short into file type groups using the right-click > Sort by > File type option.
The only thing that you need to take into account when enabling file extension visibility on Windows 11 is accidentally removing or changing a file extension when renaming a file. Although Windows tries to prevent this by not including the extension characters in the renaming selection and warns you with a prompt if you do, there’s still a possibility.
How do make File Extensions always visible on Windows 11? File Extensions always visible on Windows 11.
To make sure File Extensions on Windows 11 are always visible, you’ll need to do the following.
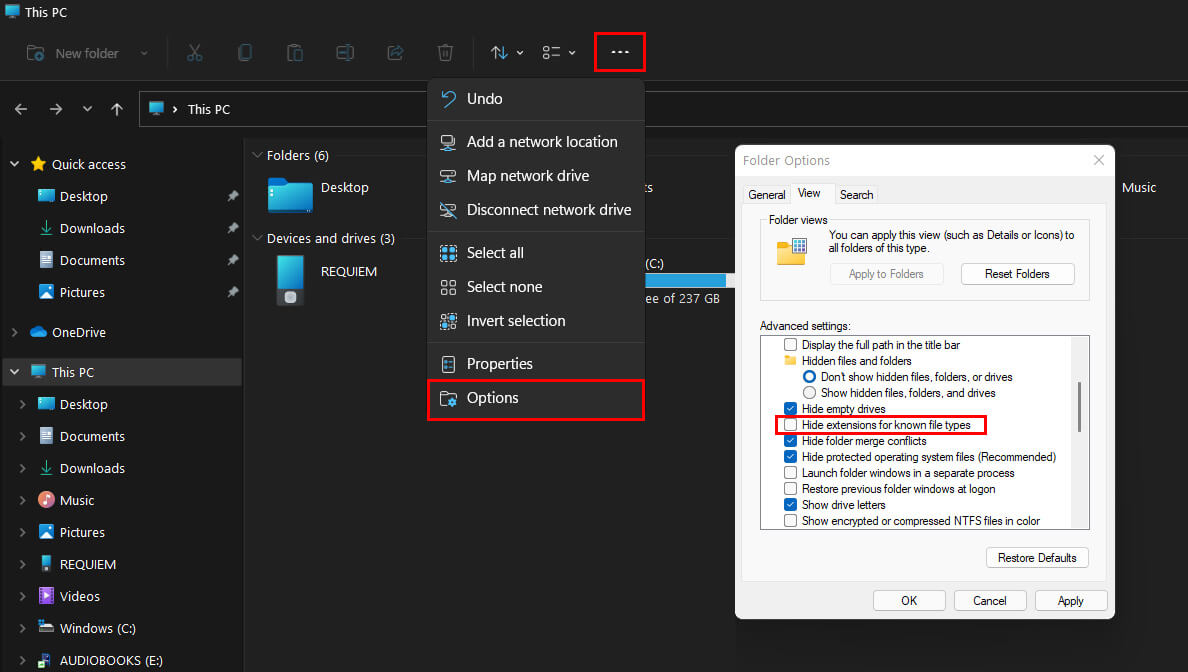
- First open File Explorer on Windows 11, then click the three dots at the end of the row of options along the top of the screen. Next click Options.
- This will open a new window called File Explorer Options (formerly known as Folder Options).
- In the new window that appears, scroll down and uncheck the Hide extensions for known file types checkbox. It’s about halfway down the list. Then click Appy and Ok.
After you have made this change, all the files on your system will show their full file name along with the file extension at the end. Just remember that you will need to be aware of this when changing file names moving forward as changing the extension name will change the file format. Windows 11 does give you a prompt of you leave the info blank or try to change it to something so you shouldn’t accidentally make a mistake. If at any stage this becomes annoying for you, you can change back to hidden File Extensions by placing a tick in the box and saving the changes.
Other Windows 11 guides you’ll find interesting?
While you are customising Windows 11 to better suit your work needs and personal tastes, make sure you check out a huge collection of Windows 11 guides. We’ve covered dozens of new features to Windows 11 and will be coving more and more as future updates roll out to the operating system. More Windows 11 guides.