Table of Contents
It’s all about speed and efficiency when working with computers, especially on Windows 10, which is notorious for hogging resources. If you have recently updated to the Creators Update you have probably noticed a substantial improvement in overall system performance. Besides updating to Creators, there are many other ways to get a speed boost. A sometimes overlooked option you can try is disabling/removing the HomeGroup, especially if you aren’t even using it.
How to Sign into Windows 10 Without Using Microsoft Account.
There are plenty of different ways you can speed up your Windows system, most of the more common fixes include, removing preinstalled junk apps or bloatware, adding an SSD or simply just making sure you run a registry cleaner like CCleaner occasionally. Something you may not know though is that disabling the Windows HomeGroup can also give you a boost, as well as speeding up your Network connection speeds.
Understanding the Windows HomeGroup.
HomeGroup allows you to share files and devices, such as printers between computers on the same local network. Basically, you won’t need to install drivers on other machines or make copies of files on each individual computer, users can share files with either the entire group or on a just peer to peer. It is also a way in which you can stream certain content to your Xbox or Smart TV. HomeGroups are protected with passwords and all traffic is encrypted. It’s a really great tool if your computer is connected to a network, if not it’s something you can simply disable.
How to Leave a HomeGroup in Windows 10.
In order to remove HomeGroup from your system, you will first need to leave your HomeGroup if you are currently in one. To find the HomeGroup settings, search HomeGroup from the start menu or open the Control Panel and go to HomeGroup. You should now see an option called Leave HomeGroup. Click on this and select Leave HomeGroup again to confirm.
How to Turn Off the HomeGroup Service
Next, we will be disabling the HomeGroup service. This will start to improve system speeds although can be a little risky if you don’t know what you are doing, so make sure you have created a restore point on your system first.
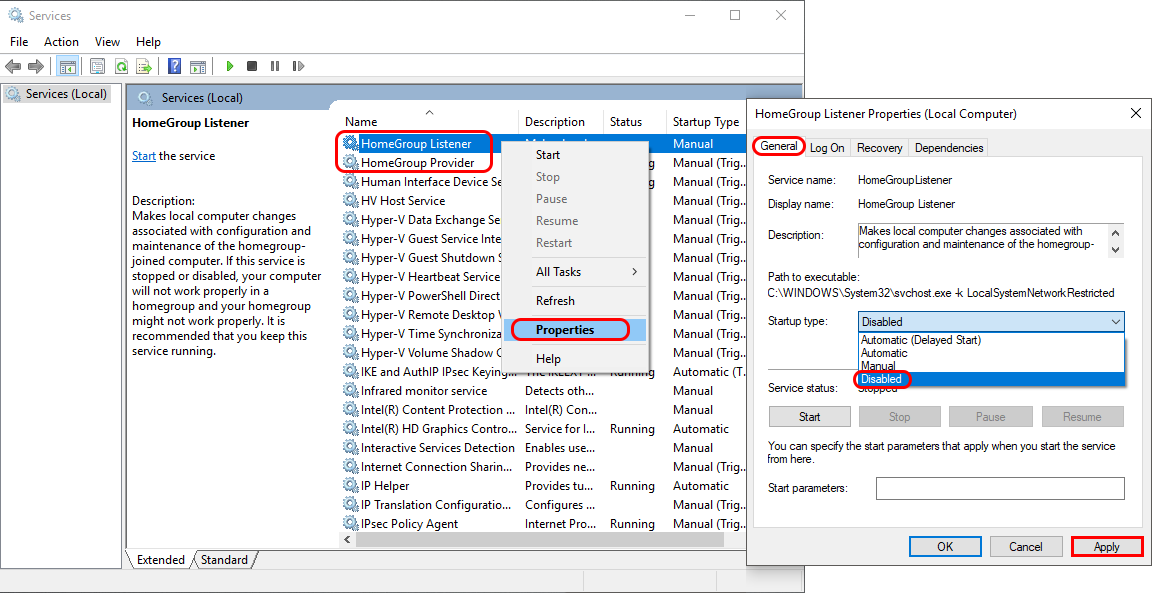
To open the Services menu, search Services from the start menu or go to Control Panel > Administrative Tools > Services. Here you will see all the services running on your computer. The two services you are looking for are: HomeGroup Listener and HomeGroup Provider. To disable these services right-click on them, select Properties, stay on the General tab and select Disabled from the drop-down menu. (next to Startup Type) Once that’s done click Apply to save the changes. Make sure you disable both of the services.
Note:
- If you’re using Windows 7, HomeGroup will also be removed from the Windows File Explorer and all context menus. So you won’t have to proceed with the following steps
- If you’re using Windows 8 or 10 and want to completely remove the service you will need to keep following the steps below. If you are fine just having them disabled you can also finish the guide here.
How to Remove HomeGroup using the Registry.
From here on out things are going to get a lot more complicated, as we will be using the Windows registry editor tool. If you haven’t already made a backup, it is something you really need to do, as any mistakes made when editing the registry can render your system unstable, possibly unable to boot. It’s also wise to have a backup of all your other data just in case. It’s better to be safe than sorry.
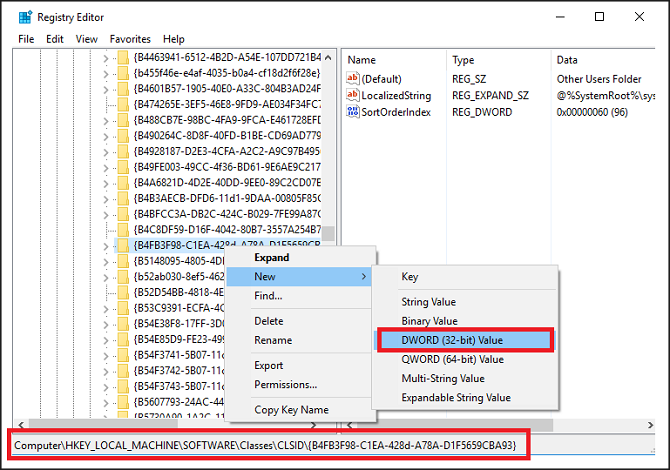
To open the registry editor, press the Windows Key + R and type regedit into the window then press Enter. In the newly opened window navigate to the following location:
HKEY_LOCAL_MACHINE\Software\Classes\CLSID\{B4FB3F98-C1EA-428d-A78A-D1F5659CBA93}
Note: Make sure you go to CLSID and not .CLSID — they are very different entries. (take note of the full stop)
When you are in the correct directory, right-click on it and go to New > DWORD (32-bit) Value. Name the new value: System.IsPinnedToNameSpaceTree. (Make sure it’s exactly the same as shown.
Windows will automatically set the value of the newly created DWORD to zero. Meaning HomeGroup will no longer be included in the File Explorer menu.
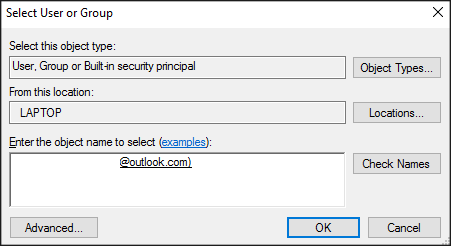
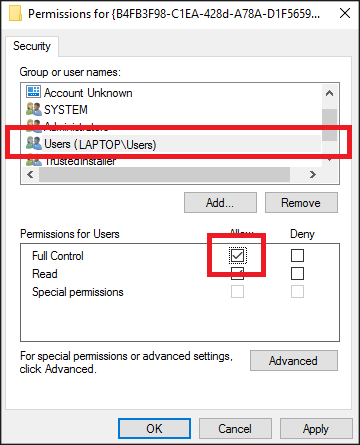
If Windows blocks you from creating a new DWORD value, right-click on the registry entry, go to Permissions > Advanced > Change and enter your Windows username into the box next to Check Objects, then click OK.
Now, go back to the first permissions screen, highlight the Users line, and set the check box next to Full Control.
How to Re-Enable HomeGroup.
Re-enabling HomeGroup is quite easy, it’s basically just a process of backtracking.
First, delete the registry entry we just made and change the two HomeGroup services back to Manual from Disabled