Table of Contents
Learn how to restrict access for any newly added removable devices on Windows 10. Devices such as USB sticks, pen drives, cameras, gamepads, controllers, etc. Any device that can be connected to your computer from an external source, more often than not USB devices.
How to Remove Blue Arrows From Files and Folder Icons on Windows 10.
On Windows 10 whenever you connect a new device like a USB flash drive, the operating system will automatically recognize and install the device so it can quickly and easily be used or accessed. Although this is the preferred response most people want from Windows, it may not be useful for everyone.
Thankfully, if you find yourself wanting or needing to block this feature, preventing Windows 10 from automatically adding new devices. It can be done relatively easily. Once the change has been made all devices that are currently connected to your system will continue to work normally, however, if they are disconnected they won’t be recognized again. This change will also make Windows ignore any and every other device connected to your computer.
How Do You Stop Windows 10 Automatically Detecting and Installing Removable Devices?
As the following steps require you to use the Windows Registry Editor, it is important to make sure you have a System Restore Point to go back to if something goes wrong. If you haven’t created a restore point before, open the start menu, type Restore, then select Create a Restore Point when it appears on the list. On the following screen, click Create in the bottom right corner, then follow the on-screen instructions.
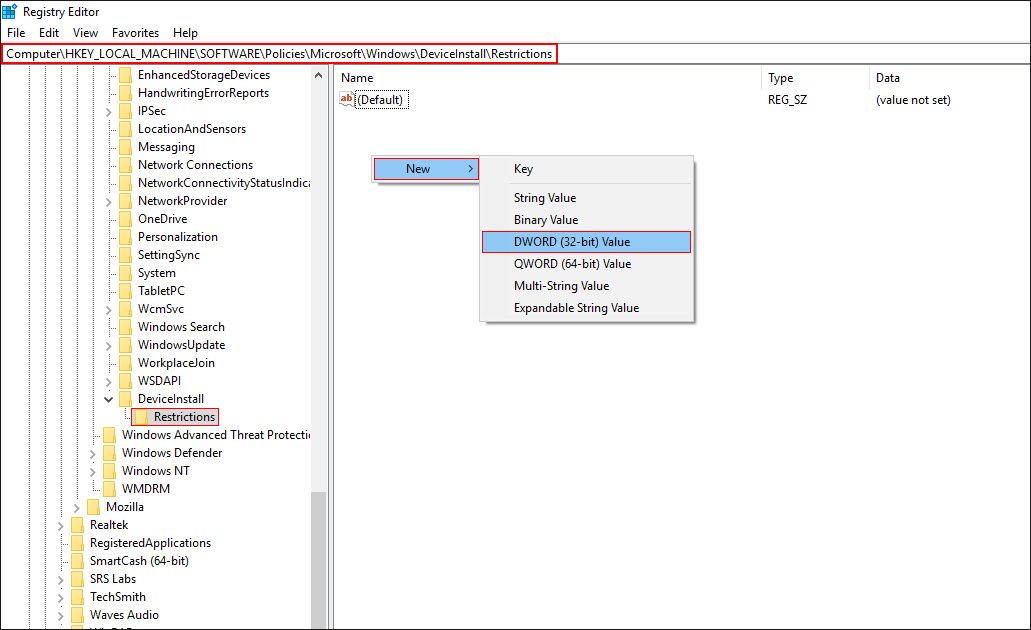
Once you have a restore point, open the Windows Registry Editor by pressing Windows Key + R, then type regedit into the Run tool text box and press Enter. When you have the tool open in front of you, navigate to the following location using the left-hand pane of the Registry Editor:
HKEY_LOCAL_MACHINE\SOFTWARE\Policies\Microsoft\Windows\DeviceInstall\Restrictions
Note: If you don’t see DeviceInstall and Restrictions, right-click the Windows key (folder) and select New > Key and name the key DeviceInstall. Then right-click on DeviceInstall and select New > Key and name the key Restrictions.
Once you have the Restrictions key (folder) selected, right-click the empty space in the central pane and select New > 32-bit DWORD Value. Then name the new entry DenyRemovableDevices.
Note: Even if you are running 64-bit Windows 10 you still need to use a 32-bit DWORD value.
Now double-click the DenyRemovableDevices entry and make sure its value is set to 1. Once done, click Ok, then Restart your computer for the change to take effect.

After making the change anything you connect to your computer will be ignored completely. If at any stage you wish to re-enable the feature, return to the exact same location and change the value of DenyRemovableDevices to 0, then Restart your computer.