Table of Contents
If you are using the new version of Microsoft Edge and would like to finally stop autoplay videos and other media. This article will guide you through the process from start to finish. For whatever reason autoplay is still a thing, this guide will finally allow you to disable it completely.
How to View Full Details in the Delete File Confirmation Dialog Box on Windows 10.
The development and roll-out of Microsoft’s new version of Edge, running on the Chromium engine has been very well received by end-users around the world. With user opt-in downloads for Canary, Dev, and Beta versions of the browser seeing huge download numbers already. Whether these new users stick with the new version of Edge has yet to be seen, but a lot of Internet chatter seems to say that most will. Especially with all the negative press coming out about Google Chrome.
Although the new version of Microsoft Edge is based on the Chromium engine there are quite a few things that make it different from Chrome. Apart from being a lot more resource-friendly it also boasts some pretty cool unique features worth exploring, and with the latest update! It finally has proper auto-play video blocking abilities.
How do you stop videos automatically playing on Microsoft Edge?
Although Edge has inherited a lot of its core features from the Chromium engine, not all of them are enabled by default. Sadly, for whatever reason, autoplay video blocking is one of them. Thankfully this can be changed without much hassle, so once you’ve updated Edge to the latest version proceed to do the following.
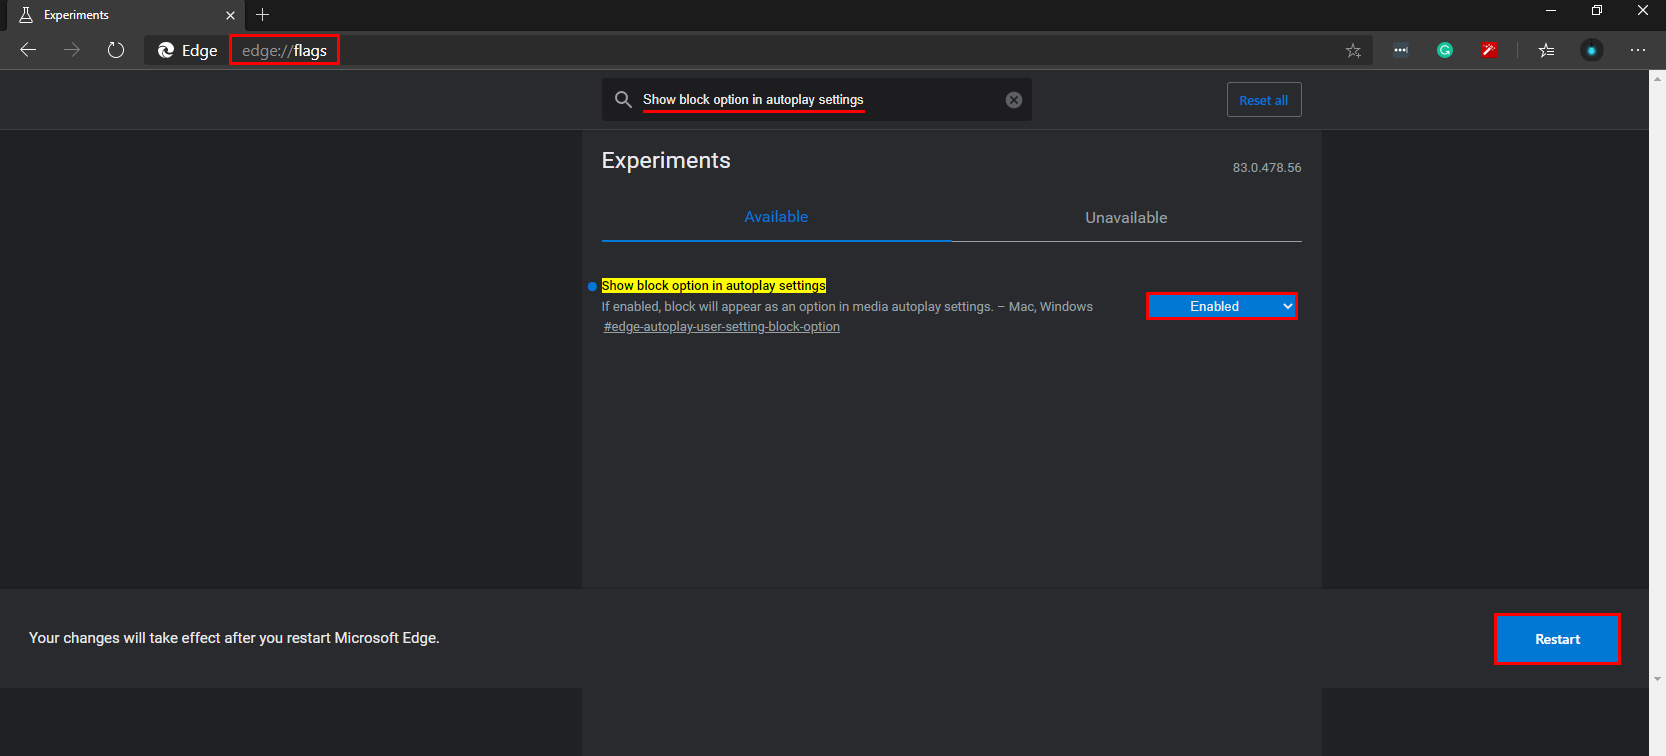
Open Edge, then type: EDGE: // flags into the address bar and press Enter. This will take you to a new page with ton of different and very complex looking options. Next, use the Search flags text box at the top of the screen to search:
Show block option in autoplay settings
When the option appears highlighted in yellow, use the drop-down text box to change the setting from Default to Enabled. Once you have made the change, click Then save the option by clicking the Restart button in the bottom right corner of the screen.
Other ways to disable autoplay from websites on Microsoft Edge Chromium.
Seeing as just about every website on the Internet wants to force-feed you their content they are always looking for ways to get around autoplay blockers (among others). As a result, you may sometimes come across sites that the above method doesn’t work for. If this happens quite regularly you’ll need to take the extra measure of installing an extension called AutoplayStopper.
Once you’ve installed the extension, it will automatically start blocking playback on all pages. However, if this causes unexpected problems on some websites (e.g., prevents the next episode of the series from automatically playing on Netflix), you can click the extension icon and select Allow autoplay on to add an exception for the site, allowing it to play content automatically.
On a side note...
If you are also looking for a quick and easy way to add a little more information to the text box that Windows 10 shows when deleting files. Make sure you check out the following article which will show you how to double the amount of information displayed before you confirm file deletions on Windows 10.
How to View Full Details in the Delete File Confirmation Dialog Box on Windows 10.