Table of Contents
Learn how to disable automatic thumbnail cache cleaning on Windows 10. A feature of Windows 10 that often uses a fair amount of system resources to update File Explorer thumbnails.
How to Run Programs and Apps in Picture in Picture (PIP) Mode on Windows 10.
Windows 10 is a fairly well optimised operating system and has one of the best file management systems of all the operating systems on the market. In fact, most file management systems in existence are loosely based around similar systems and work in very similar ways.
What a lot of people don’t know, however, is that the File Explorer on Windows 10 uses a special cache for managing thumbnail icons. (Part of the Windows 10 Cleanup tool) Which can use a considerable amount of system resources to maintain the cache which updates very regularly, clearing and reloading content as it works.
You probably won’t notice a spike in CPU usage when File Explorer loads most folders. However, if you have a folder with a ton of videos or images, you will notice that it often takes Windows 10 a long time to load and sort the contents of the folder, refreshing and reloading thumbnails. So if you don’t want or need Windows 10 to constantly clean and refresh this cache, this article will show you how to disable automatic cache cleaning of thumbnails.
If you would like to manually clear the caches current stockpile of content, you can find the cache in the following location: C:\Users\username\AppData\Local\Microsoft\Windows\Explorer
Related: How to Import Table & Spreadsheet Data From a Picture into Microsoft Excel.
How Do You Disable Automatic Thumbnail Cache Cleaning in File Explorer on Windows 10?
Since this process requires you to make changes to the Windows 10 Registry, it’s important to make a System Restore point before continuing. To do this, open the start menu, type Restore, then select Create a Restore Point when it appears on the list. From the new window that appears, click Create in the bottom right section of the screen, then follow the instructions given by Windows. Once you have successfully made a restore point, you can continue.
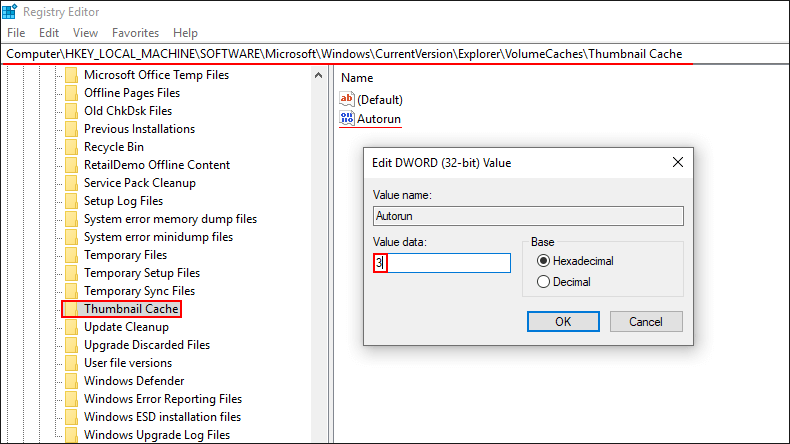
With a restore point set, it’s safe to begin making some changes. To begin, open the Windows Run tool by pressing Windows Key + R, type regedit into the box, then press Enter. Once you have the registry editor open, navigate to the following location:
HKLM\SOFTWARE\WOW6432Node\Microsoft\Windows\CurrentVersion\Explorer\VolumeCaches\Thumbnail Cache
When you get to the correct location, double click on the Autorun entry and change the value to 0. This will stop maintenance tasks and prevent the thumbnail cache from being deleted and remade regularly. If you wish to re-enable it at some stage, change the value back to 3. Once you have stopped the cache from being cleared, you will want to manually clear it out from time to time, otherwise, it will start to take up more and more space on your system.
Note: If you would like to manually clear the caches current stockpile of content, you can find it in the following location: C:\Users\username\AppData\Local\Microsoft\Windows\Explorer
How Do You Disable Automatic Thumbnail Cache Cleaning in File Explorer Without Using the Registry Editor?
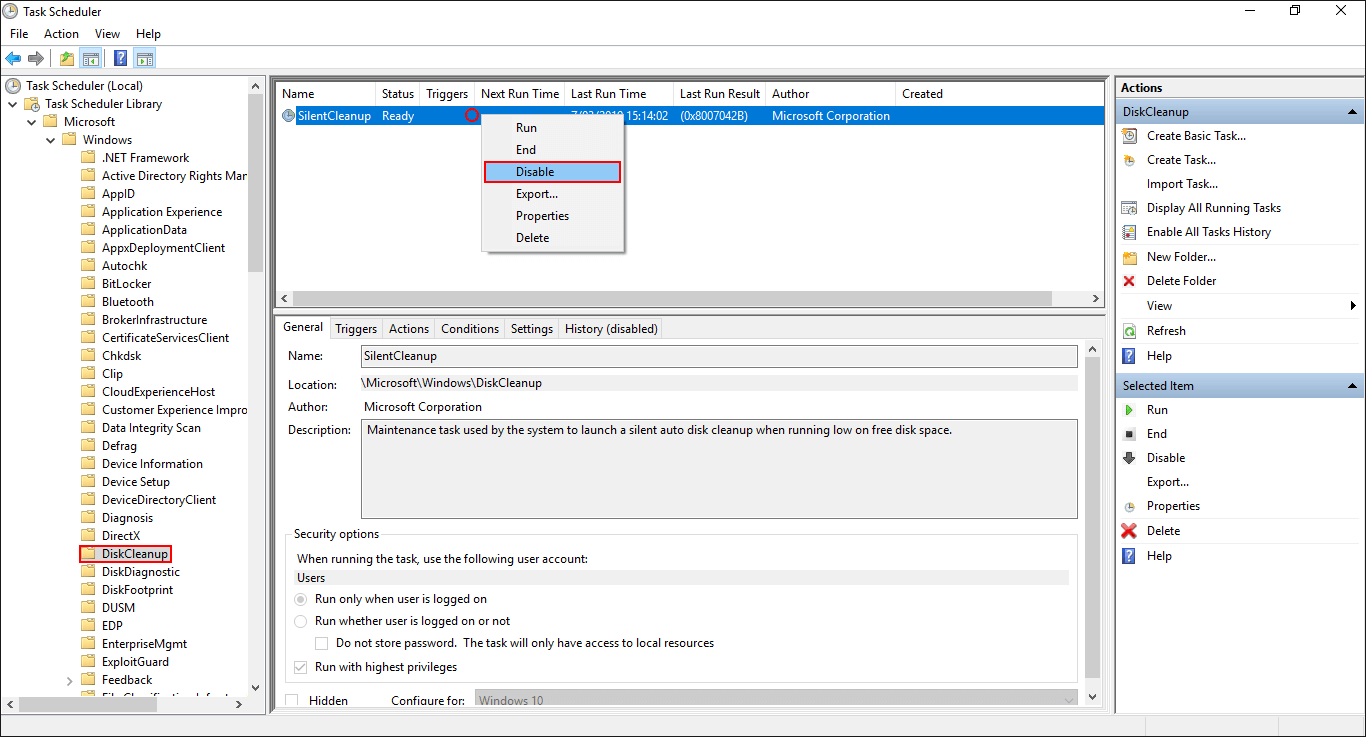
If you don’t want to use the Registry Editor, you can also stop the thumbnail cache cleaning process from the Task Scheduler. To use this method, open the Task Scheduler by searching Task Scheduler from the start menu, then use the navigation pane in the sidebar to go to Task Scheduler Library > Microsoft > Windows > DiskCleanup.
When you get to the correct location, you will see a SlientCleanup task at the top of the centre pane, now simply right-click on it and select Disable and the task will be disabled until you re-enable it or until the next Windows 10 Feature update. Windows has a track record of returning a lot of settings to defaults after major updates.