Table of Contents
If you are sick and tired of hearing the same notification sound on Windows 10 every time something noteworthy happens. This article will show you how to customise the Windows 10 notification sound plus a ton of other system sounds. Change the notification sound to anything you like.
How to Remove Shadows From Desktop Icon Text on Windows 10. (Disable Drop Shadows)
Although Windows operating systems have always been relatively customisable, a lot of the possible customisable aspects haven’t always been the easiest to perform or locate. Tools like Command Prompt, the Registry Editor and more recently PowerShell on Windows 10 are often required to make a lot of advanced changes.
Thankfully over the years Windows 10 has seen customisation become considerably easier with a lot of options now relocated from other parts of the operating system into the Windows 10 Settings App. Admittedly this hasn’t been welcomed by everyone but for a lot of newcomers, the change is very much appreciated.
As a result of these changes, it’s now possible to change notification sounds quickly and easily from the Windows 10 Settings App rather than from the Windows 10 Control Panel. So follow along as we guide you through the new simplified process.
Related: How to Delete Your Telegram Messages and Conversations From Someone Else's Telegram Account.
How Do You Change the Sound of Notifications on Windows 10?
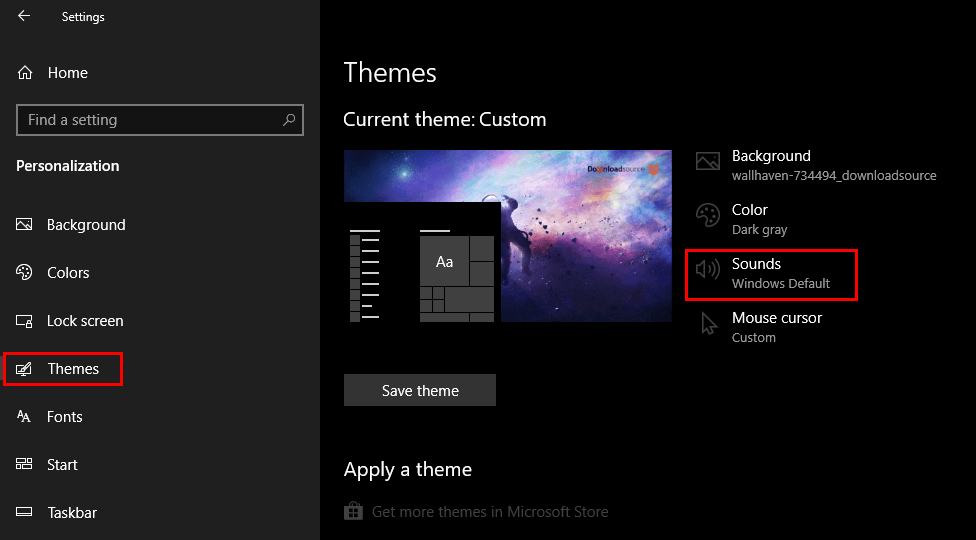
To change the sound of notifications and other aspects on Windows 10 the easiest way used to be from the Windows 10 Control Panel. However, it’s now far easier to make the change from the Windows 10 Settings App. To begin open Settings, then go to Personalisation followed by Themes in the left-hand pane. Next click Sounds in the central window and a new pop up window will appear with all of Windows 10’s system sound options.
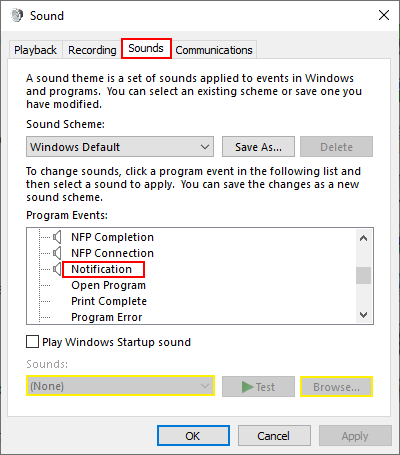
Now in the small Sound window scroll down and find Notifications. When you find it, select it and use the drop-down menu to the right to change the sound, selecting from the massive list of Windows 10 defaults. If however, you wish to use your own sound file click Browse and select a sound file from a location on your computer. The only catch is that the file has to be in WAV format. A sadly uncommon and outdated sound format.
If the sound file you wish to use isn’t in WAV format, you can quickly and easily convert it using Convertio: https://convertio.co/wav-converter/. Convertio is pretty much the go-to online tool for any kind of file format conversion.
While you have the Windows 10 Sound options menu open feel free to customise any of the other sounds that are listed. You can change the sound for New Mail Notification, New Text Message Notification, Desktop Mail Notification, Calendar Reminder, and Instant Message Notification as well as dozens of others. Alternatively, if you’d rather use the old method to change system sounds you can open Control Panel, click Sounds, then follow the exact same process to change individual sounds.
On a Side Note…
If you are currently using Google Chrome to browse the Internet and have recently updated to version 73, you may be interested in understanding why the browser now shows “Managed by your organisation” at the bottom of the settings menu. In most cases this isn’t something to be worried about however, it’s something worth looking into if you are a standard home Internet user. Google Chrome ‘Managed by your Organization’ Message Explained & Fixed.