Table of Contents
The Windows 10 User Account Control (UAC) service is a security feature that stops apps from making unauthorized changes to your system. It also allows you to prevent accidental settings change from taking place. Sometimes though it can be a pain to work with, especially if you are are working with some of Windows 10’s older legacy apps. Thankfully though, you can adjust the UAC’s settings to receive less notification or simply disable UAC altogether.
How to Change the Automatic Connection Order of Wireless Networks on Windows.
User Account Control is enabled by default on Windows 10 and for most people will never cause much annoyance. When UAC is enabled, all app changes will prompt a security warning which must be accepted manually be the user, before the change can be made. This is obviously a very useful security feature which helps reduce the risk of malware and viral infections as well as unauthorized access. It’s also a pain the ass if you know what you are doing and have to constantly accept notifications.
As we mentioned in the introduction above, the Windows User Account Control service can be customised or disabled, obviously depending on your preference. First and foremost before you can make any changes you will need to make sure you have administrator access to your system. If you don’t you won’t be able to make the required changes. If you aren’t sure how to get administrator access, the below link has all the answers you’re looking for. Alternatively, if another user on your computer has admin rights they will be able to enable the feature on your account.
How to Enable Administrator Access on Windows 10.
How to Change User Account Control (UAC) Settings on Windows 10.
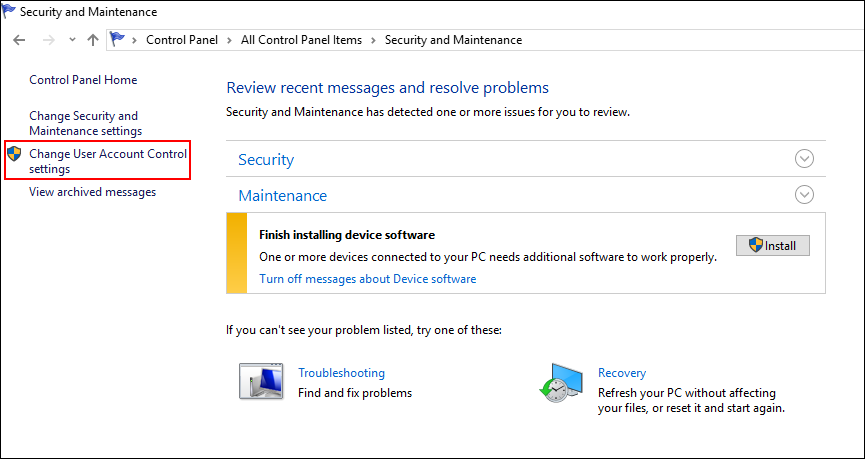
Once you are sure you have administrator privileges, you can begin the process. First, open the Control Panel and click on System and Security 'aka' Security and Maintenance. Next, find and click on the Change User Account Control Settings link.
Note: You can also find the User Account Control option by searching it from the Start menu.
Inside this menu, you will notice that there are four different levels of User Account Control protection. You’ll now see why administrator rights are important. If you have accessed the UAC settings with a Standard user account, you will not be able to view or all four settings, only two will adjustable.
- Always notify me when: This is the default option for all standard user accounts and forces apps to display the UAC notification when any system changes are trying to be executed.
- Always notify me (and do not dim my desktop): Blocks apps and users system changes in the same way that ‘Always notify me when’ does, however still gives you access to the desktop where you can continue to work as normal.
On an Administrator user account, you will be able to see all four levels and adjust them accordingly.
- Always notify me when: This is the default option for all standard user accounts and forces apps to display the UAC notification when any system changes are trying to be executed.
- Notify me only when apps try to make changes to my computer: This is the default UAC level for administrator accounts and it won’t notify you when making system changes.
- Notify me only when apps try to make changes to my computer (do not dim my desktop): This option will stop all notifications, yet you will still have access to the desktop so you can continue working as normal.
- Never notify me when: This option disables UAC completely. (not the safest option. If you know what you are doing though, feel free to choose this option)
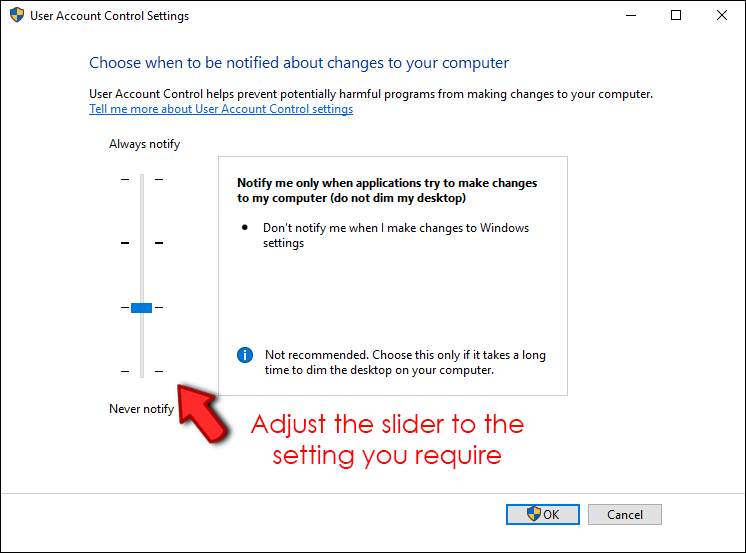
Once you have decided which option best suits your needs, click Ok to apply the changes. To make the changes take effect, you will also need to restart your computer. When you sign back into your account, the new UAC settings will be active. Just remember that the default settings are the best for security.