Table of Contents
A short tutorial showing you how to configure Windows 10 to automatically delete your system Pagefile.sys file on shutdown. A handy little change you can make to the operating system to save some space each and every time you start up your system.
Windows 10 has a lot of interesting components that all work together to make the operating system run and function in an orderly, reliable and fast nature. Although some components can’t be or shouldn’t be tweaked to keep stability as high as possible. There are a few things you can change that may make a little different to the way you use Windows 10.
One such example is the Windows 10 Pagefile.sys file. This file stores all of the operating systems virtual memory and generally matches the same figure as physically installed system ram. So if you have 16gb of ram installed in your system, your Pagefile.sys allocation will also be 16gb. However, this isn’t a set rule as it can be manually changed should you choose to do so. How this file works in detail takes quite a lot of explaining, so if you require more information, I’d suggest a quick Google search.
Seeing as this file can take up a ton of storage space, you may wish to reconfigure it to automatically delete itself on system shutdown. So follow along as we guide you through the process.
Related: How to Make Screen Brightness Stay the Same on Power and Battery on Windows 10.
How Do You Make Windows 10 Automatically Delete the Pagefile.sys File at Shutdown?
As this process will require you to make changes to the Windows 10 registry, it’s important that you make a System Restore Point before continuing. (This will allow you to revert back to a safe system point if you make any mistakes) To do this, open the start menu, type Restore, then select Create a Restore Point when it shows on the list. From the new window that appears, click Create in the bottom right section of the screen, then follow the instructions given by Windows. Once you have successfully made a restore point, you can continue.
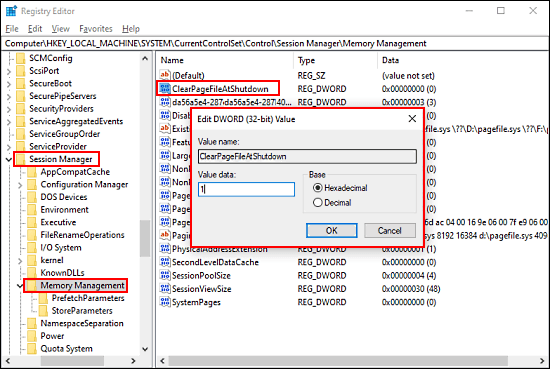
With a restore point set, press the Windows Key + R to open the Run tool, then type: regedit into the text box and press Enter. Once the registry tool is open, navigate to the following address using the left-hand pane.
Computer\HKEY_LOCAL_MACHINE\SYSTEM\CurrentControlSet\Control\Session Manager\Memory Management
Once you are in the correct location, find the ClearPageFileAtShutdown entry in the central pane and double-click on it to edit it. In the new window that appears on the screen change the figure in the Value Data box to 1, and click Ok to save the change. After a system Restart, the change will take effect and the Pagefile.sys file will auto-delete on shut down.
On a Side Note...
If you are also looking for a quick and easy way to add a little more information to the text box that Windows 10 shows when deleting files. Make sure you check out the following article which will show you how to double the amount of information displayed before you confirm file deletions on Windows 10.
How to View Full Details in the Delete File Confirmation Dialog Box on Windows 10.