Table of Contents
If you have a Windows 10 laptop and would like to know how to set your screen brightness to a constant level that doesn’t change when connected to power or running on battery. This article will guide you through the process. On completion, you’ll be able to better control how your screen brightness reacts to power and batter switches on Windows 10.
How to Stop Cortana Auto-Starting on Windows 10. Disable Cortana Auto-Start on Windows 10.
Having the ability to manually adjust your screen brightness on modern devices is one of the most useful features of any smart device. Laptops, phones, tablets, TVs and a range of other devices all have brightness settings that can be changed to best suit the current environment. Although most people generally leave their brightness levels on max, or automatic, manually adjusting your brightness is generally a much more efficient and battery-saving endeavour.
Windows 10 laptops also use a very similar system to Android and iOS devices for managing screen brightness, with one major exception. Power supply to battery energy saving presets. By default, all Windows 10 laptops currently optimise battery life over performance when disconnected from mains power. Even though these settings can be overridden, screen brightness is generally a little harder to find, so follow along as this guide shows you how to set a stable screen brightness level for when your laptop is connected to mains power or running on battery life.
Related: How to Export Passwords From Microsoft Edge. (Transfer Save Passwords From Edge)
How Do You Force Screen Brightness to Stay the Same on Power and Battery on Windows 10?
If it isn’t already obvious, it’s important to note that locking your screen to a higher brightness level will dramatically increase battery usage, so make sure you pick a nice balance that won’t chew through your battery supply. If you don’t need max battery life feel free to set it to whatever you like.
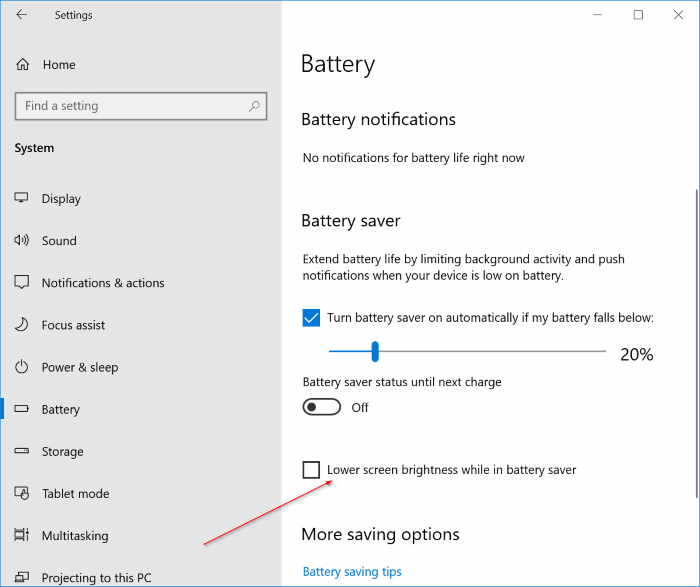
To begin, open Settings then navigate System, then finally Battery. Under the Battery settings section, you will see a subtle checkbox with the text: Lower screen brightness when in battery saver next to it. Simply remove the tick from this checkbox and Windows will make sure your screen brightness remains the same when connected to power and when running on battery.
Alternatively...
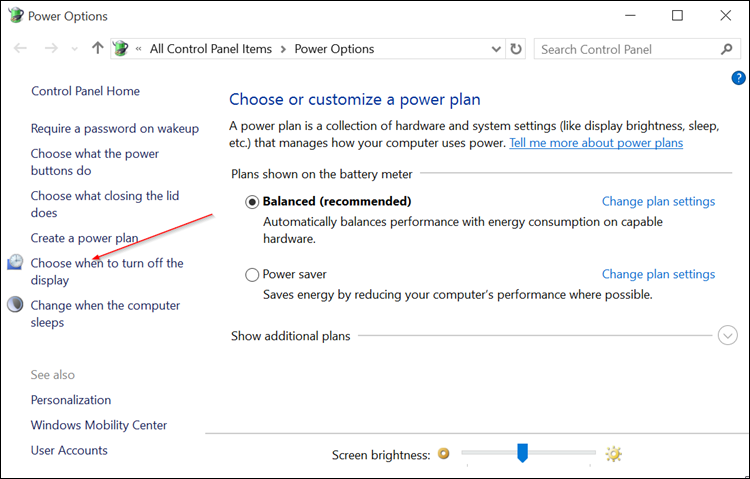
You can also lock your screen brightness to the same level by doing the following. Right-click the battery icon in the system tray, then and click Power Options. This will open a new window where you will need to click Choose when to turn off the display.
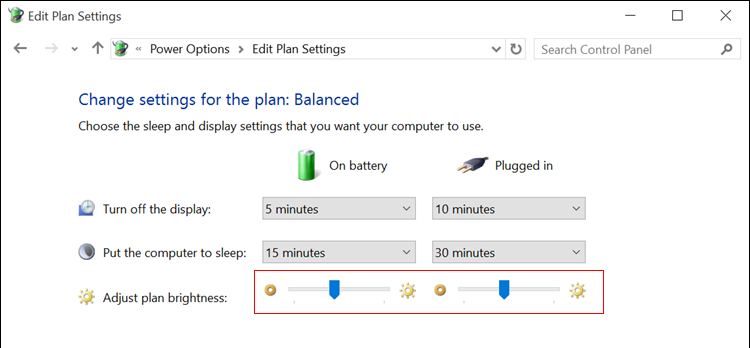
Finally use the screen brightness slider to set your screen brightness levels for power and battery modes. Just remember that this will only affect the current power plan. If you switch plans, you’ll need to readjust your settings.
On a Side Note...
If you also use Facebook Messenger Rooms from time to time, you’ll more than likely be looking for a way to blur backgrounds during video calls. Although Facebook Messenger Rooms isn’t focused on a professional user base you never know when this feature may come in handy. This guide will also show you how to get custom backgrounds for Facebook Messenger Rooms.