If you like to sign in to your Windows 11 computer as quickly as possible and hate the annoying lock screen that adds an extra click to the process. This article will show you how to disable the lock screen on Windows 11. Keep in mind this method won’t automatically sign you in. It will just remove the lock screen and show the sign-in screen by default.

Table of Contents
Related: How to fix Microsoft Visual C++ error 0x81f40001 on Windows 11.
The lock screen on Windows 11 can be a great feature for some, however, for others, it’s a waste of time and an extra step you need to take when signing in to your device. Although it serves a purpose on touch screen devices, it’s essentially pointless on Laptops and Dekstop PCs. Although I have my desktop PC set to automatically sign in (Windows 10) I have my Windows 11 laptop configured to be lock screen free.
If you aren’t fond of the lock screen and find yourself having to enter your password twice because of the lock screen delay you’ll find two different ways you can disable the lock screen on Windows 11 below. The first method is using the Windows Registry Editor, which is available to everyone on all versions of Windows 11. The second option uses the Group Policy Editor which is only available on Pro, Education, and Enterprise versions of Windows 11.
As most people will probably be using the Registry Editor to disable the lock screen on Windows 11 make sure you create a system restore point before starting. If you aren’t sure how to create a system restore point on Windows 11 we have a guide here.
How to disable the Windows 11 Lock screen using the Group Policy Tool.
To disable the lock screen on Windows 11 Pro, Education, or Enterprise using Group Policy do the following.
- Open the Start menu and search for gpedit. When it appears select the top result to open the Local Group Policy Editor.
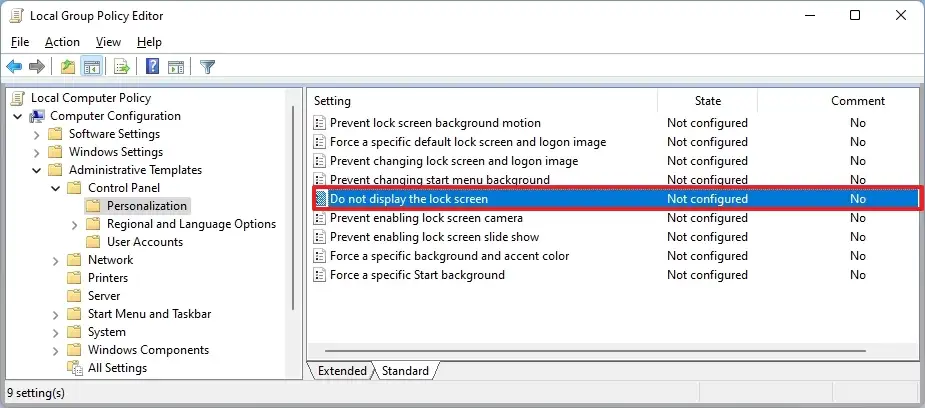
- Now navigate to the following location: Computer Configuration > Administrative Templates > Control Panel > Personalization.
- Next, double-click the Do not display the lock screen policy and choose Enabled.
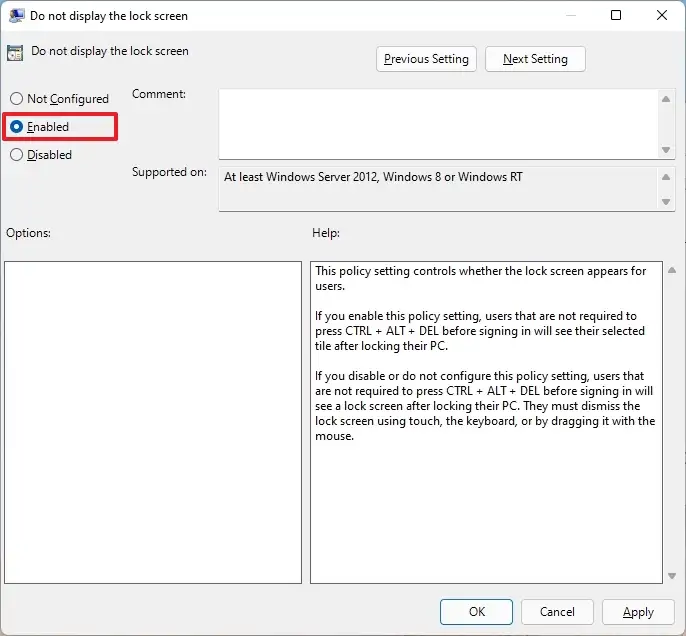
- Finally, click Apply, Ok, then Restart your computer and the change will take effect.
When your system reboots it will go straight to the login screen.
How to disable the Windows 11 Lock screen using the Registry Editor.
If you are using Windows 11 Home you can use the Registry Editor to disable the lock screen on Windows 11.
- Open the Start menu and search for regedit. When it appears open it.
- Next, navigate to the following location using the left-hand pane:
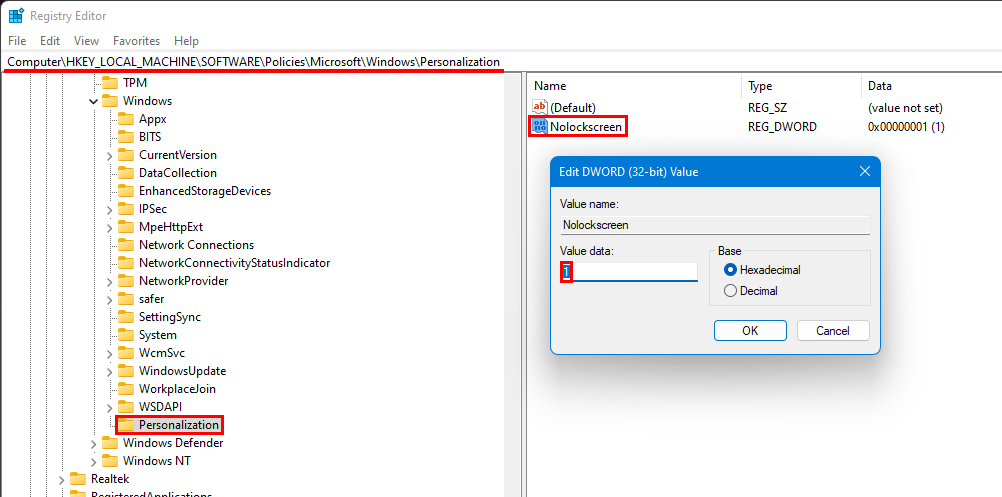
HKEY_LOCAL_MACHINE\SOFTWARE\Policies\Microsoft\Windows
- When you get to the correct location, right-click the Windows key (folder), select New > Key. Name this new entry Personalization and press Enter.
- Now right-click the Personalization key (folder), select the New > DWORD (32-bit) value. Name the new entry Nolockscreen.
- Finally, double-click the Nolockscreen entry and set its Value data from 0 to 1 then click Ok and Restart your computer.
When your computer restarts, it will take you straight to the login screen saving you from having to click past the lock screen to get to the password entry box.