If you have recently updated Windows 11 to the latest version and don’t have any use or interest in using the annoying new copilot content that is pre-installed on your computer. This article will show you several different methods you can use to disable it so you never have to see it again. At least until Microsoft forces you to try it again.

Table of Contents
Related: How to Control RGB Lighting on Windows 11. Windows 11 Dynamic Lighting Guide.
As is typical of Microsoft they have already added a brand new feature to replace an older one without even completely removing the last disaster from the operating system. What disaster? Have you forgotten about Cortana yet? Surely not! Cortana was the biggest waste of system resources in the long history of wasted resources on Windows 11.
Typically though, Microsoft has added a brand new feature called Copilot which is an updated version of Cortana in a lot of ways, aiming to make your life easier. Here’s the hilarious part though… They still haven’t fully removed Cortana from Windows even though it has 0 use for anyone anymore. So what about Copilot on Windows 11? Can you remove it, disable it, or turn it off? Yes, kinda, sorta….
How do you Disable and/or Remove Copilot from Windows 11?
This is the easiest method to disable Windows Copilot in Windows 11. The following instructions will guide you on this.
- Open Windows 11 Settings.
- Go to Personalization > Taskbar.
- Expand the Taskbar Items section.
- Turn off the Copilot (preview) button.
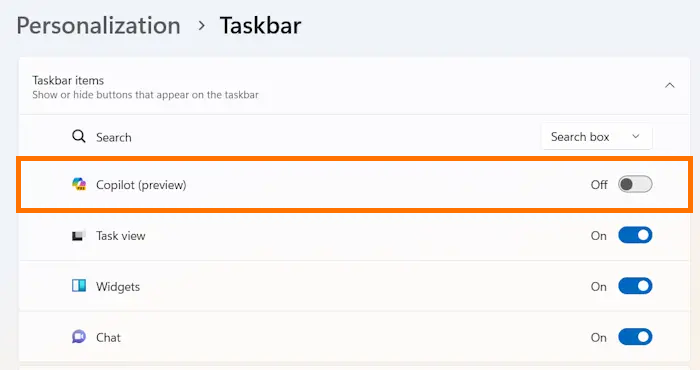
When you turn off the Copilot (preview) button, the Copilot icon will disappear automatically from the Taskbar.
Disabling Windows 11 Copilot from Windows 11 Settings is the easiest method.
Disable Windows Copilot by using the Registry Editor.
This method will work on all editions of Windows 11 but before you start, it’s a good idea to create a System Restore Point and backup your registry. If you aren’t sure how to do that on Windows 11 you can find the steps here.
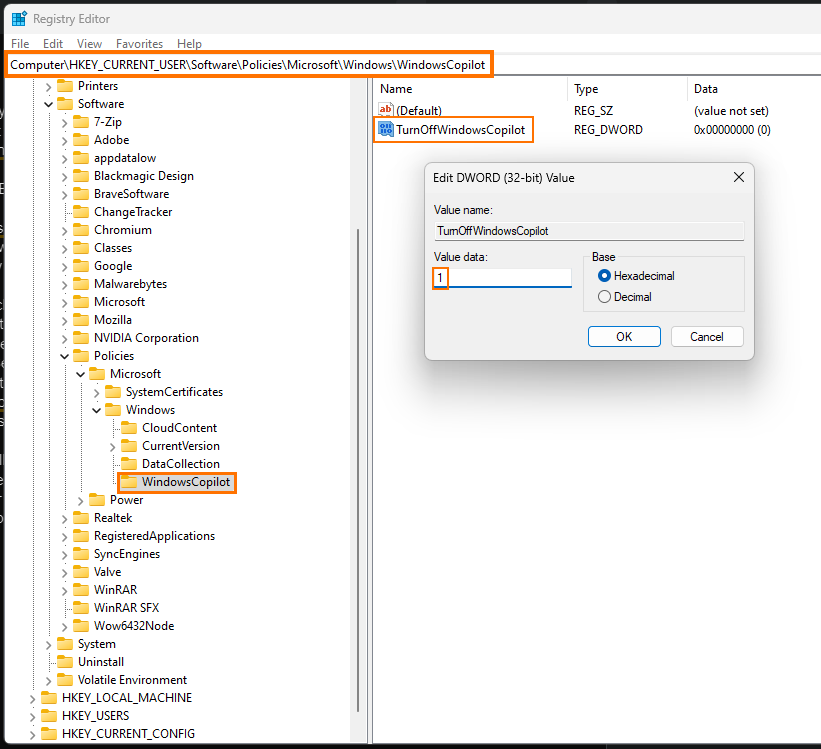
- When you have a system restore point set open the Registry Editor by searching regedit from the start menu. When you have the tool open use the left-hand pane to go to the following location.
HKEY_CURRENT_USER\Software\Policies\Microsoft\Windows
- Make sure the Windows key (folder) is selected on the left side. Now, expand the Windows key and select the WindowsCopilot subkey under it. If the WindowsCopilot subkey is missing, you have to create it manually.
- Right-click on the Windows key and select New > Key.
- Name this file WindowsCopilot.
- Now, select the WindowsCopilot key and right-click in the empty space on the right side. Select New > DWORD (32-bit) Value.
- Name this file TurnOffWindowsCopilot.
- Now double-click TurnOffWindowsCopilot and change the Value data to 1, then click OK to save the changes.
Finally, you will have to restart your computer for the changes to take effect and for the Copilot feature to be disabled. Annoying Microsoft will keep trying to enable the feature on your computer with Windows updates so you may have to do this every now and again so remember to bookmark this page.