Table of Contents
If you are a Google Chrome user who would like to add a little more organisation to your Internet browsing experience. This article will guide you through the process of enabling Tab Groups in Googe Chrome, allowing for quick, easy and time-saving organisation.
How to Make Word/Character Count Always Visible on Google Docs.
It has been quite a while since a really useful organisational feature was rolled out in Google Chrome, which is why today’s feature has been so well received globally. Tab Groups as they are called allow Chrome users to quickly and easily organise tabs into special, easy to find and manage groups, giving an unprecedented level of organisation. With Tab Groups enabled you can easily sort your list of tabs into well-managed workflows.
At this stage Tab Groups aren’t enabled by default in Google Chrome, so follow along as this guide walks you through the enabling process and the task of using Tab Groups in Google Chrome. After using Tab Groups for a few hours it’s surprising that Google and other browsers didn’t think to add them sooner.
Related: How to Stop Microsoft Teams Running in the Background After Closing it on Windows 10.
How Do You Turn on Tab Groups on Google Chrome? Enable Google Chrome Tab Groups.
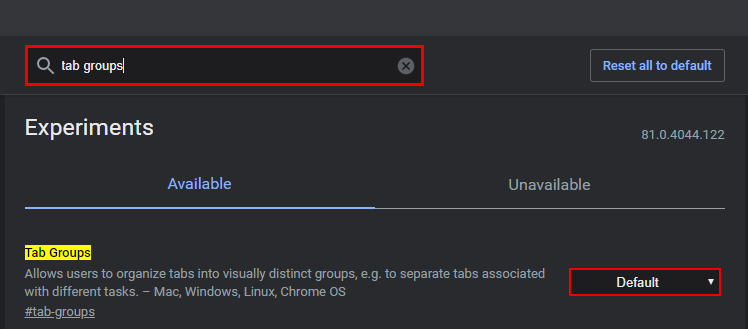
To enable Tab Group in Google Chrome you’ll need to make sure your browser is fully up to date by going to Settings > About and waiting for the auto-update process to take place. Once you are on the latest version of Chrome, open the browser and type or copy and paste chrome://flags into the address bar and press Enter. On the new page that appears search Tab Groups using the Search Flags text box at the top of the page. When the Tab Groups entry appears highlighted in yellow, use the drop-down toolbox to change the setting to Enabled, then restart/relaunch the browser. After a restart Tab Groups will be ready to use in Google Chrome.
How Do You Use Tab Groups in Google Chrome?
Once Tab Groups have been enabled, using them is super easy. First right-click on a tab, then select the option to “add to a new group” This will allow you to create a new Chrome Group Tab with a custom name and colour. When you have a group or two ready, you’ll be able to select “add to existing group” and add the tab to one of your previously created Tab Groups. All tabs in groups are arranged together with the name of the tab group in front.
If you need/want to remove a tab from a group simply right-click on the tab and choose to move the tab to a new group or close the tab completely. If at any stage you wish to change the Tab Groups name or colour you can do so by clicking the group name.
On a Side Note…
If you’re also a big Windows 10 user, make sure you take the time to check out the newly designed File Explorer. More than likely it’s going to take a fair bit of getting used to, but it does fit with the current material design of Windows 10 very well. It’s also a work in progress, so it’s best to take it with a grain of salt as it still has a lot of work to go.