If you are trying to install Windows 11 but can’t finish making the required changes in the BIOS because disabling CSM Support no longer lets the BIOS appear for you to complete the changes. This article will show you the steps you are going to have to take to fix the BIOS not appearing after disabling CSM Support on Gigabyte and other branded motherboards.

Table of Contents
Related: How to Fix NZXT Kraken X61, X62, X72, X52, X42, M22 Water Pump Stopped/Not Working.
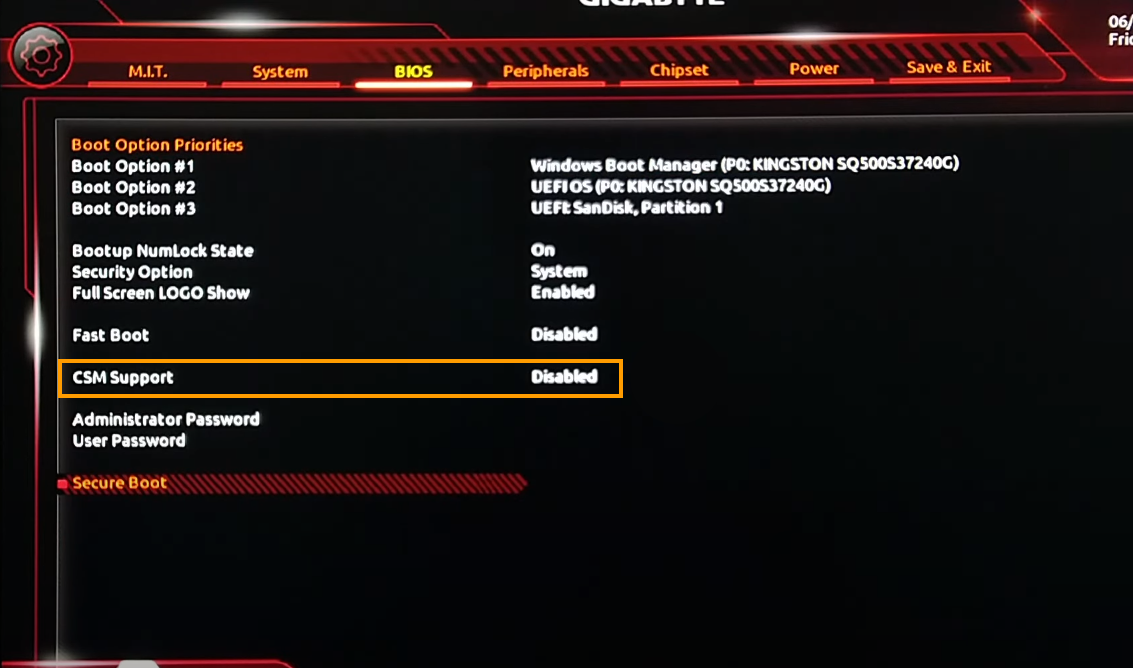
If you have recently purchased a new motherboard perhaps a Gigabyte B550 AORUS ELITE V2 or something else and have disabled CSM Support but now can’t see or access the BIOS because of a black screen you’ve got a fair bit of work ahead of you! Don’t worry though, the issue of a black screen after disabling CSM Support is easily solved, however, the process is a super annoying one with quite a lot of variables.
The issue of the BIOS screen not appearing after disabling CSM support on some motherboards has been around for quite some time now which is ridiculous considering it is a major issue. It seems to affect Gigabyte motherboards more than others but there are also some other brands that also have the same issue.
Thankfully your motherboard isn’t bricked or dead, it’s just in an annoying state of confusion that you will need to solve using a variety of primitive fixes. From my experience solving this issue several times now, you will probably have to try a few different things before you get the BIOS screen back after disabling CSM support.
How do you get the BIOS screen back after Disabling CSM support on Gigabyte and other motherboards? Try using a HDMI cable instead of Display Port.
So the first thing you can try is to switch from using a Display Port cable for your monitor to a standard HDMI port. Yes! That is correct replace any Display Port cables with a HDMI cable. This will usually bring back the BIOS screen and allow you to complete the rest of the process for a Windows 11 installation.
If this doesn’t work straight away don’t change anything just yet you may need to follow a few more steps.
Remove the CMOS battery from your motherboard to reset your BIOS to default.
Now that you have switched to a HDMI cable the next thing you need to do is turn your computer off at the power source, then remove the CMOS battery from your motherboard. On Gigabyte B550 AORUS ELITE boards it’s behind the GPU so you will need to take that out first.
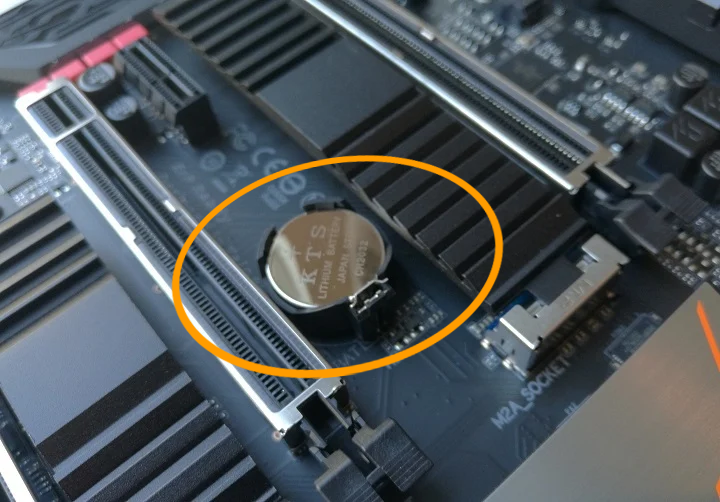
Now leave the battery out of your computer for at least one minute then replace it, and try to boot into your BIOS again. Usually, that is enough to solve the problem, however, it may not work for everyone, so keep on following the steps below.
Try using the HDMI port on your motherboard instead of your GPU.
If nothing so far has worked try using the HDMI port on your motherboard along with the CMOS battery removal step. By now you should be back in action however if you aren’t there’s one more thing you can try which depends a little bit on your hardware configuration.
Change PCIe Settings in the BIOS from Auto.
This solution comes from @arunprince143 over on Youtube who solved the problem completely by going into the BIOS and changing PCIe from Auto to X16 Gen2 (or higher if available). How you do this might vary a little bit depending on your hardware but it seems to work really well and solve the problem for older GPUS. Cards from the NVIDIA 10 series etc.
Remove your GPU and CMOS battery at the same time.
While most people will have to do this anyway just to get to their CMOS battery some hardware configurations won’t require it. So first remove your GPU, then remove your CMOS battery and wait for about 1 minute.
Next, place the CMOS battery back into your motherboard, install your GPU again and connect your display to it using a HMDI cable. Once you have done all that turn on your computer again and it will allow you to boot into the BIOS again.
Ok, so you’ve got the BIOS working again how do you finish the changes you need to make without it happening again?
Now that you can access the BIOS again disable CSM support again but don’t save and restart just yet, Go and enable TPM support and change your Secure Boot options. For Gigabyte B550 AORUS ELITE boards change it to Standard. After you have done all of these steps Save and Exit the BIOS. You should now be able to continue the process of a clean Windows 11 installation.
Also getting the - “Windows could not assign a drive letter to a partition on disk 3” error?
Now that you’ve passed the first hurdle you may also be getting another installation error.
“Windows could not assign a drive letter to a partition on Disk. The target disk, partition or volume does not support the specified operation. The error occurred while preparing the compter’s system volume. Error code 0x80300024”
If so check out our full guide on solving the issue here.