If you are having problems updating or clean installing Insta360 Studio on your computer for any reason. This article will show you how to quickly install the latest version properly, even if you are getting errors because of missing files or file access. The error message will usually ask if you want to skip the file, however, this is a bad idea and one that doesn’t usually work anyway.

Table of Contents
Related: How to fix sound cutting in and out in videos exported from Insta360 Studio.
Insta360 caters to the needs of its camera users by providing a dedicated editing software called Insta360 Studio. This tool offers a versatile set of tools for keyframing and editing 360 content, streamlining the process of enhancing your videos. While there is a plugin available for integrating with Premiere Pro, Insta360 Studio presents distinct advantages. It utilizes default proxies (low-resolution video samples) to ensure faster, smoother, and more reliable editing capabilities, especially for users with less powerful computers.
For the most part, Insta360 Studio is a stable and easy-to-use tool. However, it does encounter occasional issues with updates and installations. Often, when attempting to update to a newer version, an error occurs indicating that certain files cannot be found, are in use, or are inaccessible. Even uninstalling and reinstalling Insta360 Studio does not resolve the problem. Therefore, let us guide you through the steps to troubleshoot and solve this issue for a successful installation of Insta360 Studio.
How do you fix Insta360 Studio not updating or failing to install?
To begin the first thing you need to do is uninstall Insta360 Studio from your computer. Once you have removed it, restart your computer.
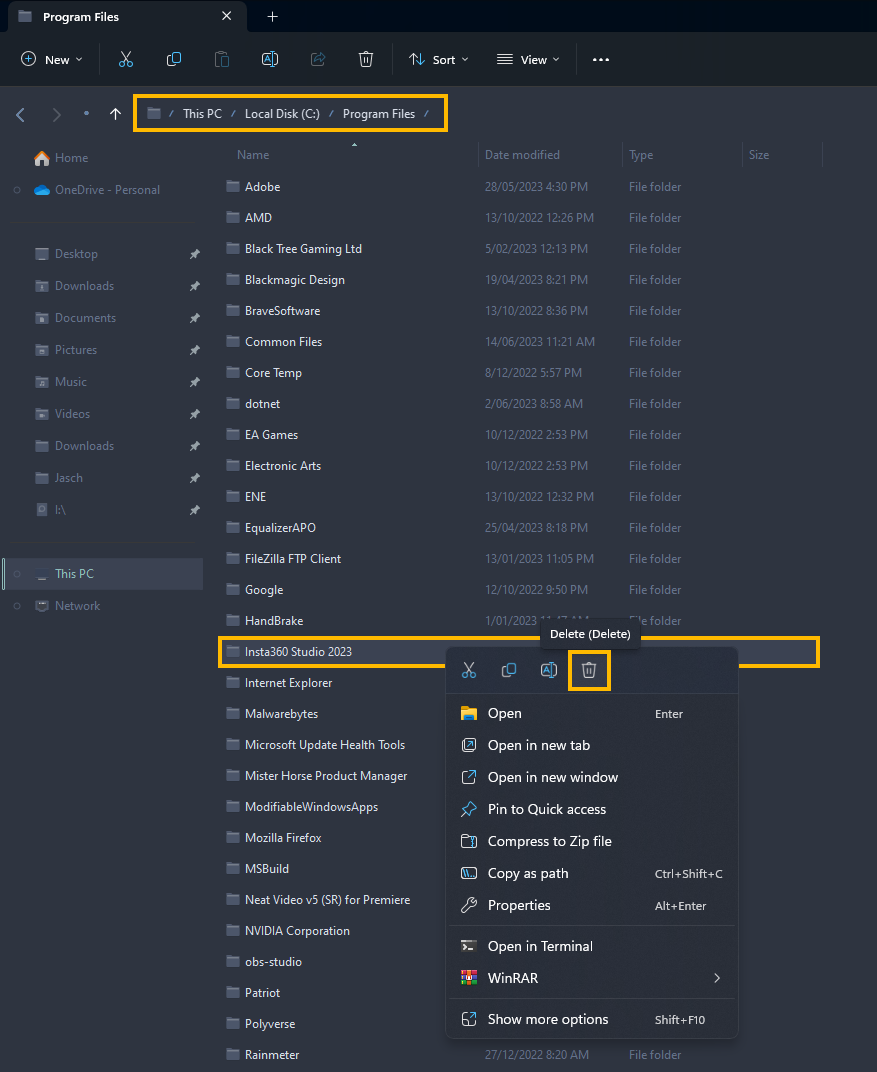
Next, open File Explorer and go to:
C:\Program Files
Here find and delete the Insta360 Studio folder. It will probably have a year after it (2022 or 2023), delete them all if there are multiple folders.
Once you have done that, navigate to the following location in File Explorer:
C:\Users\USERNAME\AppData\Roaming
Here find and delete the Insta360 folder.
Now go to:
C:\Users\USERNAME\AppData\Local
Here find and delete the Insta360 folder.
Finally, restart your computer again. Now you can download and install the latest version of Insta360 on your computer.
Note: If you can’t see the AppData folder go to Folder Options and make sure that View hidden files and folder is ticked.
Annoyingly you will probably have to follow this process for most Insta360 updates. You will also find that some automatically triggered updates actually break the software entirely because of this error so you can’t even stay on the same version. This will force you to clean install everything anyway. If you are also having some problems with audio or flickering you’ll want to checkout both of the linked guides below. They will quickly solve both issues for you.
How to fix sound cutting in and out in videos exported from Insta360 Studio.
How to fix flickering at the bottom of video exported from Insta360 Studio.